LearningOutcomes
On completion of this lesson you will know how to create simple animation by making separate images and moving a shape slightly in each image.
Go to topOn completion of this lesson you will know how to create simple animation by making separate images and moving a shape slightly in each image.
Go to topBy now we have looked at making static images by both drawing their outlines and filling in their shapes. In this lesson we shall be making the images move. In other words we shall be dealing with animation. Your first reaction may be that there will be very complex programming involved. This is not the case. We shall not even be adding a function to our code. Instead we shall slightly modify the main() and saveFile() functions.
The lesson follows on directly from the previous one. We shall be filling in a rectangle as before and using the exact same functions to fill in the space of the rectangle.
What is going to be different is that instead of creating one file we shall be creating a number of separate .PBM files. In each file we position the image in a slightly different position to the previous one. When viewed together quickly the the shape appears to move. This is the basis of all animation.
Go to top
                        def main():
                            arrPage = []
                            strFileName="Translate"
                            intVersionNumber = 0
                            intMaxCols=800
                            intMaxRows=800
                            for frameCount in range(0, 680, 9):
                                arrPage = createBackground(intMaxCols,intMaxRows)
                                arrPage = fillShape(arrPage, [[250,frameCount],[250,frameCount+100],[550,frameCount+100],[550,frameCount]], intMaxRows, intMaxCols)
                                saveFile(arrPage,intMaxRows, intMaxCols,strFileName, intVersionNumber)
                                intVersionNumber+=1
                                arrPage=[]

                        if __name__ == "__main__":
                            main()

                        print("Programme finished")
Although still a fairly short piece of code, a few changes have been made to this function. A new variable has been added and the entire processing is inside a for loop.
The first change is at line 60 where we have added a new variable intVersionNumber. The reason for this is that we shall be creating multiple version of our PBM file. To distinguish each individual file we shall add a version number to the file name.
The major change is the processing which spans lines 63 to 68. The processing is controlled by the for loop at line 63. The first thing that needs explanation is the controls of the loop itself, especially the range values of (0, 680, 9).
Unless stated otherwise for loops start zero and this is the case here. The value 680 is somewhat more complicated.
Instead of placing our shape vertically in the middle of the image, in this instance we want to place it at the very top, i.e. it's top y values will be at zero. Also since it is 100 pixels high, its lower y values will be at 100. This means that its four coordinates will be (250, 0), (250, 100), (550, 100), (550, 0).
The values 680 and 9 must be explained together as they are interrelated. Clearly 680 is the upper limit for the loop counter frameCount and 9 is the amount that frameCount increases for each iteration of the loop.
We want a five second animation at a frame rate of 15 frames per second. During that five seconds we want our rectangle to move as close to the bottom the image as we can. This means that we want 75 frames.
If in each frame the rectangle moves down 9 pixels from the top then by the last frame the top of the rectangle will be at y position of 675. This means that the bottom of the rectangle will be at y position 775, which is as far as we can go.
At line 65 the function fillShape() is called. This time we shall look in detail at the list argument
[[250,frameCount],[250,frameCount+100],[550,frameCount+100],[550,frameCount]]
At the first iteration of the loop with frameCount having a value of zero this list will produce the coordinates
(250, 0), (250, 100), (550, 100), (550, 0)
With frameCount increasing by 9 for each iteration of the loop, other coordinates will be
(250, 9), (250, 109), (550, 109), (550, 9)
(250, 18), (250, 118), (550, 118), (550, 18)
(250, 27), (250, 127), (550, 127), (550, 27)
(250, 36), (250, 136), (550, 136), (550, 36)
At line 66 the function saveFile() is called. This time it has an extra agrument, intVersionNumber. We shall later look at this function in more detail.
After the function saveFile() finishes control returns to line 67. By now the contents of a frame has been saved to a PBM file and all that remains to be done is to tidy up for the next file.
At line 67 the value of intVersionNumber is incremented by 1 so that the next frame to be saved has a unique name.
The two dimensional list arrPage still has the contents of the previous frame in it and thus we must initialise it to a blank. This is done at line 68.
Go to top
                        def saveFile(arrAll, maxRows, maxCols,fileName,versionNum):
                            myfile=open(fileName+str(versionNum)+".pbm",'w')
                            myfile.write('P1' +"\n")
                            myfile.write(str(maxRows)+" "+str(maxCols)+"\n")
                            for intRows in range(maxRows):
                                myfile.write(getArray(arrAll[intRows])+"\n")
                            myfile.close()
Of this file only lines 43 and 44 have changed. The reason for those changes is that unlike our previous examples our PBM files are now individual frames in an animation sequence. Therefore as well as a file name, which identifies the entire animation sequence we need a number to identify the individual frames, hence the new argument versionNum at line 43.
At line 44 the file name is built up from its constituent components. Thus if the argument fileName has a value of 'Translate' and versionNum has a value of 2, then the full name of the file will be 'Translate2.pbm.

Here we see the first twenty frames from which we are to create our animation.
Go to topAlthough PBM files can be opened with GIMP or PhotoShop they cannot be opened by image viewing software or HTML. So that these other software can use them they must be converted first to standard file formats such as JPG or PNG.
This process is very simple. First you open the PBM files in the same way as any other file and then use either Save As or Export As. As an extension specify either JPG or PNG.
In out current example we have 76 PBM files that we wish to convert to an animated GIF file. For this exercise we shall be using the open source image processing software GIMP.
With GIMP running click on File/Open as Layers... This will bring up the Open File dialogue box shown below
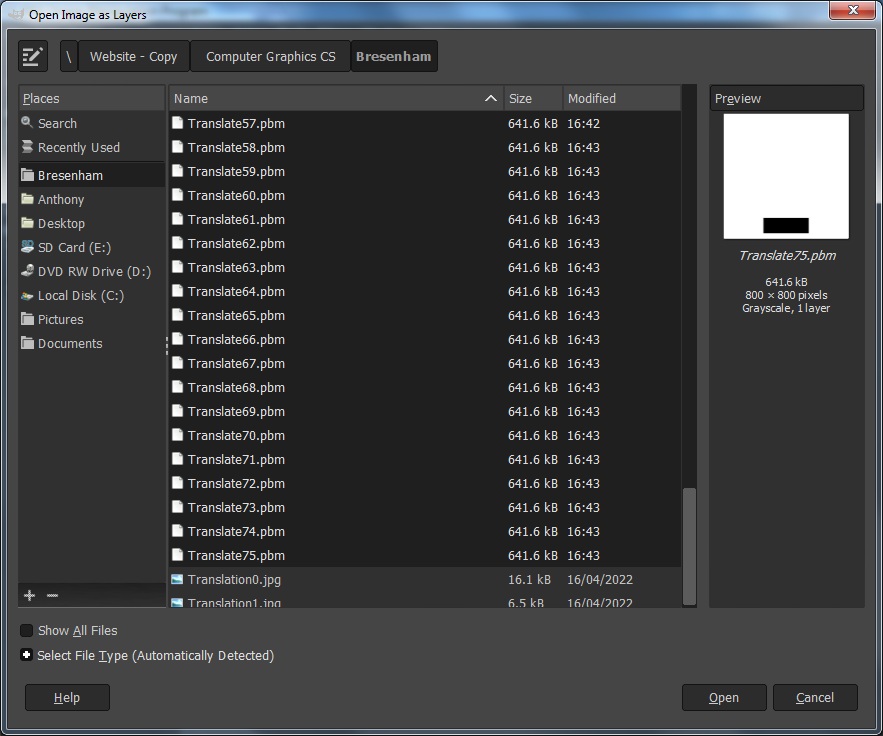
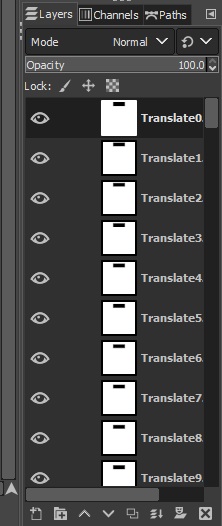
To begin with select the first of the files you want to open. Next hold down the SHIFT key and then click on the last file in the list you want to open. This selects all of the files between the two you clicked on. The files may take a while to load but once complete you will have 76 layers, one for each file you uploaded. Some of the layers can be seen below in Fig 3.
By stopping here we have enough files to create an animation. It will however appear somewhat amateurish. The animation will begin at the top and move gradually down to the bottom. It will then jump back up to the top and start moving gently down to the bottom again.
To avoid this break the same set of files is opened once more but in reverse order. To reverse the order of the files select Open Image as Layers again and reverse the order of the files by clicking the upside down V next to the word 'Size'. Once this is done select from the last file to the first one and proceed as before.
All you need to do now is click on File/Export As. This will bring up the export dialog box shown below.
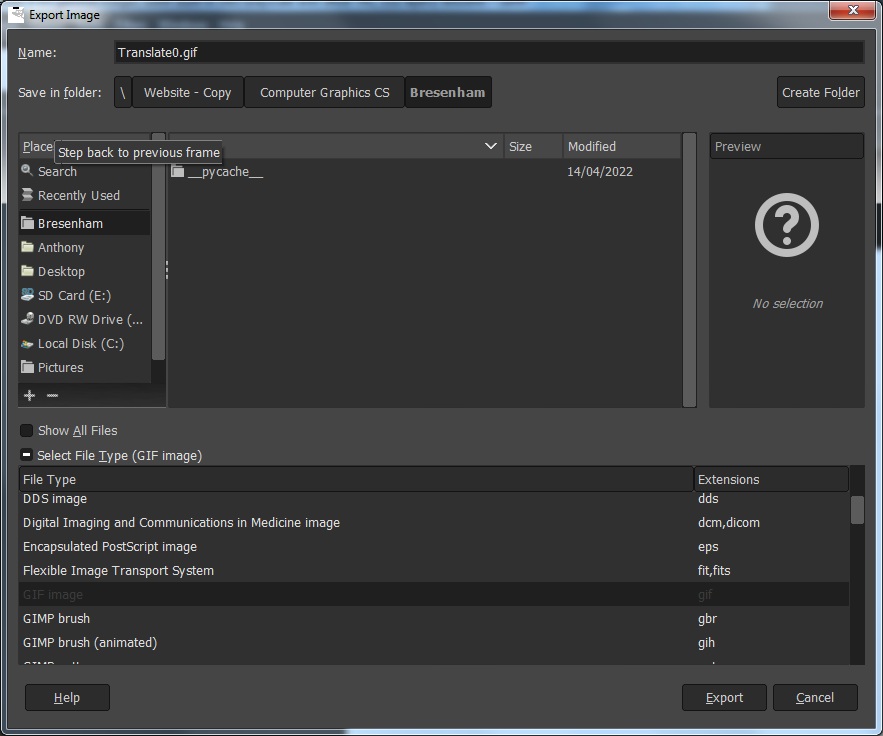
Supply a name for the file and from the Select File Type select GIF.
Clicking on the button Export brings up the dialog box below.
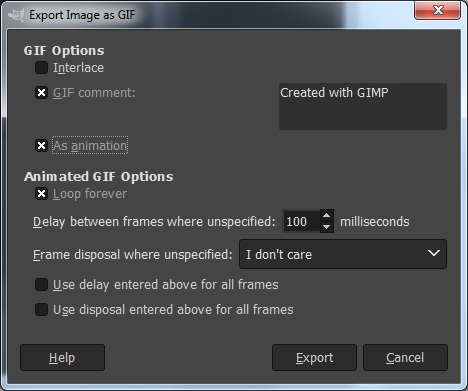
Here ensure that the checkbox labelled as As animation is checked. Now click on Export again, and your frames will be saved as a GIF image.
This image can now be opened by most file viewing applications, including HTML as shown below.

The uploaded file is a lesson on creating simple animations in computer graphics, focusing on moving shapes across sequential frames. It demonstrates how to achieve animations by generating a series of slightly modified images and sequencing them. The lesson avoids complex programming and introduces minor adjustments to the main() and saveFile() functions to achieve the desired animation effects.
The learning outcomes of the lesson include understanding how to create animations by incrementally moving a shape across multiple frames and saving these frames as separate files. The process results in a sequence that, when viewed quickly, simulates motion. The introduction emphasizes that this method builds upon previous lessons on static images by adding motion through the controlled manipulation of coordinates.
The core logic is implemented in the main() function. A for loop generates frames by modifying the rectangle’s position using a loop counter (frameCount). The intVersionNumber variable ensures that each frame file is uniquely named, avoiding overwrites. Each iteration creates a new frame, moves the rectangle 9 pixels vertically, and saves the result as a .PBM file. By the end of the loop, 75 frames are created, representing 5 seconds of animation at 15 frames per second.
The saveFile() function is modified to include the version number in the filename, distinguishing each frame in the sequence. This ensures smooth sequencing during playback and simplifies file organization. After generating the frames, the .PBM files must be converted into a more accessible format for viewing and integration with other software.
The lesson highlights converting .PBM files to GIFs using GIMP, an open-source image editing tool. GIMP allows loading multiple .PBM files as layers, which are then saved as a GIF animation. The process includes the option to reverse the order of frames to create a looping effect, adding polish to the final animation. This ensures a seamless visual flow when the animation reaches its endpoint and starts over.
Exporting the GIF is a crucial step, requiring the “As animation” option to be checked in the export dialog. The resulting GIF can be played on most image viewers and embedded in HTML pages, making it versatile for a range of applications. The document also provides visual aids and instructions to guide learners through this process effectively.
In summary, this lesson combines basic programming techniques with image processing to create simple animations. It covers the theoretical underpinnings of animation and offers a practical, step-by-step approach to implementation. The focus on tools like GIMP complements the programming aspect, providing a complete workflow for creating accessible and polished animations.
Go to topFor this exercise, you are required to modify the provided code to create a different animation sequence. Follow the steps below to complete the task:
By completing this exercise, you will gain practical experience in creating animations using Python and image processing software. Experiment with different shapes, sizes, and frame rates to enhance your animation skills.
Go to top