Learning Outcomes
On completion of this lesson you will know how to
- Fill a familiar shape with colour
- Fill a familiar shape with colour gradation
- Reverse a shape's colours
- Place shapes in a vertical hierarchy

On completion of this lesson you will know how to
By now we have covered most of the basics of a digital image and its most essential part, the pixel. Using only pure black and white and a two dimensional array we have been able to lay out shapes and fill them with colour (black). We have been able to scale those shapes, rotate them and tramslate them.
All of the processing we have mentioned have been done using .pbm files where each pixel can have only one of two values, zero or one. In this somewhat long lesson we shall look at implementing the same processing using colour instead of black and white. For this we shall need a different file type: a .PPM file. This file type is more complex than the .PBM files we have been using. This is because we need to provide more information about the colours that we shall be using.
With paint there are three primary colours: red, yellow and blue. We can mix those to get the three secondary colours:
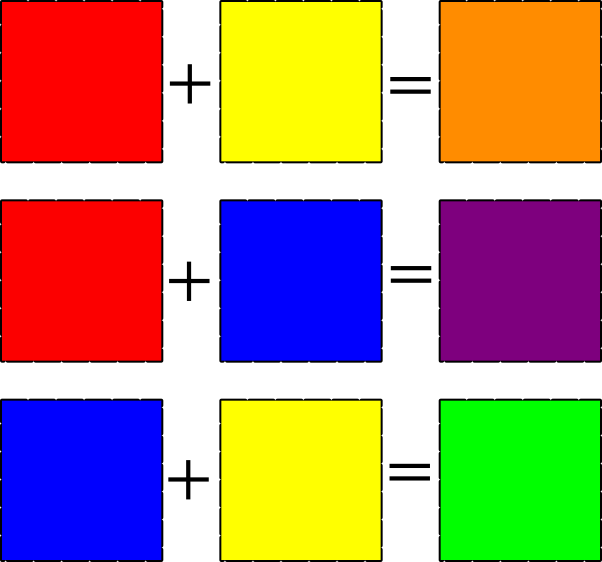
With paint you cannot mix any two or three colours to get either white or black. These must be added to the list of basic colours you need. They can be used on their own or to darken or lighten other colours.
With computer screens, or tv screens for that matter, there is no paint involved and another method must be employed to convey colour. This is the RGB system.
The RGB refers to the three primary colours of that system, red, green and blue. Those three primaries have three corresponding secondary colours:

Unlike paints, the RGB system also has black and white.
Each of the three primary colours are graded from zero to 255. Thus assigning red a value of zero means that there is no red, while assigning it a value of 255 means fully saturated red. Similarly a value of 80 gives a dark red. The same applies to the other two colours.
If all colours are assigned a value of zero then we have black. If all three are assigned a value of 255 then we have white.
Since we can make up different colours by assigning a value between 0 and 255 to each of the three colours we can get 2553 different colours which amounts to 16,777,216. This is much more than the 10 million colours that the human eye can see.
Up until now we have worked with .PBM files that were 800 X 800 pixels. In each element of those files we entered a zero or one, denoting white or black. When dealing with colour a single digit will no longer do. For each pixel we must accommodate three numbers, each in the range 0 to 255. We accommodate those three numbers by appending each of them to a list. We then add this list to our two dimensional list. This will result in a three dimensional list as shown below.
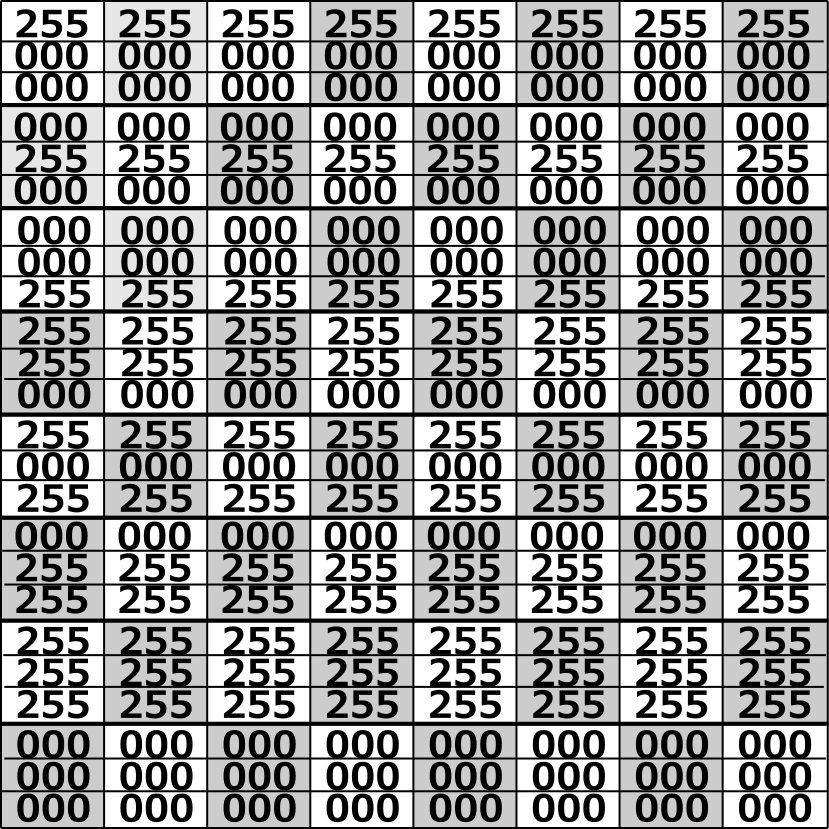
A three dimensional list is illustrated above. The checker board appearance is to enable the user to easily distinguish the individual pixels, each with its three element list.
Our list consists of eight rows, each row having eight pixels. Each pixel has three numbers denoting the colour of that pixel. We manipulate the colours by altering the value of one or more of the three numbers in each element.
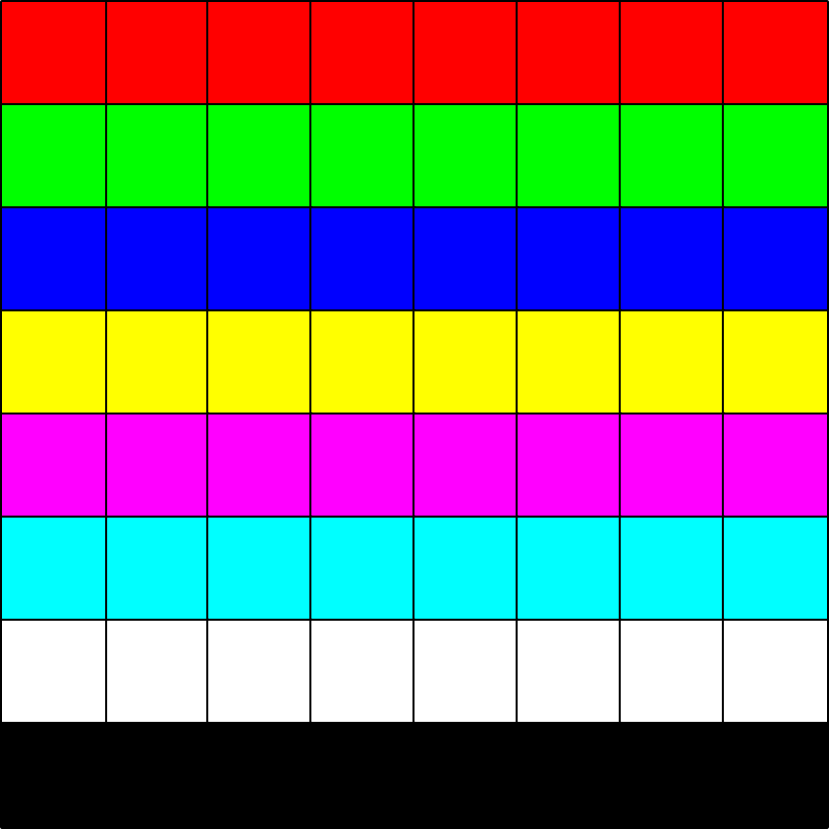
The image in Fig 3 shows what approximately what our .PPM file would look like if opened using Notepad or any other text editor. Fig 4, however, shows what the same file would look like if opened in GIMP, Photoshop or any other image editor.
Go to top
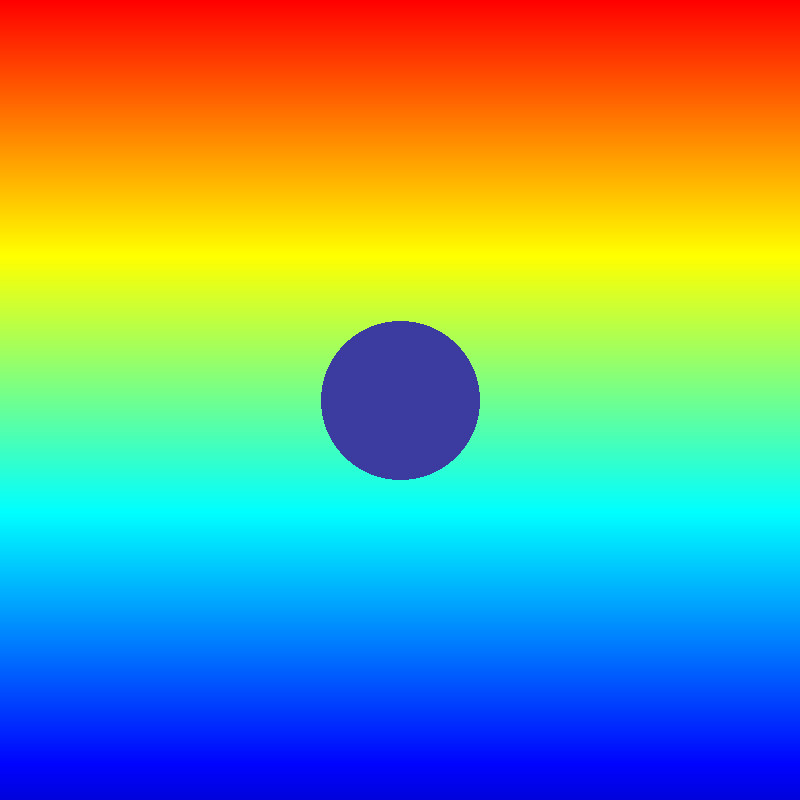
The code below is much more complex than the simple version of createBackground() from the lesson Drawing Lines. It has been used for blending the colours in Fig 5 above.
Check out the original createBackground() function.
                                def createBackground(maxWidth,maxHeight,r,g,:
                                    arrAll=[]
                                    arrRow=[]
                                    colourByte=[]
                                    red=r
                                    green=g
                                    blue=b
                                    for intRows in range(maxHeight):
                                        colourByte.append(re
                                        colourByte.append(green)
                                        colourByte.append(blue)
                                        for intCols in range(maxWidth):
                                            arrRow.append(colourByte)
                                        arrAll.append(arrRow)
                                        arrRow=[]
                                        colourByte = []
                                        if intRows < 255:
                                            green += 1
                                        elif intRows >= 255 and intRows <511:
                                            if intRows == 255:
                                                red = 255
                                                blue = 0
                                            else:
                                                blue += 1
                                                red -= 1
                                        elif intRows >= 512 and intRows < 764:
                                            green -=1
                                        else:
                                            blue -=1
                                        arrRow=[]
                                        colourByte = []
                                    return arrAll
Lines 4 to 9 are used to initialise variables. The lists arrAll[] and arrRow[], whom we alredy know are initialised to blanks.
At line 6 a new list colourByte[] is also initialised to blank. This is the list that will hold the three values for red, green and blue.
At lines 7 to 9 the values of the arguments r, g, b are copied into the variables red, green and blue.
When processing starts at line 10 red has a value of 255 and the other two variables have a value of zero.
At lines 11 to 13 the values of the variables red, green and blue are copied as elements into the list colourByte.
A for loop takes up lines 14 and 15. The loop iterates from zero to 799. On each iteration it adds a copy of the list colourByte to the list arrRow[]. This means that when the loop finishes iterating there will be a 800 copies of colourByte in the list arrRow
At line 16 the contents of arrRow is appended to the main list arrAll. Once this happens the first line of colour is written into the main list. Since it is the first line its colour is pure red.
At lines 17 and 18 both arrRow and colourByte are both set to blank, and then data is processed for the next iteration of the loop. What processing occurs depends on how far down through the loop we are.
For the first 255 iterations of the loop only lines 19 and 20 are executed. At line 20 the value of green is incremented by 1 at each iteration. This means that as green gets stronger the colour produced moves towards yellow. (Remember that green and red produce yellow.) This can be seen in Fig 5 where coming from the top down the colour moves from strong red to yellow.
Once we have exceeded 255 and have not yet got to 512, processing is controlled by the code that spans lines 21 to 27. Lines 22 to 24 are executed only once, when intRows is exactly 255. Here the program ensures that red and blue still have values of 255 and zero. Otherwise for every other iteration blue incremented by 1 and red is decremented by 1.
The outcome of the above processing is that when we get to 511, red will have a value of zero and blue a value of 255. Thus both green and blue will have a value of 255. This is indicated by the line of cyan at about two thirds of the way down the image at Fig 5.
Once we have reached 512 iterations blue will have reached saturation at a value of 255. Since green was already at saturation the two give us the cyan coloured band between the green and the blue
Between 512 and 764 green is being gradually reduced at line 29 leading to the stronger blue towareds the bottom of the image.. After 764 blue is being reduced thus leading to the thin dark blue band at the bottom of the image.
How we save our PPM file is slightly different from how we saved our PBM files in previous lessons.
                            def saveToFile(Page,NameOfFile,VNum,cols,rows):
                                myfile=open(NameOfFile+str(VNum)+".ppm",'w')
                                myfile.write('P3' +"\n")
                                myfile.write(str(cols)+" "+str(rows)+"\n")
                                myfile.write(str(255)+"\n")
                                for row in Page:
                                    for cVal in row:
                                        for c in cVal:
                                            myfile.write(str(+' ')
                                        myfile.write('\n')
                                myfile.close()
Lines 37 to 40 open the file and write administrative data to the start of the file before writing the actual image data. This latter action is performed by lines 41 to 45. Lines 41 and 42 iterate over the rows and columns while line 43 iterates over the list that contains the three elements designating the colour information. This is the same information that had been first stored in the list colourByte in Listing 1-1 above.
The data is written one byte at a time followed by a space character.
Line 45 then writes a newline character and then control passes to line 43 where the loop continues iterating.
When all the data is written, the file is closed at line 46.
                            def main():
                                strFileName="ColoursCircles"
                                intFileFrame=1
                                intMaxCols=800
                                intMaxRows=800
                                arrPage=createBackground(intMaxCols,intMaxRows, 255,0,0)
                                saveToFile(arrPage,strFileName,intFileFrame, intMaxRows, intMaxCols)

                            if __name__ == "__main__":
                                main()

                            print("Programme finished")
There is not much to say about the main() function. It simply calls the createBackground() furnction at line 53 and the saveToFile() function at line 54.
                        def drawCircle(arrPage, centreX, centreY, radius, r, g, :
                            colourByte=[]
                            colourByte.append(r)
                            colourByte.append(g)
                            colourByte.append(
                            for x in range(radius * -1, radius + 1):
                                for y in range(radius * -1, radius + 1):
                                    if radius > round(math.sqrt(x**2+y**2)) :
                                        arrPage[int(x)+centreX][int(y+centreY)] = colourByte
                            return arrPage
The function drawCircle() here is almost identical to its predecessor in the lesson on Circles. All we need to do therefore is to point the differences between the two.
The first difference is that at line 36 three extra arguments are added. Those are r, g and b, i.e. the values that will determine the colour to fill the circle with.
As in Listing 1-1 we declare a list colourByte at line 37 and append the values for r, g and b to it at lines 38, 39 and 40 respectively.
The only othe difference is that at line 44 the list colourByte is added to the main list instead of the value 1 that was added in the previous example.
                        def main():
                            strFileName="CentralCircle"
                            intFileFrame=1
                            intMaxCols=800
                            intMaxRows=800
                            arrPage=createBackground(intMaxCols,intMaxRows, 255,0,0)
                            arrPage = drawCircle(arrPage, int(intMaxCols/2), int(intMaxRows/2), 80, 60, 60, 160)
                            saveToFile(arrPage,strFileName,intFileFrame, intMaxRows, intMaxCols)
In listing 2-1 the difference to its predecessor in listing 1-3 is that there is a call to drawCircle() at line 65.
Download Program Code Go to top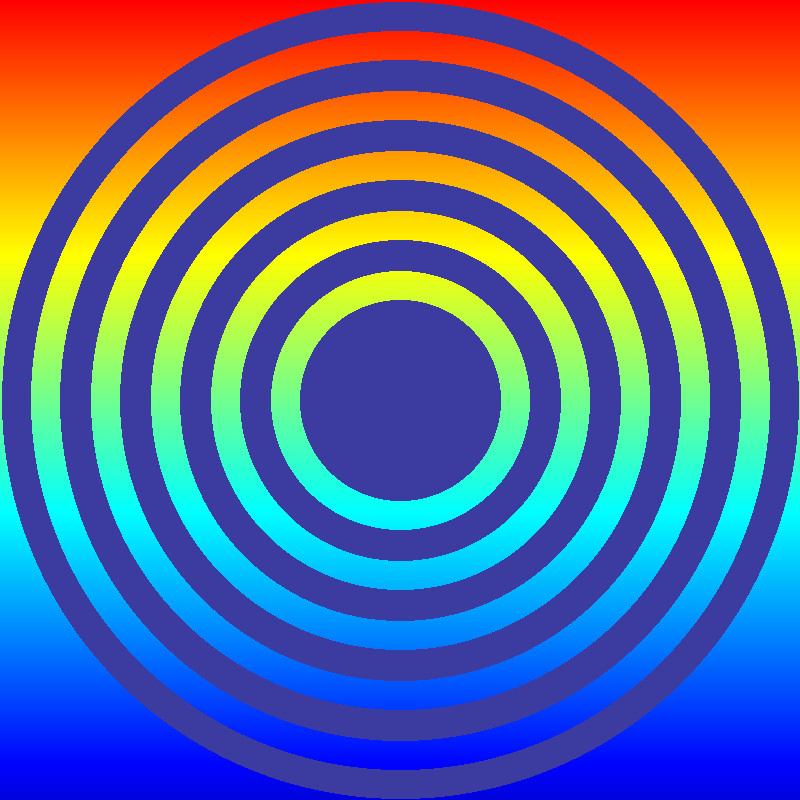
                        def drawCircleBorder(arrPage, centreX, centreY, longRadius, shortRadius,r, g, :
                            colourByte=[]
                            colourByte.append(r)
                            colourByte.append(g)
                            colourByte.append(
                            for x in range(longRadius * -1, longRadius + 1):
                                for y in range(longRadius * -1, longRadius + 1):
                                    lengthOfLine = round(math.sqrt(x**2+y**2))
                                    if longRadius >= lengthOfLine and  shortRadius <= lengthOfLine:
                                        arrPage[int(x+centreX)][int(y+centreY)]=colourByte
                            return arrPage
As with the function drawCircle() above, the function drawCircleBorder() varies from its predecessor as follows:
                        def main():
                            strFileName="ColoursAnnulus"
                            intFileFrame=1
                            intMaxCols=800
                            intMaxRows=800
                            arrPage=createBackground(intMaxCols,intMaxRows, 255,0,0)

                            arrPage = drawCircleBorder(arrPage, int(intMaxCols/2),int(intMaxRows/2),398,370,60,60,160)
                            arrPage = drawCircleBorder(arrPage, int(intMaxCols/2),int(intMaxRows/2),340,310,60,60,160)
                            arrPage = drawCircleBorder(arrPage, int(intMaxCols/2),int(intMaxRows/2),280,250,60,60,160)
                            arrPage = drawCircleBorder(arrPage, int(intMaxCols/2),int(intMaxRows/2),220,190,60,60,160)
                            arrPage = drawCircleBorder(arrPage, int(intMaxCols/2),int(intMaxRows/2),160,130,60,60,160)
                            arrPage = drawCircle(arrPage, int(intMaxCols/2), int(intMaxRows/2), 80, 60, 60, 160)
                            saveToFile(arrPage,strFileName,intFileFrame, intMaxRows, intMaxCols)

                        if __name__ == "__main__":
                            main()
The function main() has grown by five extra lines. These are simply separate callings to drawCircleBorder()
Download Program Code Go to topThis section will complete our putting shapes into our image. The final part will then be involved in animating those shapes. Here we have two modified functions to look at
                         def drawCircleRev(arrPage, centreX, centreY, radius):
                             for x in range(radius * -1, radius + 1):
                                 for y in range(radius * -1, radius + 1):
                                     if radius > round(math.sqrt(x**2+y**2)) :
                                         paint=arrPage[x+centreX][y+centreY]
                                         colourByte=[]
                                         temp=255-paint[0]
                                         colourByte.append(temp)
                                         temp=255-paint[1]
                                         colourByte.append(temp)
                                         temp=255-paint[2]
                                         colourByte.append(temp)
                                         arrPage[int(x)+centreX][int(y+centreY)] = colourByte
                             return arrPage
It is easy to determine from lines 48 to 50 and line 59 that this function draws and fills in circles. What is unusual about is is how it fill in the colour. What it does in fact is to reverse the colour of its background.
How it works is easier to explain by using an example.
If we have a pure red background then each pixel will have a value of 255, 0, 0. Subtracting each of those from 255 will give the result 0, 255, 225., This is the RGB code for cyan or light blue. Another example is if the background is pure blue then the cells will have a value of 0. 0, 255. Subtracting each of those values from 255 will give 255, 255, 0. This is the RGB code for yellow.
Lines 48 to 50 are the same as we have used to draw a circle. Line 51 is where we should enter the colour of the pixel into the list. Here instead we start working out what the actual colour is. The steps for this are:
At line 60 the processed list is returned to main() and the function drawCircleRev() finishes.
                        def lightRays(pageName,width,r,g,:
                            colourByte=[]
                            colourByte.append(r)
                            colourByte.append(g)
                            colourByte.append(
                            radius=int(width/4)
                            x1=0
                            y1=0
                            seed(1)
                            for angle in range(0,360):
                                radian=angle*math.pi/180
                                lineLength=radius+randint(0,radius)
                                x1=int(lineLength*math.cos(radian))
                                y1=int(lineLength*math.sin(radian))
                                x2 = x1 * -1
                                y2 = y1 * -1
                                if x1 != x2:
                                    m = (y1 - y2)/(x1 - x2)
                                if y1 == y2:
                                    for x in range(x1,x2):
                                        pageName[y1+400][x+400]=colourByte
                                elif x1 == x2:
                                    for y in range(y1, y2):
                                        pageName[y+400][x1+400]=colourByte
                                elif m <= 1 and m>= -1:
                                    for x in range(x1, x2):
                                        y = round(m*(x - x2) + y2)
                                        if y <800:
                                            pageName[y+400][x+400]=colourByte
                                else:
                                    for y in range(y1, y2):
                                        x = round((y - y2)/m + x2)
                                        pageName[y+400][x+400]=colourByte
                            return pageName
This function mainly draws a straight line between two points when the coordinates are provided. It is very similar to the function drawLine() in the lesson Drawing Lines.
There are two differences between the functions:
Our function gets the values of the width of the image and the colour of the light rays from the arguments width, r, g, and b.
We shall now look at how the functions uses those arguments.
At lines 88 to 91 it initialises a list named colorByte and appends the values for r, g, and b to it. At line 92 it calculates the radius of the circles as a quarter of the width of the page. Shortly we shall discuss why this value.
At line 96 we have a loop that iterates 360 times in steps of 1. The value of the loop counter determines how much the angle of the line varies from the horizontal.
At line 97 the radian value of the angle is calculated. This will be required for calculating the sine and cosine of the angle later.
At line 98 the variable lineLength is calculated as the sum of radius and a value returned by the Python function randint(). This variable and its components need some further explanation.
Depictions of rays of sunlight or any other source look better and more artistic if the lengths of the rays differ from each other. In our image the maximum size of a radius is 400, since the width and height of the image are both 800.
In order to give rays of different lengths we used the 'formula' of 400 plus a random number between 0 and 400.
To generate a random number between zero and 400 we used the Python function randint(). This function takes two argument, the minimum and the maximum values.
At line 98 we put those ideas into practice when we assign to lineLength the value of radius plus the value returned from randint().
Lines 99 and 100 calculate the x and y coordinates of the starting point of the first line by using the value of lineLength and the sine and cosine of our angle.
As stated above the rest of the code should be familiar to you from the lesson 'Drawing Lines'. At each iteration of the loop it draws a line between (x1, y1) and (x2, y2), where all four variables are local to the function itself.
                        def main():
                            strFileName="RevColoursSunRays"
                            intFileFrame=1
                            intMaxCols=800
                            intMaxRows=800
                            arrPage=createBackground(intMaxCols,intMaxRows, 255,0,0)

                            arrPage = drawCircleBorder(arrPage, int(intMaxCols/2),int(intMaxRows/2),398,370,60,60,160)
                            arrPage = drawCircleBorder(arrPage, int(intMaxCols/2),int(intMaxRows/2),340,310,60,60,160)
                            arrPage = drawCircleBorder(arrPage, int(intMaxCols/2),int(intMaxRows/2),280,250,60,60,160)
                            arrPage = drawCircleBorder(arrPage, int(intMaxCols/2),int(intMaxRows/2),220,190,60,60,160)
                            arrPage = drawCircleBorder(arrPage, int(intMaxCols/2),int(intMaxRows/2),160,130,60,60,160)
                            arrPage = drawCircleBorder(arrPage, int(intMaxCols/2),int(intMaxRows/2),100,70,60,60,160)

                            arrPage = drawCircleRev(arrPage, 70, 70, 50)
                            arrPage = drawCircleRev(arrPage, 70, 730, 50)
                            arrPage = drawCircleRev(arrPage, 730, 730, 50)
                            arrPage = drawCircleRev(arrPage, 730, 70, 50)

                            arrPage = drawCircleRev(arrPage, 75, 400, 45)
                            arrPage = drawCircleRev(arrPage, 725, 400, 45)
                            arrPage = drawCircleRev(arrPage, 400, 725, 45)
                            arrPage = drawCircleRev(arrPage, 400, 75, 45)
                            arrPage = drawCircleRev(arrPage, 170, 170, 45)
                            arrPage = drawCircleRev(arrPage, 629, 629, 45)
                            arrPage = drawCircleRev(arrPage, 170, 629, 45)
                            arrPage = drawCircleRev(arrPage, 629, 170, 45)

                            arrPage = lightRays(arrPage, intMaxCols, 255, 255, 125)

                            arrPage = drawCircleRev(arrPage, int(intMaxCols/2), int(intMaxRows/2), 45)
                            saveToFile(arrPage,strFileName,intFileFrame, intMaxRows, intMaxCols)
our main() function has again grown in size, but not in complexity.
Its processing are as follows:
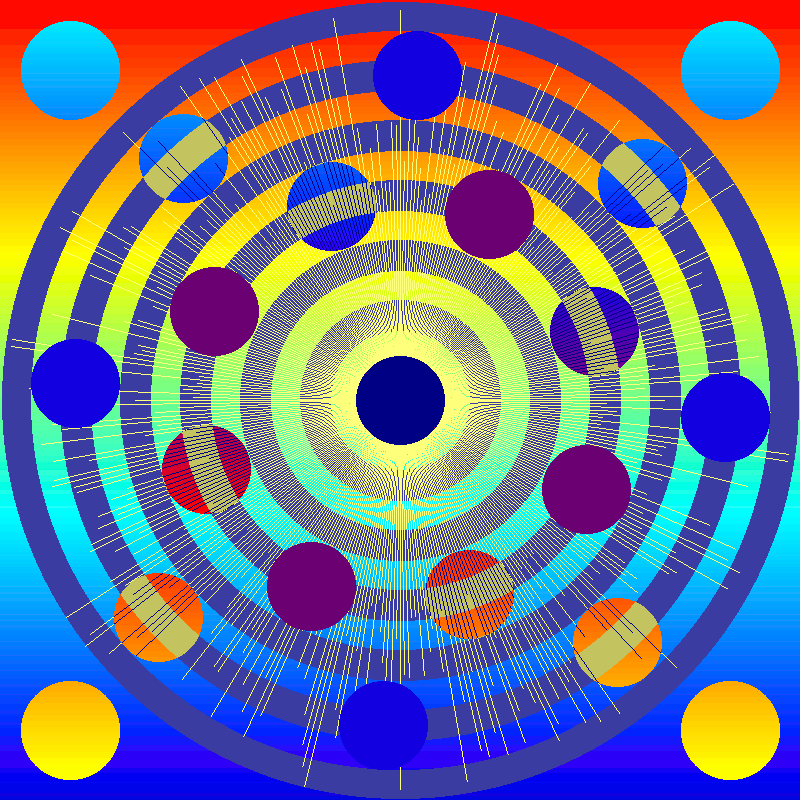
Instead of 'Rotating Circles' this section could also be called 'Putting it all together'. We are not introducing any new shapes or functions here and therefore we are discussing only the function main()
                            def main():
                                strFileName="ColoursSunRays2_"
                                intFileFrame=1
                                intMaxCols=800
                                intMaxRows=800

                              for angle in range(0, 180, 3):
                                  arrPage=createBackground(intMaxCols,intMaxRows, 255,0,0)

                                  arrPage = drawCircleBorder(arrPage, int(intMaxCols/2),int(intMaxRows/2),398,370,60,60,160)
                                  arrPage = drawCircleBorder(arrPage, int(intMaxCols/2),int(intMaxRows/2),340,310,60,60,160)
                                  arrPage = drawCircleBorder(arrPage, int(intMaxCols/2),int(intMaxRows/2),280,250,60,60,160)
                                  arrPage = drawCircleBorder(arrPage, int(intMaxCols/2),int(intMaxRows/2),220,190,60,60,160)
                                  arrPage = drawCircleBorder(arrPage, int(intMaxCols/2),int(intMaxRows/2),160,130,60,60,160)
                                  arrPage = drawCircleBorder(arrPage, int(intMaxCols/2),int(intMaxRows/2),100,70,60,60,160)

                                  arrPage = drawCircleRev(arrPage, 70, 70, 50)
                                  arrPage = drawCircleRev(arrPage, 70, 730, 50)
                                  arrPage = drawCircleRev(arrPage, 730, 730, 50)
                                  arrPage = drawCircleRev(arrPage, 730, 70, 50)

                                  arrPage = lightRays(arrPage, intMaxCols, 255, 255, 125)

                                  radian = math.radians(angle)
                                  xPos = round(325*math.cos(radian))
                                  yPos = round(325*math.sin(radian))
                                  arrPage = drawCircle(arrPage, xPos+400, yPos+400, 45, 32, 0, 223)

                                  radian = math.radians(angle+45)
                                  xPos = round(325*math.cos(radian))
                                  yPos = round(325*math.sin(radian))
                                  arrPage = drawCircleRev(arrPage, xPos+400, yPos+400, 45)

                                  radian = math.radians(angle+90)
                                  xPos = round(325*math.cos(radian))
                                  yPos = round(325*math.sin(radian))
                                  arrPage = drawCircle(arrPage, xPos+400, yPos+400, 45, 32, 0, 223)

                                  radian = math.radians(angle+135)
                                  xPos = round(325*math.cos(radian))
                                  yPos = round(325*math.sin(radian))
                                  arrPage = drawCircleRev(arrPage, xPos+400, yPos+400, 45)

                                  radian = math.radians(angle+180)
                                  xPos = round(325*math.cos(radian))
                                  yPos = round(325*math.sin(radian))
                                  arrPage = drawCircle(arrPage, xPos+400, yPos+400, 45, 32, 0, 223)

                                  radian = math.radians(angle+225)
                                  xPos = round(325*math.cos(radian))
                                  yPos = round(325*math.sin(radian))
                                  arrPage = drawCircleRev(arrPage, xPos+400, yPos+400, 45)

                                  radian = math.radians(angle+270)
                                  xPos = round(325*math.cos(radian))
                                  yPos = round(325*math.sin(radian))
                                  arrPage = drawCircle(arrPage, xPos+400, yPos+400, 45, 32, 0, 223)

                                  radian = math.radians(angle+315)
                                  xPos = round(325*math.cos(radian))
                                  yPos = round(325*math.sin(radian))
                                  arrPage = drawCircleRev(arrPage, xPos+400, yPos+400, 45)

                                  angle1 = angle+ 22.5

                                  radian = math.radians(angle1)
                                  xPos = round(206*math.cos(radian))
                                  yPos = round(206*math.sin(radian))
                                  arrPage = drawCircleRev(arrPage, xPos+400, yPos+400, 45)

                                  radian = math.radians(angle1+45)
                                  xPos = round(206*math.cos(radian))
                                  yPos = round(206*math.sin(radian))
                                  arrPage = drawCircle(arrPage, xPos+400, yPos+400, 45, 104, 0, 116)

                                  radian = math.radians(angle1+90)
                                  xPos = round(206*math.cos(radian))
                                  yPos = round(206*math.sin(radian))
                                  arrPage = drawCircleRev(arrPage, xPos+400, yPos+400, 45)

                                  radian = math.radians(angle1+135)
                                  xPos = round(206*math.cos(radian))
                                  yPos = round(206*math.sin(radian))
                                  arrPage = drawCircle(arrPage, xPos+400, yPos+400, 45, 104, 0, 116)

                                  radian = math.radians(angle1+180)
                                  xPos = round(206*math.cos(radian))
                                  yPos = round(206*math.sin(radian))
                                  arrPage = drawCircleRev(arrPage, xPos+400, yPos+400, 45)

                                  radian = math.radians(angle1+225)
                                  xPos = round(206*math.cos(radian))
                                  yPos = round(206*math.sin(radian))
                                  arrPage = drawCircle(arrPage, xPos+400, yPos+400, 45, 104, 0, 116)

                                  radian = math.radians(angle1+270)
                                  xPos = round(206*math.cos(radian))
                                  yPos = round(206*math.sin(radian))
                                  arrPage = drawCircleRev(arrPage, xPos+400, yPos+400, 45)

                                  radian = math.radians(angle1+315)
                                  xPos = round(206*math.cos(radian))
                                  yPos = round(206*math.sin(radian))
                                  arrPage = drawCircle(arrPage, xPos+400, yPos+400, 45, 104, 0, 116)

                                  arrPage = drawCircleRev(arrPage, int(intMaxCols/2), int(intMaxRows/2), 45)
                                  saveToFile(arrPage,strFileName,intFileFrame, intMaxRows, intMaxCols)
                                  intFileFrame+=1
                                  arrPage=[]
                            if __name__ == "__main__":
                                main()

                            print("Programme finished")
Since we are back to creating animation again we have a for loop beginning at line 129. It iterates from zero to 180 in steps of 3, thus giving us 60 frames with which we can create our animation.
Lines 130 to 142 are similar to their equivalents in Listing 4.3 above and therefore don't need to be discussed.
At line 144 we call the lightRays() function. By calling it after calling the annuli, at lines 132 to 137, it appears to shine over them.
The eight blocks spanning lines 146 to 184 are just souped up versions of lines 142 to 149 of Listing 4-3. We can use single lines for calling them in Listing 4-3 since there is no animation involved and therefore their positions won't change.
In listing 5 the circles are meant to move around the centre of the image and always maintaining the same distance from the same centre. For this reason their own centres have to be recalculated for each iteration of the for loop.
To examine how the circles are placed in relation to each other on any one frame we shall look at lines 146 to 159 of Listing 5.
We have added another set of eight circles to our image that are not in Fig 5. Those will be closer to the centre and will start at an angle of 22.5 degrees. This is shown at line 186 above.
At line 188 we are using the new angle on its own, while at line 193 we are adding 45 degrees to it. Again at start of every other block we see that another 45 degrees has been added to the angle. Thus all eight new circles align themsevles between the circles in the first group.
The document provides both theoretical explanations and practical exercises to help users understand and apply concepts related to circle geometry and animation.
Go to topDownload the code for the section 'Coloured Annuli' and modify it as follows:
Download the code for 'Rotating Circles'. Try adding as many as you can of the animations from Exercise 2 to it.
Go to top