Module: as91892 - Use advanced techniques to develop a database
Requirements: designing the structure of the data,
using appropriate tools and advanced techniques to organise, query and present data for a purpose and end users, applying appropriate data integrity and testing procedures
Relevant Implications: end-user considerations
Advanced techniques: linking data in related tables or nodes using queries or keys, writing custom queries to filter and/or sort data, using logical, mathematical and/or wildcard operators, customising presentation of the data, using custom forms to add user input to the database, setting validation rules for data entry
SQL stands for Structured Query Language. Although not, strictly speaking, a programming language it is used to extract and combine data from a number of tables. Although this is its primary function, it is also capable of creating tables and of adding, modifying and deleting data.
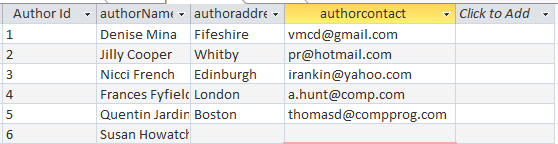
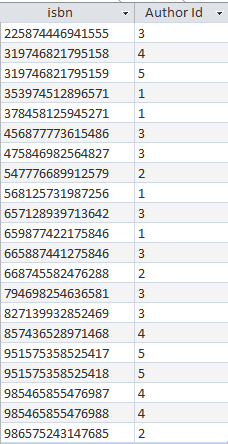
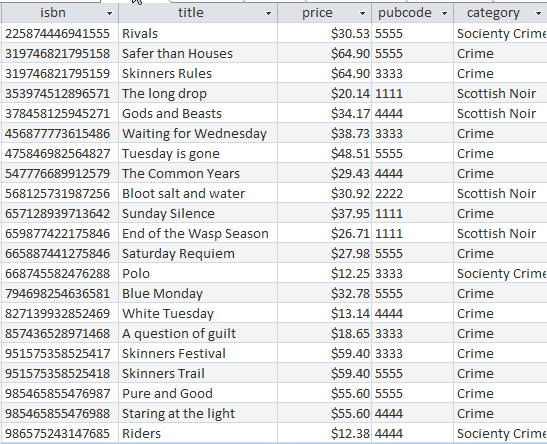
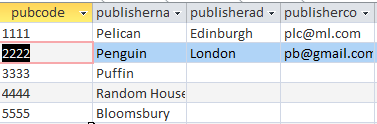
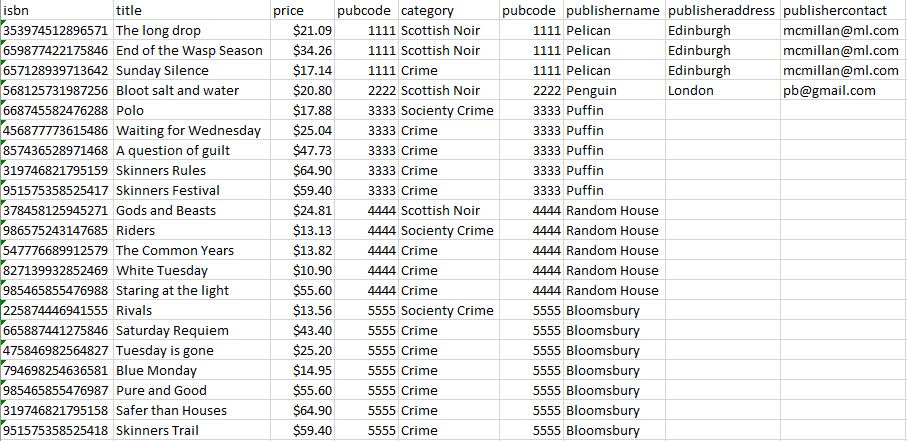
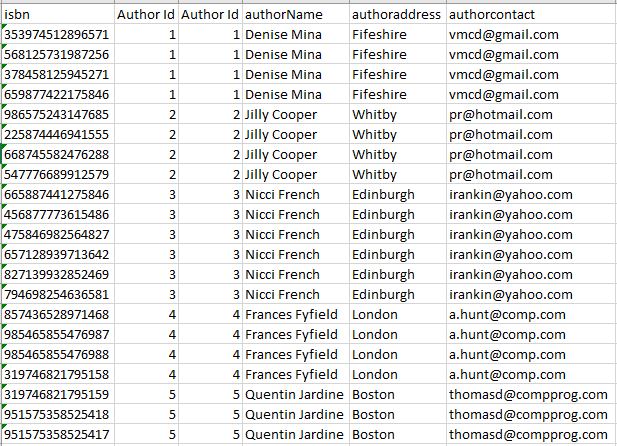
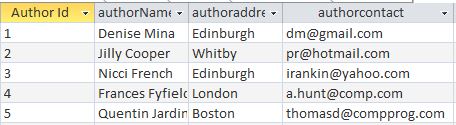
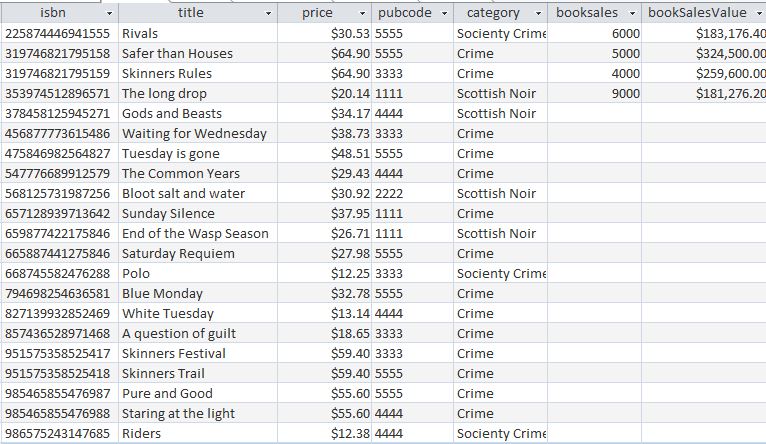
In this chapter we shall be extracting and combining data from a number of tables and therefore we begin by outlining the tables we shall be using and the data that they contain.
Fig 1 - Author TableFig 2 - Author-Book TableFig 3 - Book TableFig 4 - Publisher TableGo to top
Simple Queries
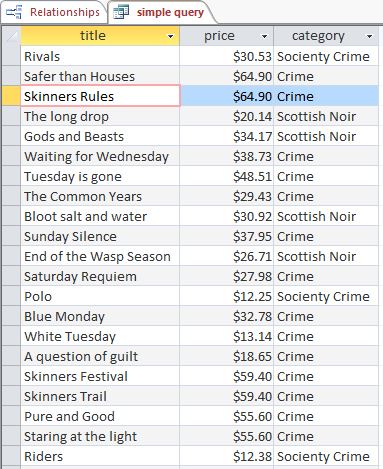
Although we stated above that SQL is used for combining data from a number of tables, it is also capable of selecting specific data from a single table. Since this is the easiest way to introduce it, we will look here at selecting specific fields from the book table.
This is the text of the SQL statement:
SELECT title, price, category FROM book;
The text of this query is self-explanatory and almost a complete English sentence. In Word’s grammar checker it only raises the issue that the word ‘category’ should be preceded by ‘and’.
Running the query produces the following result:
Fig 5 - Publisher Table
This result is almost identical to the Book table itself except that it is missing the isbn and pubcode fields.
The example above displays every single book in our database. Not a major problem in our current small database. In a large bookstore with a range of over 2000 titles, this output would be very large and cumbersome. Furthermore, a full list like this would be rarely required – it would be just as simple to look at the table itself.
On the other hand if we wished to look at only the books from the category ‘Crime’ then we will have a more manageable and more useful output. To modify the query in order to produce specific results we add a ‘Where’ clause.
The text of the new query is below.
SELECT title, price, category FROM book WHERE category='crime';
Again the text of the query is self explanatory. The output is shown in Fig 6.
The query below is similar to its predecessors in that it is extracting selected data from tables. They differ however in that the query below is extracting data from more than one table. The tables in question are Book and Publisher.
SELECT title, price, publishername FROM book INNER JOIN publisher ON book.pubcode = publisher.pubcode;
To look at how the query works we shall examine its component parts:
SELECT title, price, publishername FROM
This is almost identical to the opening of any of the queries we have done so far. The sole difference is that the fields title and price are from one table and that publishername is from another table.
Book INNER JOIN publisher ON book.pubcode = publisher.pubcode
Book INNER JOIN publisher means combine the data in the Book table with the data in the Publisher table.
How are we to do this? The answer is book.pubcode = publisher.pubcode. What this means is that we match up the records in the publisher table that have the same value of pubcode as the corresponding records in the book table.
Fig 7
Fig 7 above shows how the data in the combined tables would look like. It is simply like an un-normalised table, which, if normalised, would give two tables just like the present Book and Publisher tables.
From this combined table we can pick the fields we wish to display. Furthermore we can display them in a completely different order to the order they appear in the original table.
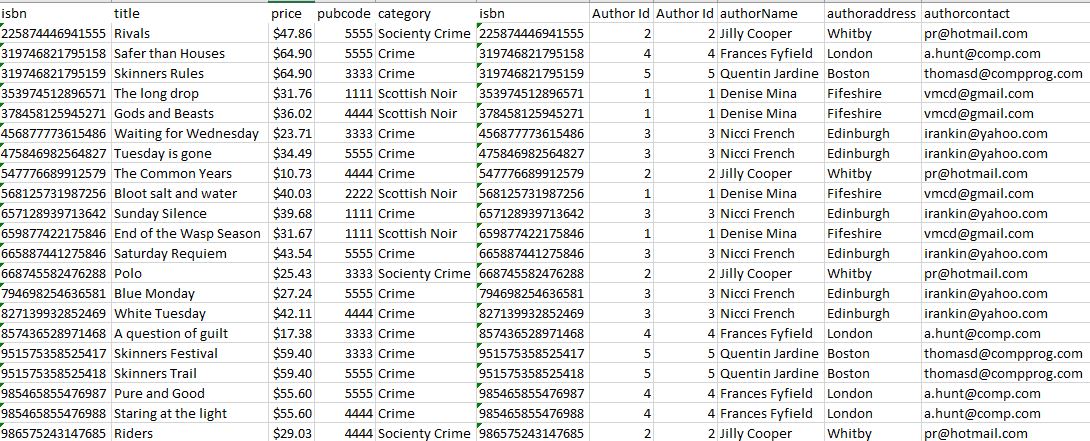
SELECT authorname, title FROM (author INNER JOIN authorbook ON author.[author id]=authorbook.[author id]) INNER JOIN book ON book.isbn = authorbook.isbn;
To look at how the query works we shall examine its component parts:
SELECT authorname, title FROM This is the same as the previous example and does not need any further explanation.
(author INNER JOIN authorbook ON author.[author id]=authorbook.[author id]) Other than the fact that it is enclosed in brackets this works exactly like the INNER JOIN in the previous example and produces a combined table like that shown in Fig 8 below.
INNER JOIN book ON book.isbn = authorbook.isbn; This creates an INNER JOIN, not between two actual tables, but between the combined table that was created above and the table Book, by matching up the isbn fields of both the Book table and combined table, thus producing an extended combined table.
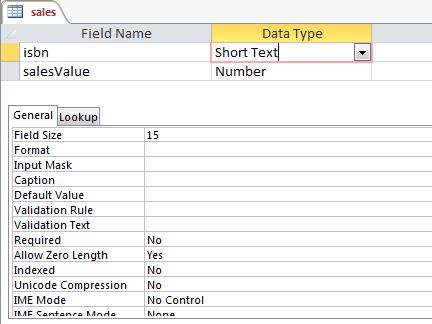
Creating tables using SQL is remarkably simple. The SQL statement below creates a very small table with two fields in it.
create table sales ( isbn varchar(15), salesValue int);
The name of the table is sales. Of the two fields, the first is named ISBN. The property varchar means it is a text field while the number in brackets means that it has space for 15 characters.
The second field is named salesValue and it is of type integer.
No keys are specified for this table.
Fig 10
Fig 10 shows the newly created table. Notice that the ISBN field has got a field size value of 15 - just as specified in the query.
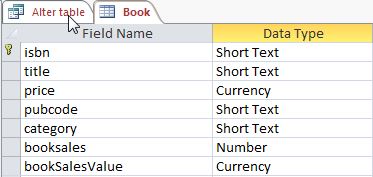
Modifying an existing Table – the ALTER TABLE query
Having created our table sales, we shall later use it to store the sales data of various books in our Book table. That data will be then used to update the Book table itself with the amount of sales, i.e. the number of books sold and the amount earned by that book. The latter will be calculated by multiplying the price of a book by the value of the amount sold.
Our Book table currently has no field for storing either of those values, and, for that reason, we need a query to create them. The query is shown below.
alter table book add column booksales int, bookSalesValue currency;
Again it is quite simple to follow. Its first three words indicate that we are going to make changes to a table named Book. The fourth and fifth words indicate that we are going to add columns to the table. The next two word indicate that we are going to add a field called booksales, which will be of type integer. This word-pair is separated from the next word-pair by a comma. The next two words indicate that we are adding another field named bookSalesValue, which is to be of type currency. By separating each field and its data type by a comma, we can add as many fields to a table as we wish.
Fig 11 below shows the table with the newly added fields.
Fig 11
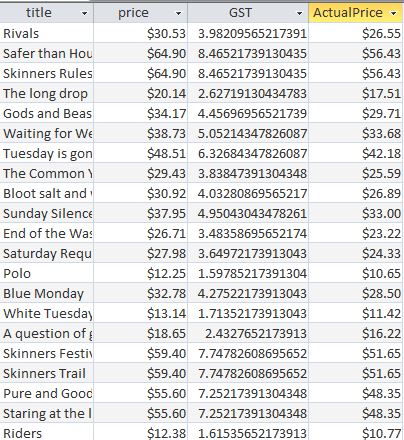
As well as extracting data, either from a single table or from multiple tables SQL can also perform calculations on the extracted data and add the result as an extra field to the output. To examine this feature we shall look at creating a query on the book table that lists the fields: title and price.
Presuming that the price includes the GST we need to extract the GST from the price. Presuming GST to be 15% we would extract it with the formula GST = price * 15/115.
We would also like to know the value of the price before GST has been added. We get this by subtracting the GST from the price.
One would presume that a query for doing this would be quite complicated, but in fact it is very simple, as you can see below.
SELECT title, price, [price]/115*15 AS GST, [price]-[gst] AS ActualPrice FROM Book;
Here it is a simple select statement. The fields: title and price are fields from the table Book.
The next field, [price]/115*15 AS GST, is simply a calculation based around the value of the price field. The name of this calculated field is specified by the word following the clause AS, i.e. GST.
So far we have used queries to extract data from tables and have been able to create extra fields based on calculations performed on the extracted data. With update queries we can change the existing data by replacing it either with constant values or calculated values.
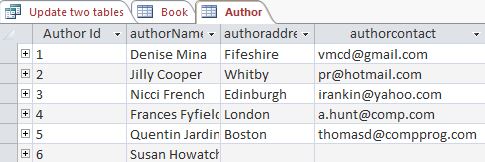
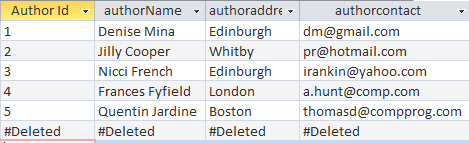
We shall begin with constant values. For this we shall update one of our Author Records. Below we have the Author table in its current state.
Fig 13
Here we are going to change the address of Denise Mina to ‘Edinburgh’ and her contact to ‘dm@gmail.com’. The SQL statement below does this for us.
update author set authoraddress='Edinburgh', authorcontact = 'dm@gmail.com' where [author id] = '1';
As an update query, the query text begins with the keyword update. This is followed by the name of the table whose contact we wish to update. Next is the keyword SET. This keyword is followed by the names of the fields we wish to update and the value they are being updated to. A comma separates each field and value pair.
Since we wish to update only one author we have a where clause which specifies that update takes place only with the author whose id is ‘1’.
Notice that the name of the key field is enclosed in square brackets. This is because SQL does not support spaces in table or field names and when these occur in a database, the name has to be enclosed in square brackets.
Fig 14
In the present situation, the SQL statement could be written as follows and still produce the same result.
update author set authoraddress='Edinburgh', authorcontact = 'dm@gmail.com' where authorname = 'Denise Mina';
The only problem with the above version is that if there was a second author called ‘Denise Mina’ then the details for both of them would be updated.
A more complex update
Now let us look at a more complex update query. Recall that earlier on in the chapter we created two queries, one for creating a table and the other for altering the structure of an existing table by adding two extra fields to it.
The first of those queries created a new table named sales, which had two fields: isbn and salesValue. This table is meant to be a temporary storage for data about book sales. The data entered into it would be the isbn number of a book and the amount of that book that has been sold.
The two fields added to the Book table were bookSales and bookSalesValue. The first , as the name implies, is for storing the value of the amount of books sold. This field is to be updated by adding the number stored in SalesValue to the current value in bookSales.
BookSalesValue will be updated by multiplying the contents of booksales and price.
Below we have manually entered data into the sales table. This data will be used to update the bookSales and bookSalesValue fields in the book table.
Our update query is below.
UPDATE book INNER JOIN sales ON book.isbn = sales.isbn SET booksales = booksales + salesvalue, booksalesvalue = price * salesvalue;
Its overall structure is like the update query that precedes it. The only differences is that it updates an inner join of the book and sales tables and updates the fields booksales and booksalesvalue with calculations instead of constants..
Below we see the Book table, now containing the two fields that were added to it earlier, and the same fields containing sales data put into them by the above query.
Finally we look at how to delete a record from a table using SQL. For our example we shall delete the record for ‘Susan Howatch’ in the Author table. The sql code is:
delete from author where authorName='Susan Howatch'
Again, the code is self-explanatory. Fig 16 below shows the Author table with the last record deleted.
SQL is a powerful tool for extracting and combining data from tables. It is also capable of creating tables and of adding, modifying and deleting data. In this chapter we have looked at how to extract data from a single table, from two tables and from three tables. We have also looked at how to create a table, how to modify an existing table, how to update existing data and how to delete records.