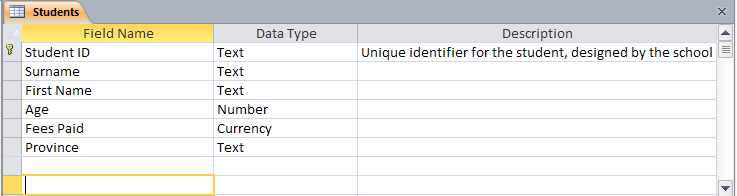
For our first application we shall look at a very simple database for a school’s students’ records. The data we shall need will be Student ID, Surname, Name, Age, Fees Paid and Province. A real life application would require a lot more data than this, and towards the end of the book we shall extend the scope of the database to include more than one table. To begin with, however, we have enough here to examine most of the features of creating tables and entering data into them.
Creating a new Access database is like creating any new object using other software such as Word, Excel etc. The steps are:
Ensure that Microsoft Access is running
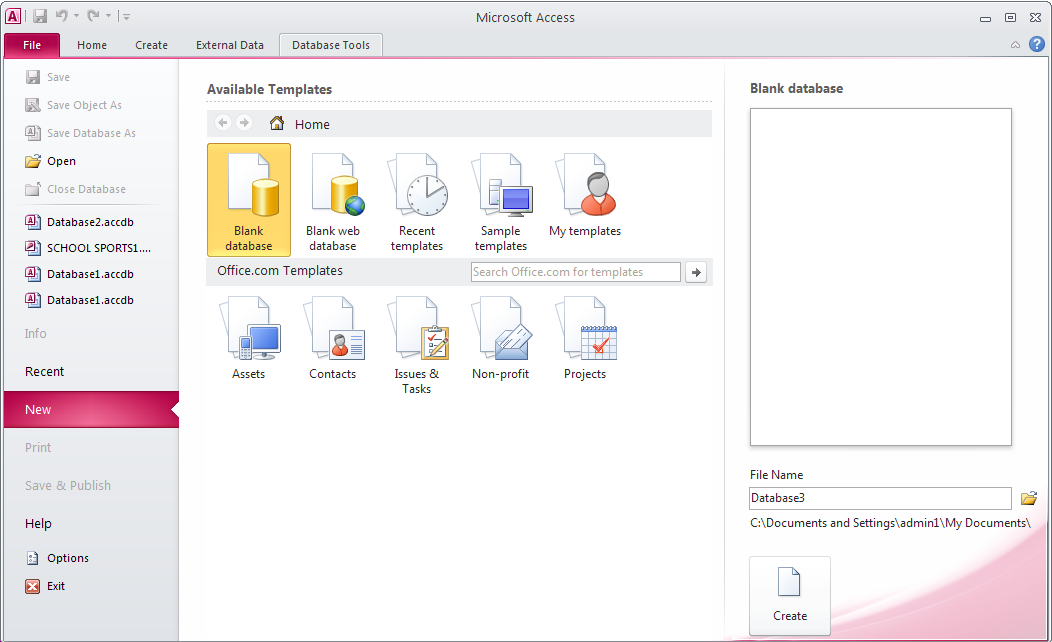
Click on File/New. This will give you a display as in Figure 2‑1 below
.
From Available Templates select Blank Database and in the box labeled File Name enter the name of the database.
Click on the button Create.
Fig 1
Our new database now appears as in Fig 2
Fig 2
There are many different objects that we can put into a database. These include tables, queries, forms, reports, web pages, macros and programming code. Of those we have examined the concepts of tables very thoroughly in the previous chapter. Here, before actually creating a table we shall take a quick look at queries, forms and reports.
Queries: this is a way of selecting from all of the data stored only the data that we want for a particular application. Queries are extremely useful when we are trying to extract data from more than one table.
Forms: A GUI interface that allows us to look at a table one record at a time. A form will also allow us to enter data into the table.
Reports: Paper printouts of part of the data in the database. Usually they are subtotaled.
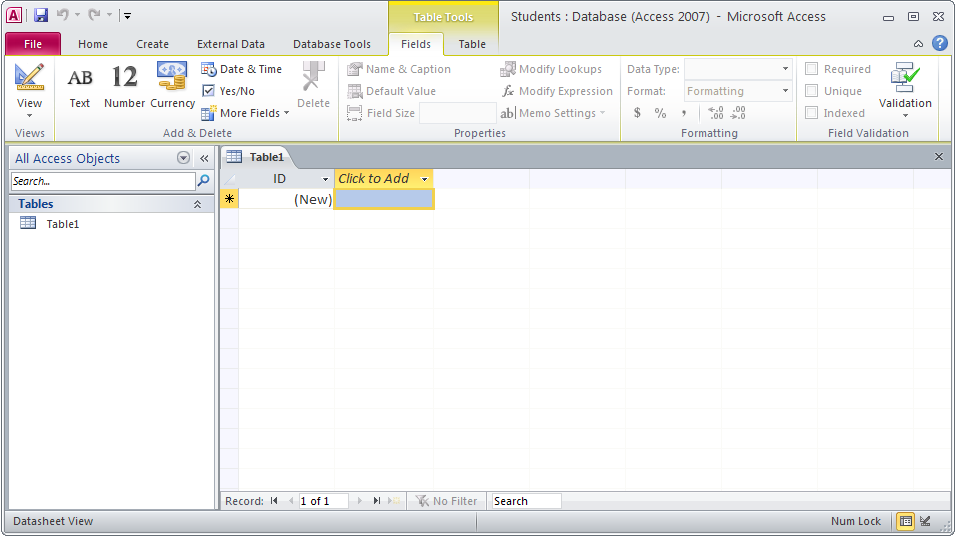
When you create a new database, Access automatically creates a new table for you. If it does not or if you wish to create a second table you simply go to the Create tab and click on the icon Table. Either way you get a display as shown in Figure 2‑2 above. The first thing you must do is to save the table. As we are going to enter students’ data into this table we shall call it Students. To save the table, simply right click on the tab that has the table’s name on it. In Figure 2‑2 the table’s name is Table 1. Once you right click a pop up menu appears and among the options is Save. Once you select this option a dialogue box appears asking for the table’s name. Here you enter Students and then click on OK. Now the name Students will replace the name Table 1 in the table’s tab.
As your table is newly created it has no fields in it. Your first task therefore is to add fields to the table. To do this, however, you must change the table display to design view. To do this, again right click on the table’s tab, and from the pop up menu select Design View.
Specifying Field Names and Field Types
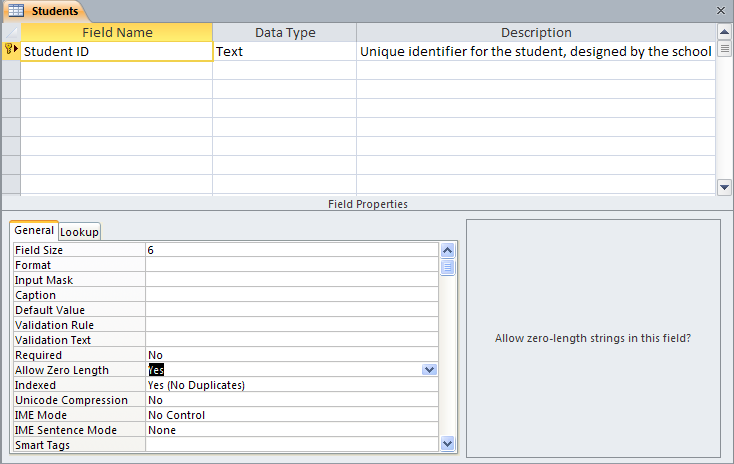
We are now ready to enter the description of our table, or in other words specify the fields and their characteristics. First we enter the name of the first field – Student ID in this case. Once we do this Text appears automatically in the Data Type column. As this is going to be a text field we shall not make any alteration here. Instead we shall look at General tab in the lower part of the window which displays other details about the field. This is shown in Fig 3 below
Fig 3
Field Properties
We do not need to alter every single one of those field properties in the General tab but we need to be familiar with most of them: Field Size, Format, Input Mask, Default Value, Validation Rule, Validation Text, Required, Allow Zero Length and Indexed. For this reason we shall spend a little while examining them.
Field Size: Text can be of any length and thus if our field is a text field we must specify how many characters we want. If our student id is to be limited to 6 characters then we enter the number 6 in the Field Size property.
Format: This means the same thing as it means in Word or Excel, which is the way in which the data looks, whether it has currency symbol in front of it, whether the thousands are separated by commas etc. With text it indicates whether the initial word is capitalised or not, whether the entire text is converted to capitals etc.
Input Mask: Often numbers such as phone numbers are written as follows (675)74378922. When entering numbers like this the input mask determines whether the brackets are supplied in the input box for the user, whether they are stored along with the numbers or not etc.
Default Value: Suppose we are compiling a list of people’s addresses including the province they come from, and suppose that 90% of the people we are listing come from East New Britain, then we would save a lot of time and of typing if we made “East New Britain” the default value for the Province field. Once a new record was created the value “East New Britain” would be automatically inserted into the Province field of that record. The user would only need to change this value only when entering a person who comes from some other province.
Validation Rule: If we have specified 6 characters for the size of the id field and if each of them is to be a numeric character then we must ensure that the user enters no more or no less than 6 characters and that each of those characters must be numeric. In order to achieve this we use the Validation Rule property. In our case we enter Like “######”. After the keyword Like we have 6 hash signs between quote marks. It means that each one of those hash signs must be replaced by a digit in the range 0 – 9 inclusive. As there are 6 hash signs there must be 6 digits in the field.
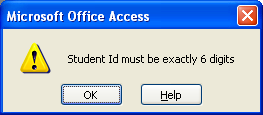
Validation Text: The person entering the id number for the student may not be aware of the ruling regarding the format of the number and thus may make mistakes such as entering 3 digits only or else adding an alphabetical character to it. This will break the Validation Rule and thus cause an error. If this occurs we must inform the user of the mistake he has made. To do this we enter the text "Student ID must be exactly 6 digits" for the Validation Text property. The result of this is that if the user makes an error in entering the id number, an error message will appear as in Fig 4. Notice that the text in the message is exactly the text we entered in the Validation Text property.
Fig 4
Required: The value for this property is either yes or no. If the value is yes then some data must be entered into this field, whereas if the value is no we can leave the field blank.
Indexed: A database table can have as many indexes as there are fields in the table. A database index performs exactly the same function as in index in a book. For example if we are using a reference book and we want to look up the word "computer" without having to read the entire book, we first look up the word "computer" in the index. This tells us which pages in the book has a reference to the word and then we simply go to those particular pages.
Similarly in a database table if we frequently look up a person by using his surname we create an index of the surnames. Then when we want to look up a surname the database first searches the index and from the record numbers it finds there it looks up the actual records in the table. Again this is much quicker than searching the entire table.
This field has three options, they are No, Yes (Duplicates OK) and Yes (No Duplicates). We shall later on discuss the difference between Yes (Duplicates OK) and Yes (No Duplicates) but for the moment we shall take the No duplicates option.
The student ID field must be text and be 6 characters long. For this reason we enter 6 in the Field Size property box.
Next we look at the Format property. Supposing that a student id of 437986 is normally written as 43-7986 i.e. the second and third digits are separated by a hyphen. Now we would like this hyphen to appear on the screen once we have entered the six digits but we don’t want to have to type it ourselves. What we do is to format the field so that the second and third digits are separated by a hyphen. To do this we add the following to the Format field: “@@-@@@@”. This specifies that each of the @ symbols must be replaced by a character and that the second and third character will be separated by a hyphen. Thus typing in 328954 will result in 32-8954 appearing in the table field or in the form’s textbox.
Next we look at creating an Input Mask. In this example the input mask will be a follow up to the formatting we have specified. If the user entered any six digits then the Format property will ensure that they are displayed with a hyphen between the second and third digits. With the input mask we provide extra help for the user in that the empty field or text box will appear as follows “__-____”, i.e. two underscores followed by a hyphen followed by four underscores. As the user types in the numbers they replace the underscores.
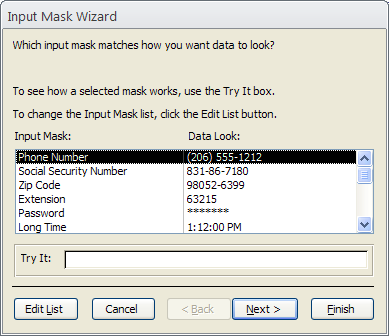
In order to create an input mask click inside the Input Mask box. As soon as we do this the graphic appears to the right of it. Clicking on this graphic will bring up the Input Mask Wizard box shown in Fig 5.
Fig 5
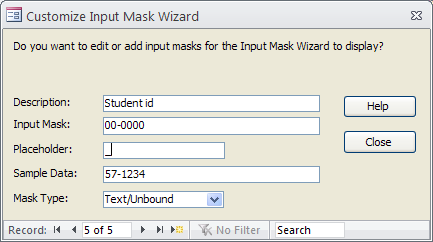
There are already a number of input masks available for us but none of them suits us. We therefore must add our own input mask. For this we click on Edit List. This brings up the dialogue box in Figure 2‑6.
Here we scroll to the end of the list to find a blank record where we can enter our mask. Firstly we enter the name of the mask in the Description field. We follow this by specifying the underscore character as the placeholder and then entering 00-0000 into the Input Mask field. Next we enter six digits into the Sample Data box and click on Close.
Fig 6
This returns us back to Fig 5 where we click on Finish. This will put the mask we specified into the Input Mask field.
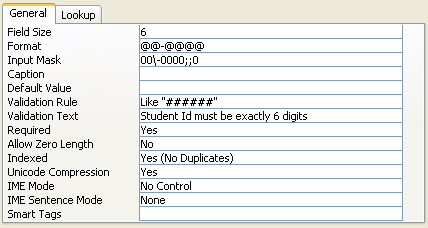
Both theFormatand the Input Mask properties restrict the data for the Student Id field to six characters. The data, however, can be either text or numbers. We wish to restrict the data to six numbers in the range 0 – 9 inclusive. In order to do this we use the Validation Rule property. Here we enter "Like “######”". In the quotes after the keyword Like we have six hash signs. The Validation Rule states that each one of those hashes must be replaced by a numeric digit. No text or punctuation marks are allowed. Also, since there are six hash signs, there must be six numbers, no more and no less.
A user, of course can make an error in entering the id number for the student. In this case he should be alerted to his error and be told the correct type of data to enter. To do this we enter the text Student Id must be exactly 6 digits in the Validation Text box. In this case if the user enters non numeric data or enters more or less than six digits his input will be rejected and a dialogue box with the message in the Validation Text box will appear on the screen. Fig 7 below shows all of the properties for which we added values for the Student ID field.
Fig 7
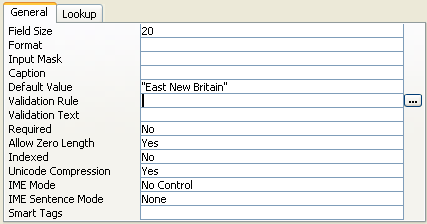
The next two fields are Name and Surname. Again these are text fields. There is not much validation that we can do on either of those fields and so the only property that we shall change will be the Field Size. In both cases we shall set this at 20. Data must be entered into both of them and thus the Required field must be set to Yes.
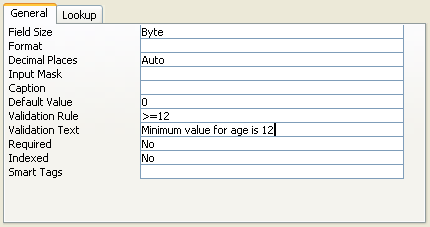
Our next field is the Age field. Again we enter the name of this field in the Field Name column, but in the Data Type column we select Number.
Fig 8
For this we get a different General tab as shown in Fig 8. The Field Size property this time has been set to Byte. This is a numeric data type that can hold values up to 255. As people normally don’t live beyond that, then it is sufficient for holding the value of the age. The Validation Rule property is also different. In this case we assume that we don’t accept children less than 12 years old and thus we use “>=12” as the value for this property. In other words this is equivalent to greater than or equal to 12.
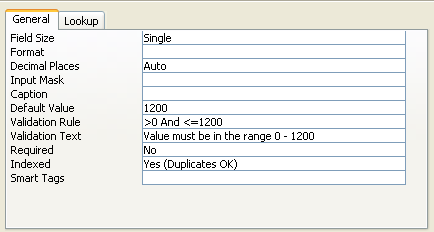
Again we have to do some thinking about the field Fees Paid. We will assume that the majority of parents pay the fees straight away while others pay by installments. In order facilitate the data entry we shall assign a Default Value of 1200 to the field. What this means is that once a new record is created, 1200 is automatically inserted into the Fees Paid field. Of course for those who are not paying the full fee we can override this value with the actual amount that the parents are handing over.
Again since the maximum is 1200 we validate the data to be a number greater than zero and less than or equal to 1200. Thus we give the Validation Rule property the value >0 And <=1200.
These properties are shown in Fig 9
Fig 9
The final field is Province. As stated above, if we are dealing mainly with students from East New Britain, then we should make “East New Britain” the default value for this field. This is shown in Fig 10 below.
Fig 10
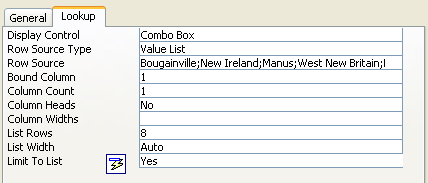
As we are dealing with PNG, the contents of the Province field should be limited to the names of the provinces in that country. In order to do this we shall have to use the Lookup panel that we have not used so far.
When we click on this panel its property fields will be blank apart for the Display Control which will have Text box in it. From the drop down list we select Combo Box. In the Row Source Type we select Value List. This means that we will have to type the names of the provinces in ourselves. In the property Row Source we enter the names of the provinces. The name of each province must be separated from the other by a comma or a semi colon.
The only other property we need to concern ourselves with at the moment is the Limit to List. If this is set to Yes then the system will not accept any value except the values we have typed into the Row source.
Our table design is now almost complete and looks as in Figure 2‑12. We notice that to the left of the Student ID field is a key symbol. This means that this field is the key field for the table or in other words the primary key. The purpose of a primary key is to ensure that the values entered into that field are unique or, in other words, that no two records have the same value. If a user attempts to insert the same value twice into this field then the second value will always be rejected. This means that no two students will have the same id value. In our case this is important since we will be able to ensure that we can distinguish between two students with the same name by using their id numbers.
When we create a new table Access automatically sets the first field in the table as the primary key. If we wish we can remove the key from the table. To do this first ensure that the table is selected and that the Design tab is active. Now select the primary key field and click on the icon Primary Key. The key symbol will disappear from beside the field name
A new primary key can be created in exactly the same way. Select the field you want as the primary key and in the Design click on the icon Primary Key.
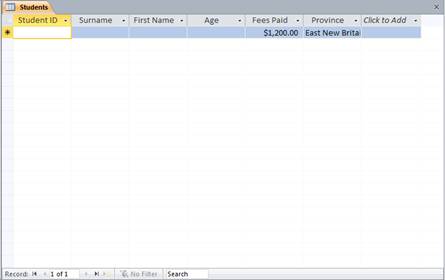
A database table is for holding data entered by the user. So far, however, we have not entered one single item. This is because we have spent the time designing the table and configuring the fields to ensure that the data entered is as correct as possible. What we have seen of the table, therefore, is the Design View. In this view we cannot enter any data, we can only specify the type and range of data that can go into the fields. Since our table is now fully designed we are ready to start entering data into it. In order to do this we have to go to another view of the table – the Datasheet View. In order to do this we right click on the table tab and from the pop up menu select Datasheet View. The table now changes as shown in Fig 13.
Fig 13
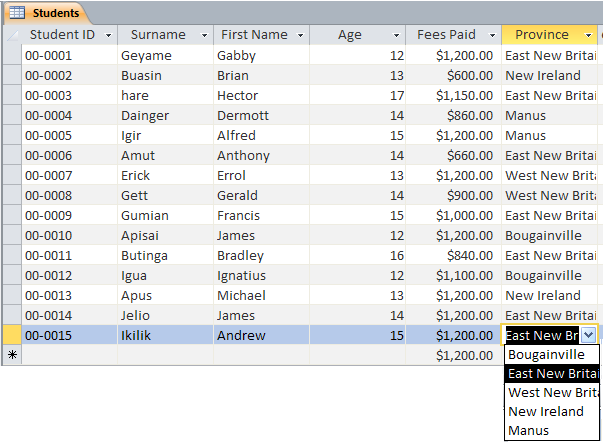
The table of course is empty but the names of the fields appear across the top in the order that we specified them in the Design View. Also notice that the field Fees Paid has 1200 in it since in the Design View we specified that the Validation Rule of that field was 1200. For the same reason Province has East New Britain in it. We are now ready to start entering data. This is done in the same way as we would enter data into a spreadsheet. Figure 2‑14 shows the table with data entered into it. Notice that in the empty record at the very bottom that the default value of 1200 appears in the Fees Paid field and that the Lookup for the Province field has its combo box showing the provinces. (For the sake of brevity we limited the list here to the Island Provinces.)
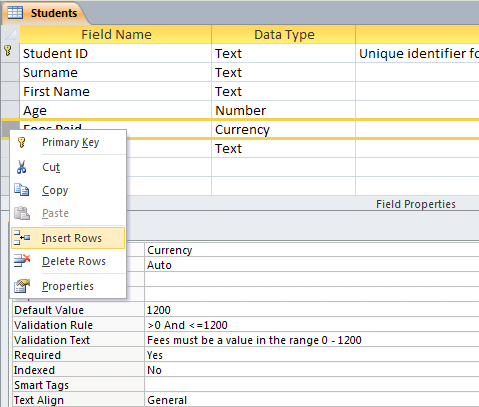
At times we need to alter the design of our table. We may have made a field too short for the required data or a value list may not have enough options in it. One of the most frequent alterations we may do is to add extra fields. In our case we want to add a field for the student grade. We want this field to appear between the Age and Fees Paid fields.
Fig 15
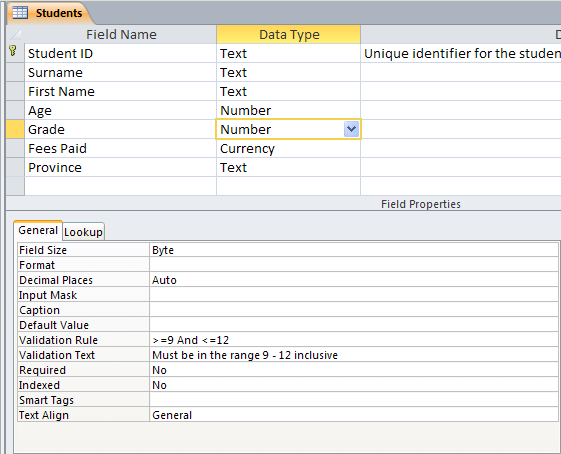
First we open the table in Design view and then select the entire row of the field Fees Paid as shown in Figure 2‑15. Next we right click on the margin and from the pop up menu select Insert Rows. This causes a blank row to appear between Age and Fees Paid. We now fill in the details of our extra field. Figure 2‑16 below shows the Design View after we have entered the details of the field.
A table is a rectangular grid in which data is stored. When a table is designed the fields are defined. This includes the data type that each field will store, the size of the field if its text, default values, validation rules and validation text. A table normally has a primary key. This is a field where duplication of data is not allowed and its contents are used to uniquely identify each record.
Create a database for administering a library. The database will have one table called Books. The fields in this table will be Book number, Dewey Number, Title, Author, Publisher, Topic, Status and Price.
The field Book Number will be the key field. It may be an Auto-number field or else it may be like the Student Id field in this example. If that is the case, then it must be validated for 6 digits only.
The field Dewey Number is to be a text field 6 characters long. It must be validated so that the first three characters are alphabetic and the last three characters are numeric.
The fields Title, Author, Publisher and Topic will also be text with size 20.
The field Topic will have values “Literature”, “History”, “Geography”, “Science”, “Education”.
The field Status will have values “On shelf”, “On Loan” or “Missing”.
The field Price will be of type Currency and must be validated as being in the region 10 – 200.