Key competencies
Thinking, using language symbols and text
Go to top
Thinking, using language symbols and text
Go to topRegarding software being used, students are expected to know how to alter form control properties.
Regarding HCI, students are expected to be aware of the concept of designing forms to enhance user experience.
Go to top#2: Match between system and the real world
#5: Error Prevention
#8: Aesthetic and minimalist design
Go to topOn completion of this lesson you will know how to create forms that protect the underlying data from unauthorized access.
Go to topSo far we have looked at controlling how individual controls on a form can be manipulated to ensure that incorrect or unacceptable data is prevented from being stored in the form’s underlying table.
Although those controls will always perform their functions correctly, they still may allow correctly validated data into the correct field of the wrong record. Similarly, they may allow an inexperienced user to actually open an underlying table and interfere with the data. We shall look at further formatting the form for preventing those type of errors from occurring.
Go to topHere we shall create a form that will only allow the user to add new records to the underlying table. This is all done by manipulating the properties of the from itself – something that we have not done much of up to now.
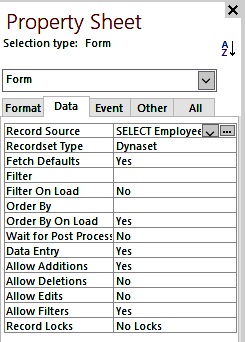
Creating a form that will only allow us to add records to a table but will not allow us to look at existing records is very easy to create. We simply select the from itself and bring up the Property Sheet. Here we select the Data tab as shown above.
We set the values of the properties Data Entry and Allow Additions to Yes and the values of the properties Allow Deletions and Allow Edits to No.
Once we have set those values and saved the altered form, when we open it in Form view we get the display as shown in Figure 8 2 below.
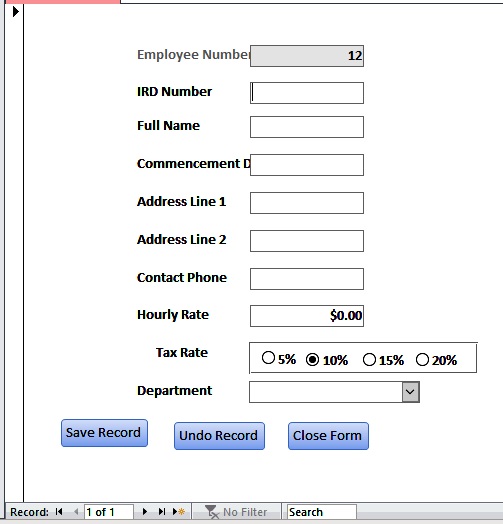
In this mode the form ignores all of the records currently stored in the table and presents us with a blank record where we can enter new data.
Using a data entry only form has a number of benefits. Firstly, it enhances the privacy of the data because users cannot see any of the data, apart from the new data that they are currently entering. Strictly speaking, this is not a heuristic and is not concerned with HCI, but it relates to other database issues such as privacy and data security.
Error prevention is also enhanced since, as stated above, users cannot accidentally enter new data on top of existing data, since the existing data is hidden from them.
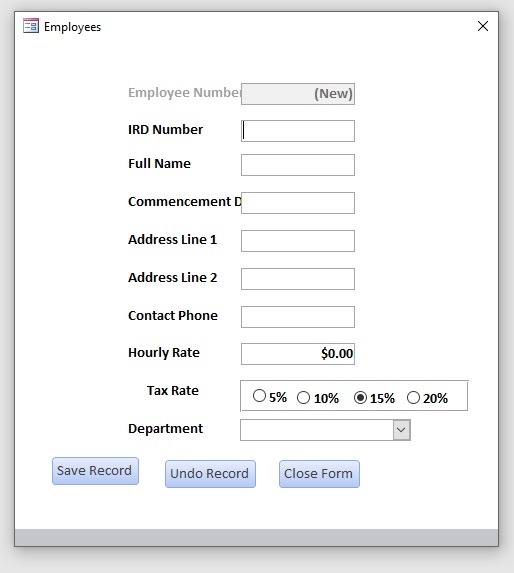
Go to topLooking at Figure 8 2 we see that there is a lot of unnecessary controls and features on the form that can be removed. At the very base of the form we have navigation buttons which are not required in this instance, since this form is not allowed to navigate through the records. They are therefore a source of distraction and confusion to the user and are better removed.
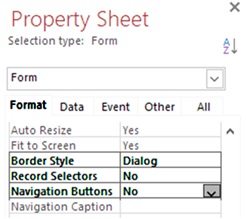
To remove the navigation buttons and control the size of the form, we select the form itself and then go to the Property Sheet. Here we select the Format tab and make the changes that are highlighted in Figure 8 3.
Setting Border Style to Dialog means that the form now will be exactly the size of the gridded background that we see in Design View. This size can be altered only by dragging the sides of the gridded background.
Setting the Navigation Buttons to No means removing the selectors at the bottom of the form that are shown in Figure 8 2.
Setting the Record Selector to No means removing the tall rectangular shape at the left of the form.
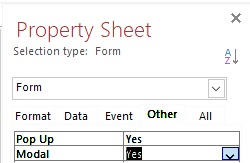
A few more items to tidy up. We would like the form to appear on its own, independent of the database itself. To do this we to the Other tab on the Property Sheet and set both Pop Up and Modal to Yes.
Setting Pop Up to Yes means that the form will now float above the database application and can be moved along the screen independently of the application..
Setting Modal to Yes means that as long as the form is open no part of the underlying database can be accessed. This is again a form of Error Prevention because in order to access any other part of the database the user must first complete whatever activity they were performing on the form, or else cancel that activity using the Undo Record button.
Figure 8 5 below shows the form with the unnecessary controls removed
#5 Error Prevention
Making a form modal means that the user is confined to working on that form exclusively and cannot get to an underlying form until the current form is shut down
#8: Aesthetic and minimalist design
Removing the navigation buttons visually improves the form and focuses the user’s attention on the command buttons.
Go to topBy manipulating the properties of a form we can create a form that will only allow new records to be added to the underlying table. This form can be further tidied up by removing unnecessary controls and features.
Go to top