Key Competencies
Thinking
Go to top
Thinking
Go to topStudents know how to add controls to a form and modify their properties
Go to top#1 Visibility of system status
#3 User control and freedom
Go to topOn completion of this lesson you will know how to use command buttons to perform actions such as:
You will also know how to make an application more learnable by clearly labelling command buttons to indicate their functions and by allowing users to experiment with the system without causing damage.
Go to topAlthough MS Access forms provide controls for saving records, those same controls are rigid, not very customisable and not very visible.
Command buttons, on the other hand have a strong clicking affordance and their titles act as signifiers as to their functionality (Norman, 2013). For this reason, we shall add three buttons to our form for saving new records, cancelling erroneous data and closing the form
MS Access provides a number of easy-to-use wizards for creating buttons and adding functionality to them.
Go to top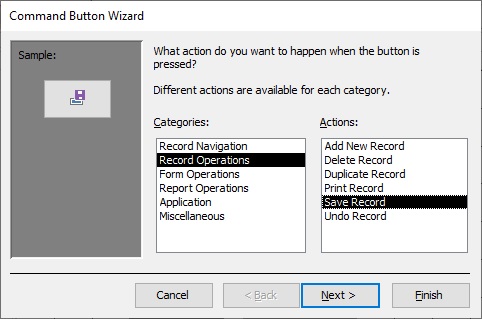
Once we draw a button on the form, a wizard is automatically fired up by the system to guide us towards creating a function for the button. The wizard appears as in Fig 1 above.
Since we want to save a record, which falls within the category of record operations we select Record Operations from the Categories group. This gives us a set of Actions related to record operations. Here, we select the Save Record action. Clicking on Next will take us to the next dialogue box of the sequence shown below.
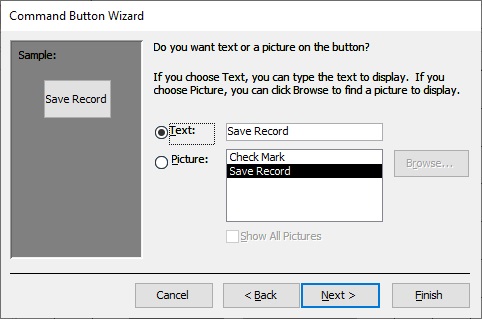
This allows you to determine what to display on the button. For good documentation what appears on the button must make it very clear to the users what the button is to be used for. If all of the users speak the same language, then it is better to use text such as the default text above. On the other hand, if people with different languages are to use the system then it is better to use a picture, provided the picture clearly conveys the idea of saving a record. Being clear on what functions buttons do contributes to good documentation of the system.
Once we click on Finish the system will automatically create a button for us, which, once we click on it, will save our current record for us.
Also, we will configure the button so that not only will it save the record for us, it will also print a message if the record has been correctly saved or if an error has occurred. This is part of the idea of giving the user feedback to the user about the system status (Harley, 2018) (Johnson J. , 2010, p. 103).
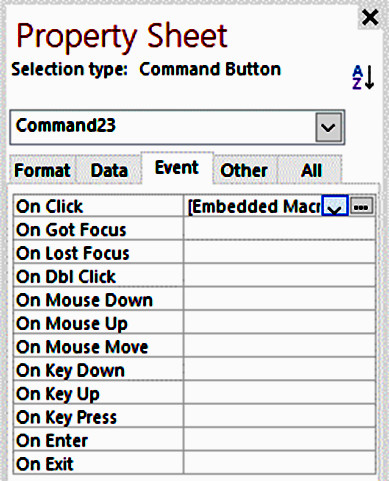
To configure the button, we first select it and then display the Property Sheet as shown in Fig 3. Select the Event tab and click on the icon on the far right of the On Click event. This will the macro that runs when we click the Save Record button.
Even if you are familiar with the basics of programming, the above piece of code can appear cryptic, and therefore we will spend some time examining it.
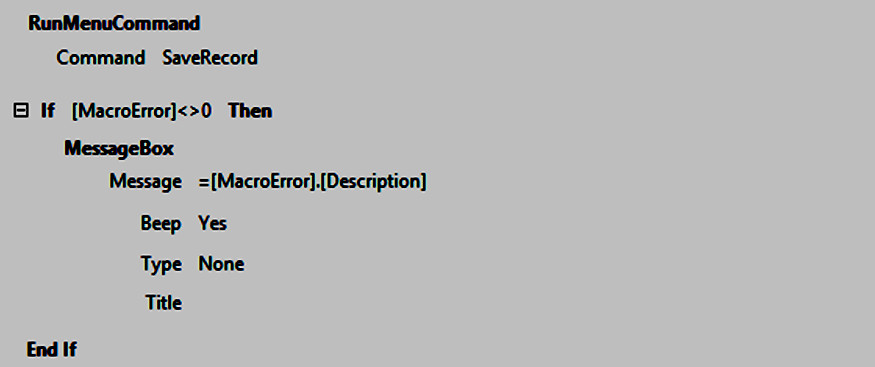
Let us look at the first two lines. Firstly, the internal system has a series of commands for manipulating the records of the database. One of those commands is for saving records and, believe it or not, the name of that command is SaveRecord. Thus, the first two lines could be rephrased in human speech as follows:
Run one of the system commands.
Which command will I run?
The command named SaveRecord.
Telling the system to save a record is no guarantee that the record is going to be saved. One of the most common reasons is that the record contains some data that the system cannot handle for one reason or another.
If the record saves correctly then an internal flag named MacroError is give a value of zero. On the other hand, if the record is not saved the reason for not saving it is determined and that reason is stored in the flag MacroError.Description while a corresponding non-zero number is stored in MacroError.
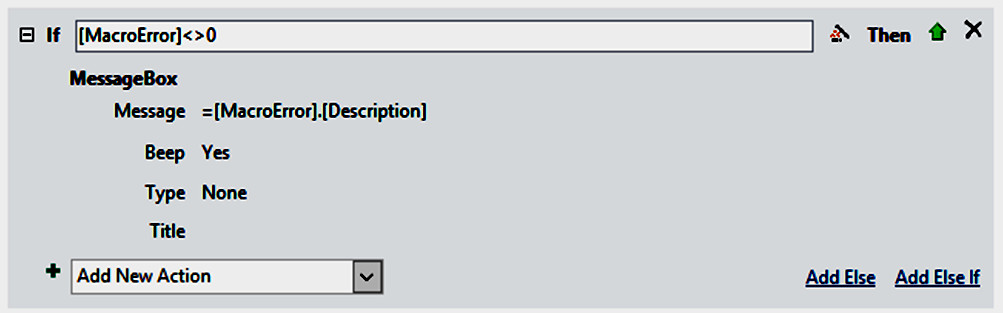
With the above information we can now look at interpreting the code above.
If [MacroError]<>0 can be interpreted as if MacroError has any value other than zero. If MacroError has a non-zero value then it means that an error has occurred. If this is the case then MessageBox is called. This command simply displays a message on the screen.
What message is it going to display? It is going to display the flag MacroError.Description which contains a message from the system as to why the file was not saved.
Beep having a value of Yes means that the system will beep to alert the user that an error has occurred.
The macro shown in Fig 5 will only produce a message if an error occurs. On the other hand, for giving proper feedback regarding system status we should also inform the user if the record has been successfully saved.
To do this we have to modify the code shown in Fig 5 so that it will also display a message informing us if the record was successfully saved.
Our first step here is to click on the link Add Else. This will cause our macro code to change to that shown in Fig 6.
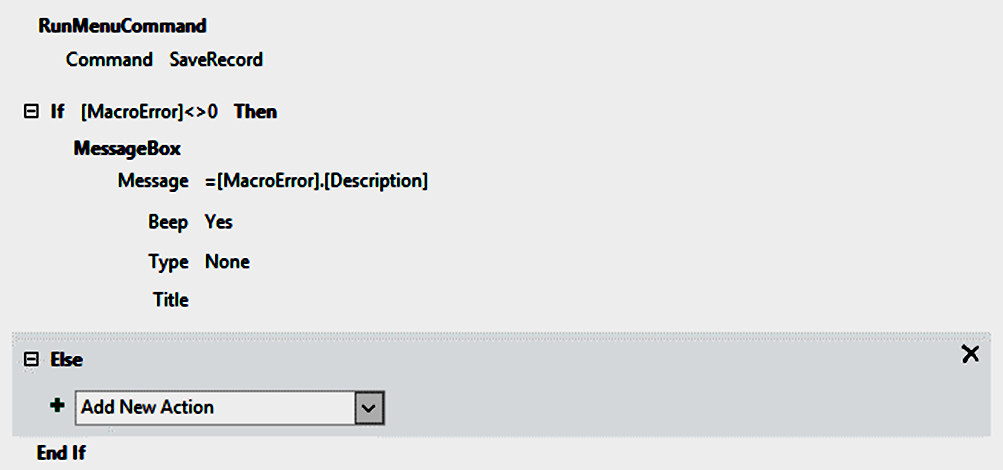
Now the macro has got two parts the If..Then part and the Else part. If an error occurs the If..Then part will run since MacroError is non-zero and the Else part will be ignored.
However, if there was no error then MacroError will have a value of zero. This means that the If..Then part will be ignored and the Else part will run.
Of course, the Else part will need some code in it to do anything and so far it has none. To add code, we simply click inside the combo box with the holding text of Add New Action and either type in the word “MessageBox” or else select it from the drop-down list.
Once we do this it expands as shown in Fig 7 below.
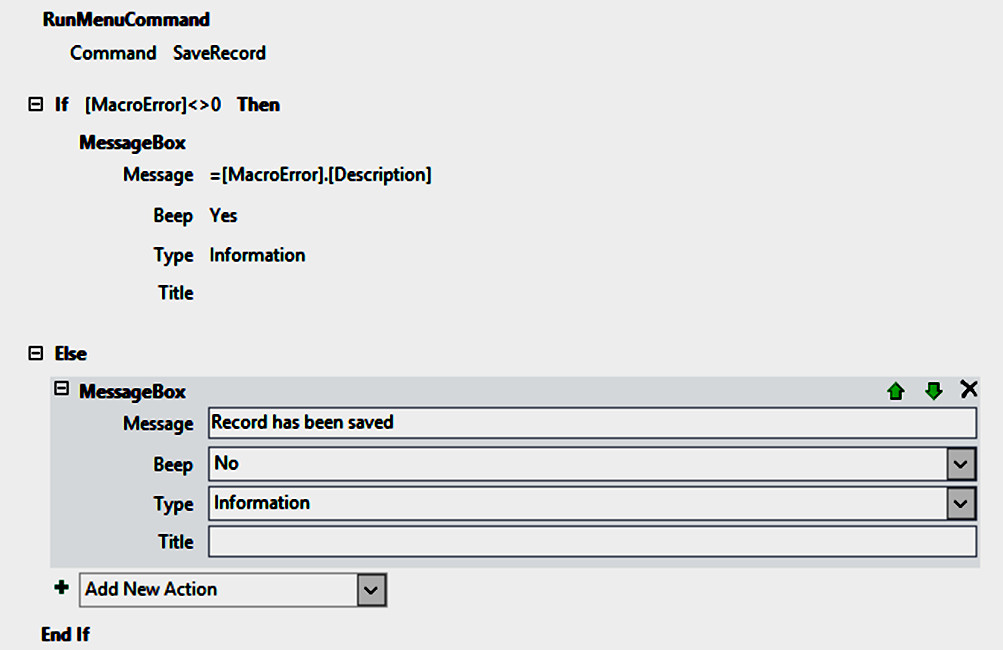
Initially the textboxes and combo boxes are blank for us to fill in. The only essential one is the one labelled Message. Here we enter s simple statement that the record has been saved, which is all that is required.
Beep should have a value of No since continuous beeping whenever a record has be successfully saved would be annoying to users.
Leave Type blank or else use Information. Using any other icons may give the impression of bullying or blaming the user.
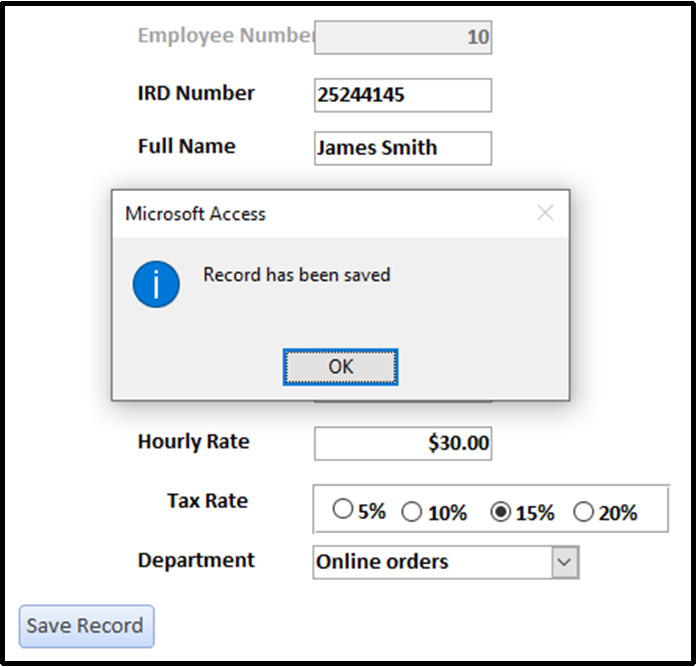
We shall now test out our modified macro to see if it works. Recall that when we were designing our table we stated that we could not have two IRD Numbers with the same value. This means that if a new record is being added the system checks if the new IRD Number already exists. If it does then an error is generated by setting MacroError to a non-zero value, otherwise MacroError is set to zero.
In Fig 8 the IRD Number 2244145 is a new value that does not already exist. For this reason the record is saved and the message generated by the Else part is displayed, informing the user that the record was successfully saved.
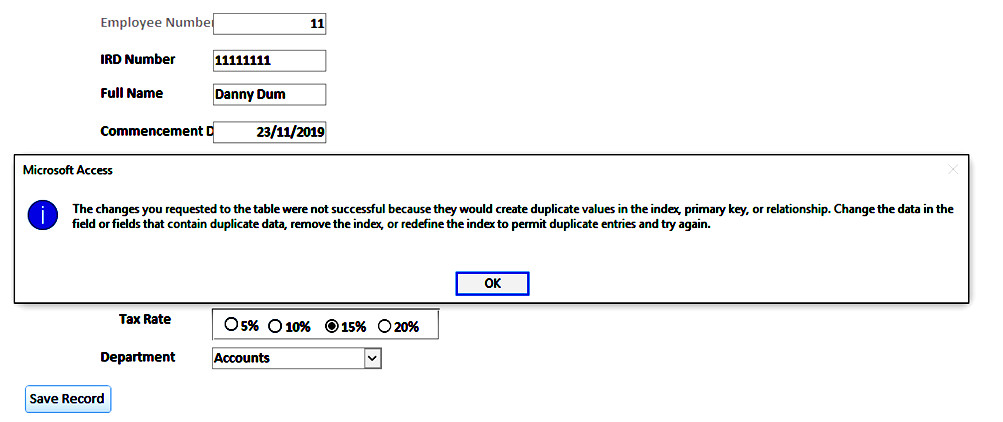
In Fig 9 the IRD Number 1111111 already exists in the table. For this reason, the system will reject it. It will then assign the appropriate non-zero value to MacroError and the appropriate message to MacroError.Description.
Since MacroError will have a non-zero value, the If..Then part of the macro runs, which simply prints out the description of the error.
Finally, we make this record the Default object on the form, so that it can be activated by pressing the Enter key as well as by clicking on it.
Go to top#10 Documentation
At the start of this section we discussed the importance of having clear and unambiguous captions on our buttons so that the users know exactly what the buttons actually do. This can be regarded as part of the documentation.
#1 Visibility of system status
We have spent most of this section looking at creating a button that would save the contents of the form’s controls to a table and ensuring that this button would provide instant feedback to the user as to whether the record was successfully saved or not, and if not giving the reason why. This is part of ensuring visibility of the system status.
Once the record has been saved a message is given to the user informing them of the successful completion of the task (Johnson J. , 2010, p. 103).
Go to topWe need another button for cancelling our data entry in the event that we don’t wish to save our current record. This is also part of Record Operations and therefore we use the same wizard as in Fig 1, only this time we select Undo Record. Clicking Next will give us the dialogue shown in Fig 10.
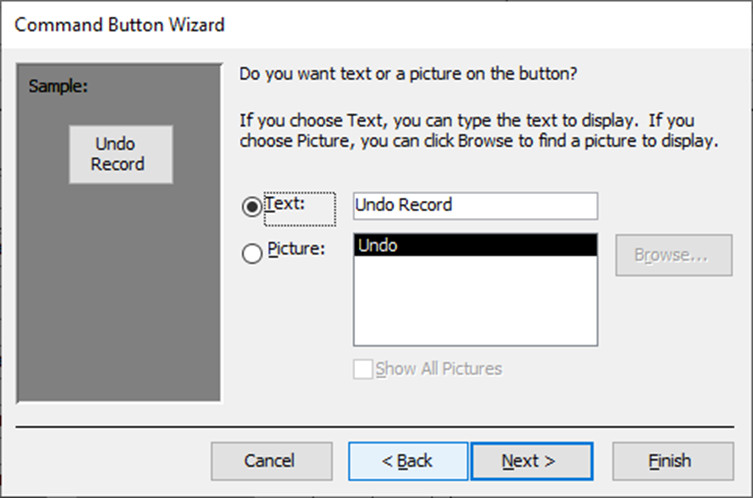
Whether to use text or picture has the same reasoning behind it as with the previous button. Clicking Finish will create our button for us. As long as you have not previously saved the record then clicking on this button will cancel all of your operations on that record.
This button is a very useful tool, especially for beginners. It can help you experiment freely with entering data and familiarizing yourself with the form and its controls without any worry about writing faulty data to the table. It should not be regarded solely as the equivalent of a rubbish bin for getting rid of data entry that went wrong although it is also useful for that purpose.
Being able to experiment with data entry without actually saving any data is an excellent way to learn about how the system works, but it is not possible unless we can back out of the system whenever we want. Having an undo button gives us this freedom (Tidwell, 2010, p. 84). The undo button “should be less a tool for reversing errors and more a tool for supporting exploration” (Cooper, Reimann, Cronin, & Christopher, 2014, p. 365) .
#3 User control and freedom
#9: Help users recognize, diagnose, and recover from errors
The Undo Record button allows users to experiment as much as they like with data entry on a form as long as they have the safety valve of the Undo Record button to cancel their experiments.
Equally users engaged in genuine data entry or editing can recover from an error simply by cancelling their input so far.
Go to topCommand buttons are a very useful tool for providing users with a way of interacting with the system. They have a strong clicking affordance and their titles act as signifiers as to their functionality (Norman, 2013). For this reason, we shall add three buttons to our form for saving new records, cancelling erroneous data and closing the form
MS Access provides a number of easy-to-use wizards for creating buttons and adding functionality to them.
Once we have created a button we can configure it so that it will provide feedback to the user as to the system status. This is part of the idea of giving the user feedback to the user about the system status (Harley, 2018) (Johnson J. , 2010, p. 103).
Once we have created a button we can configure it so that it will provide feedback to the user as to the system status. This is part of the idea of giving the user feedback to the user about the system status (Harley, 2018) (Johnson J. , 2010, p. 103).
Having an undo button gives us the freedom to experiment with data entry without actually saving any data. This is an excellent way to learn about how the system works, but it is not possible unless we can back out of the system whenever we want. Having an undo button gives us this freedom (Tidwell, 2010, p. 84). The undo button “should be less a tool for reversing errors and more a tool for supporting exploration” (Cooper, Reimann, Cronin, & Christopher, 2014, p. 365) .
Go to top