Informative: If you are describing an artwork, then you will save yourself a lot of writing and the reader a lot of frustration and boredom if you include an image of that artwork. Images of either historical or mythical events tend to be full of action and drama. These type of images allow people with various cognitive impairments to orientate themselves in the context.
Assistive: Large blocks of continuous text can be intimidating to people with reading difficulties. Judiciously placing relevant images throughout the text breaks up these blocks of text and also helps the user engage with the text content.
Decorative: Those type of images should be used sparingly. Also they should be marked up in such a way that screen readers will ignore them.
One of our goals in this page is to show how to make contents of relevant images available to those who are blind or are visually or neurologically impaired. This is done by providing extra textual descriptions. These textual description can be provided through:
the alt attribute of the <img>tag
the image's caption
being integrated with the main text of the page
being available as a separate transcript.
Our othe goal is to show to to make images break up large blocks of text and at the same time improve the visual quality of the page.
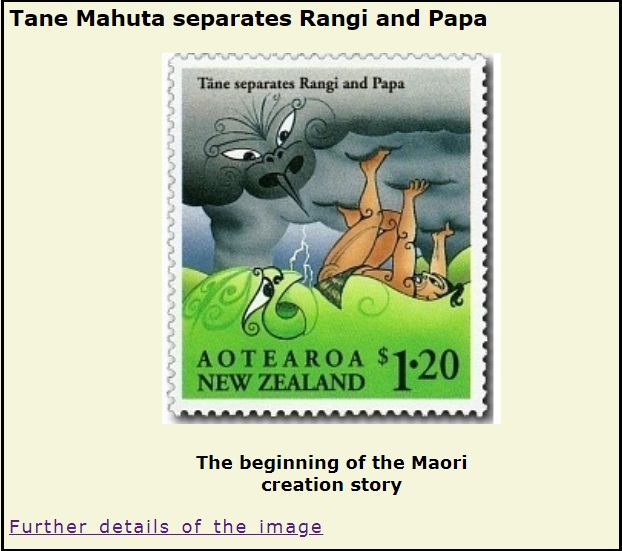
The first of our creation stories is the separation of Rangi and Papa. Here we will illustrate the main event of that story with an artwork from a New Zealand Post stamp shown below.
Fig 1: Tane Mahuta separating his parents
This image encapsulates the Maori creation story through the separation of Rangi and Papa. The image is integral to the story and it focuses on the main event of that story - the actual separation of the primordial parents. The artistic style of the image is that of the traditional Maori, which is interwoven with European realism. Due to its relevance it must be made accessible to the blind, the visually impaired and the cognitively impaired.
A blind person can get the full story from the text and strictly speaking does not need any extra help. However the emotional and dramatic aspect of the story should be made clear to them as well. Using the alt attribute may not be sufficient for this; we may also need a separate transcript.
A dyslexic person could use the image and its caption to get an overall view of the story. This would make the main text that relates to the image more accessible to them.
To cater for those groups we shall provide this image with a caption, an alt value and a separate transcript. Also we must ensure that the contents of the alt attribute and the caption complement each other and don't have any overlapping information.
The following piece of code shows us how to mark up such an image. The code should be inserted into the file Maori Creation Stories.html immediately after the h3 heading Tane Mahuta separates Rangi and Papa.
Listing 1
<figure> <img src="Tane%20separates%20rangi%20and%20papa.jpg" alt="Lying on his back and his face straining with the effort Tane uses his legs to push Rangi into the sky"> <figcaption>The beginning of the Maori creation story</figcaption></figure><a href="Transcript%20Tane%20separates%20Ranig%20and%20Papa.html">Further details of the image</a><a id="CreationReturnFromTRP"></a>
The image and its caption is enclosed in a <figure></figure> block, which spans lines 1 - 4.
At line 2 we specify the image itself: the src attribute specifies the image's name and where the image is located. The alt attribute appears in the code but will not appear on the web page itself under normal circumstances. However it will be read out by a screen reader or will be printed on the page itself if the browser cannot locate the image.
It is recommended that the value of the alt attribute should be less than 250 characters. This is the reason a longer description is required if the image requires a long detailed description. This long description or transcript should be either integrated with the main text or else put into a transcript.
Line 3 specifies the caption of the image. Notice that the description in the alt attribute and that in the caption complement each other. The alt text tells us what is happening in the picture and the caption puts those events in the context of the bigger picture.
Line 5 is for those who want a more comprehensive information on the image It is a hyperlink to another html page, Transcript Tane separates Rangi and Papa.html. This is a separate web page that only contains a more detailed description of the image. Its name is for the convenience of the developers. It simply signifies that it is a transcript that describes the image of Tane separating Rangi and Papa. It can be accessed from the hyperlink specified in the href attribute.
Listing 2 below is the HTML code for the page that contains the transcript for the description the image shown in Fig 1 above.
Listing 2
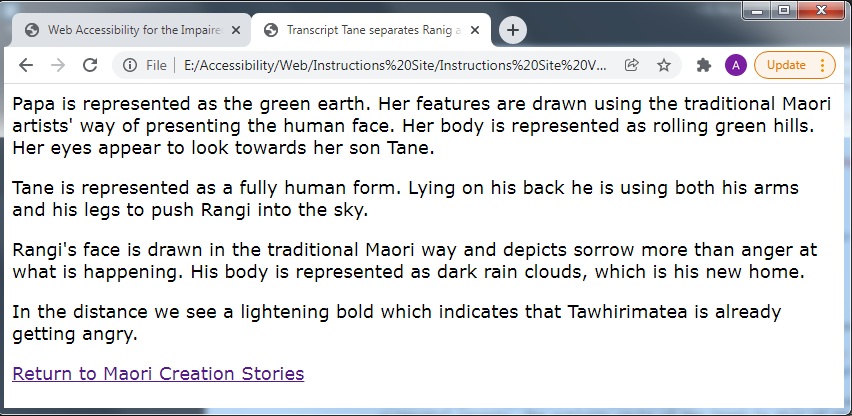
<html lang="en"> <head> </head> <body> <p>Papa is represented as the green earth. Her features are drawn using the traditional Maori artists' way of presenting the human face. Her body is represented as rolling green hills. Her eyes appear to look towards her son Tane.</p> <p>Tane is represented as a fully human form. Lying on his back he is using both his arms and his legs to push Rangi into the sky.</p> <p>Rangi's face is drawn in the traditional Maori way and depicts sorrow more than anger at what is happening. His body is represented as dark rain clouds, which is his new home.</p> <p>In the distance we see a lightening bold which indicates that Tawhirimatea is already getting angry.</p> <a href="Maori%20Creation%20Stories.html#CreationReturnFromTRP">Return to Maori Creation Stories</a> </body></html>
Refreshing the page will now show it as below.
Fig 2: The image along with its caption and a link to the long description.
Here we can see the image and its caption. We cannot see the <alt> attribute's value; this will only be read out by the screen reader. The next item, however, is a hyperlink that should take us to the transcript file. This is the hyperlink that is shown coded in line 5 of Listing 1.
The file that it links to is that which is coded in Listing 2 above. In a browser it looks as in Fig 3 below.
Fig 3: The long description page
This file has no formatting; it only contains text, which a screen reader would call out to the user. The very last item is a hyperlink with a very helpful and meaningful text indicating that this hyperlink will take us back to the Creation Stories page. The hyperlink text is reproduced below.
<a href="Maori%20Creation%20Stories.html#CreationReturnFromTRP">Return to Maori Creation Stories</a>
This code is telling us to move back to the page Maori Creation Stories.html. The additional #CreationReturnFromTRP tells us that when we get to that file to move to the anchor #CreationReturnFromTRP. (This strange sounding anchor name decodes to 'Return to the Maori Creation Stories' from Tane/Rangi/Papa, i.e. the transcript file.) This anchor was created at line 6 of Listing 1. It directly follows line 5 in the same listing which is a hyperlink which passes control to the 'Transcript Tane separates Rangi and Papa.html'.
By using those two hyperlinks we have avoided a keyboard trap when switching back and forth between the files Maori Creation Stories.html and Transcript Tane separates Rangi and Papa.html.
This demonstrates a screen reader being used to get audio information about a static image
In the above video we see the actions of an NVDA user as they extract data about a static image from the value of the image's alt attribute, from the image's caption and from a separate transcript file, which the user manages to link with. On being finished with the transcript file they can make their way back to the original file and continue reading where they left off.
The activities shown in the video is an example of providing text alternatives for images. This complies with WCAG'.'s criterion 1.1.1 regarding having a text alternative for an image that serves the same purpose as the image itself.
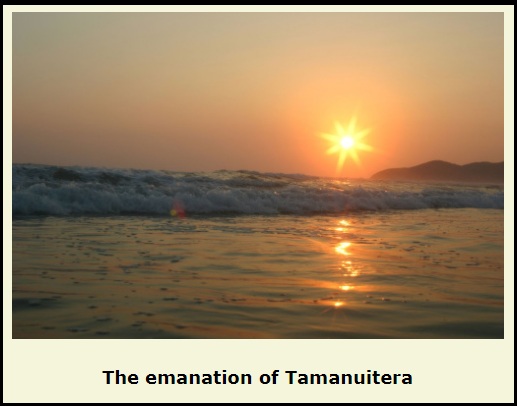
In the article Gods of the Maori Pantheon we give the greatest space to Tamanuitera, the sun god. So we need to give him a picture.
Instead of a drawing or a carving we shall give him a photograph of the setting sun.
We need to give him an alt value, otherwise the screen readers will ignore the image and just call out the caption in isolation, thus confusing the user.
We give the alt a value of "The setting sun" in line 2 above. We give the caption a value of "The emanation of Tamanuitera". This should result in the screen reader calling out "Image the setting sun, the emanation of Tamanuitera" - the alt and the caption complementing each other.
Fig 4: Our image showing only the caption.Go to top
Integration with main text
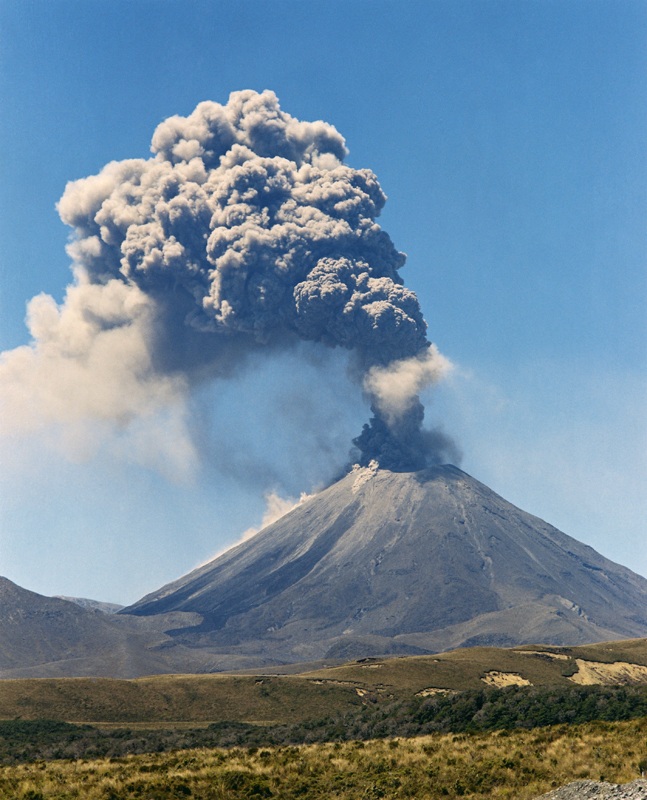
Fig 5: Ruamoko moving: Ngauruhoe erupting
The above image and its caption have been taken directly from the Creation Stories web page. Since the image content has no direct divine or human connection the title is sufficient explanation for anyone familiar with the Maori creation stories. For someone who is unfamiliar with those stories, however a discussion is woven into the text. The entire text block is shown below. The portion that relates to the image is shown in bold text.
Ruamoko was the youngest of the children of Rangi and Papa. He was also known as Ruaimokoroa.
At the time of their separation by Tane Mahuta, Ruamoko was still at his mother's breast.
To ameliorate their mother’s sorrow from having to look up continuously at Rangi, her children turned her face downwards. Ruamoko was therefore buried in the earth.
To keep them warm their children gave Papa fire from under the earth. Because of this Ruamoko became the god of the volcanoes. Also the earthquakes are supposed to be caused by Ruamoko moving around beneath the earth
Since Ruamoko has always been underneath his mother in the earth, images of him don't make sense. He is therefore represented here in one of his spectacular emanations: Ngauruhoe in eruption.
Decorative images don't need an alt attribute. Neither do they need a caption. Some people maintain we should not use them at all! To be fair to them decorative images, as well as being pretty, can also be useful.
We mentioned earlier that images can be used to break up blocks of text. To continue with the theme of the website we are building we shall use a Kowhaiwhai image to act as separator between the <article> blocks.
Fig 6: Kowhaiwhai
Our image is shown above.
We could separate our paragraphs by importing any number of copies of the above image, ensure that it had an alt = "" attribute and that it had no caption. It could be resized and styled as much as we liked .. and it would be an incredibly inefficient way of working. The best policy is to use CSS.
In the listing above we are using a CSS file to specify the formatting of a <div> opbject. Lines 1 - 5 should be familiar so we will concentrate on the last three lines.
Line 6 specifies the image Kowhaiwhai.png as being the background image for the div block.
Line 7 specifies that the image will be "contained" within the div block. What this means is that if the image is wider than the div block then the image will be shrunk proportionally to fit the width of the block. If the height of the image is less than that of the block the height of the block will be shrunk to fit that of the image.
Listing 4 below shows how we implement the CSS code in Listing 4 in order to have an image in our HTML file
Listing 5
<html> <head> <link href="Colours.css" rel="stylesheet" type="text/css"> <link href="TextFormatting.css" rel="stylesheet" type="text/css"> <link href="Images.css" rel="stylesheet" type="text/css"> <link href="Tables.css" rel="stylesheet" type="text/css"> </head> <body> <main> <article> <h3>Header of Article 1</h3> <p>This is the text for Article 1This is the text for Article 1This is the text for Article 1This is the text for Article 1This is the text for Article 1This is the text for Article 1This is the text for Article 1This is the text for Article 1This is the text for Article 1This is the text for Article 1</p> <div></div> </article> <article> <h3>Header of Article 2</h3> <p>This is the text for Article 2This is the text for Article 2This is the text for Article 2This is the text for Article 2This is the text for Article 2This is the text for Article 2This is the text for Article 2This is the text for Article 2This is the text for Article 2This is the text for Article 2</p> <div></div> </article> <article> <h3>Header of Article 3</h3> <p>This is the text for Article 3This is the text for Article 3This is the text for Article 3This is the text for Article 3This is the text for Article 3This is the text for Article 3This is the text for Article 3This is the text for Article 3This is the text for Article 3This is the text for Article 3</p> <div></div> </article> <article> <h3>Header of Article 4</h3> <p>This is the text for Article 4This is the text for Article 4This is the text for Article 4This is the text for Article 4This is the text for Article 4This is the text for Article 4This is the text for Article 4This is the text for Article 4This is the text for Article 4This is the text for Article 4</p> <div></div> </article> </main> </body></html>
The above code is very simple and the only lines there we need to examine are lines 13, 18, 23 and 28. Each one of those four lines have an empty div object. Being empty screen readers will ignore it. Since it contains no data it normally would not ever be visible on the screen. However in the CSS file shown in Listing 3 above we formatted the div object to have the image 'Kowhaiwhai.png' as a background image. Thus whenever the browser sees an empty div object it will display it along with its background image.
Fig 7: The <article> blocks separated by a Kowhaiwhai design
Above we see how the browser renders the Kowhaiwhai image. Since the image is defined within a CSS definition it is not regarded as part of the html file. This is the reason that the screen readers don't see it. These images, however, are very useful for breaking up large blocks of text and therefore a great help to those with cognitive impairments.
We have stated earlier that images can help people with cognitive or neurological impairments orient themselves in a block of text. We have just seen that decorative images can be used to visually separate the contents of different article blocks. Here we shall quickly look at images that are informative in their own right but also double up as separators within a single story.
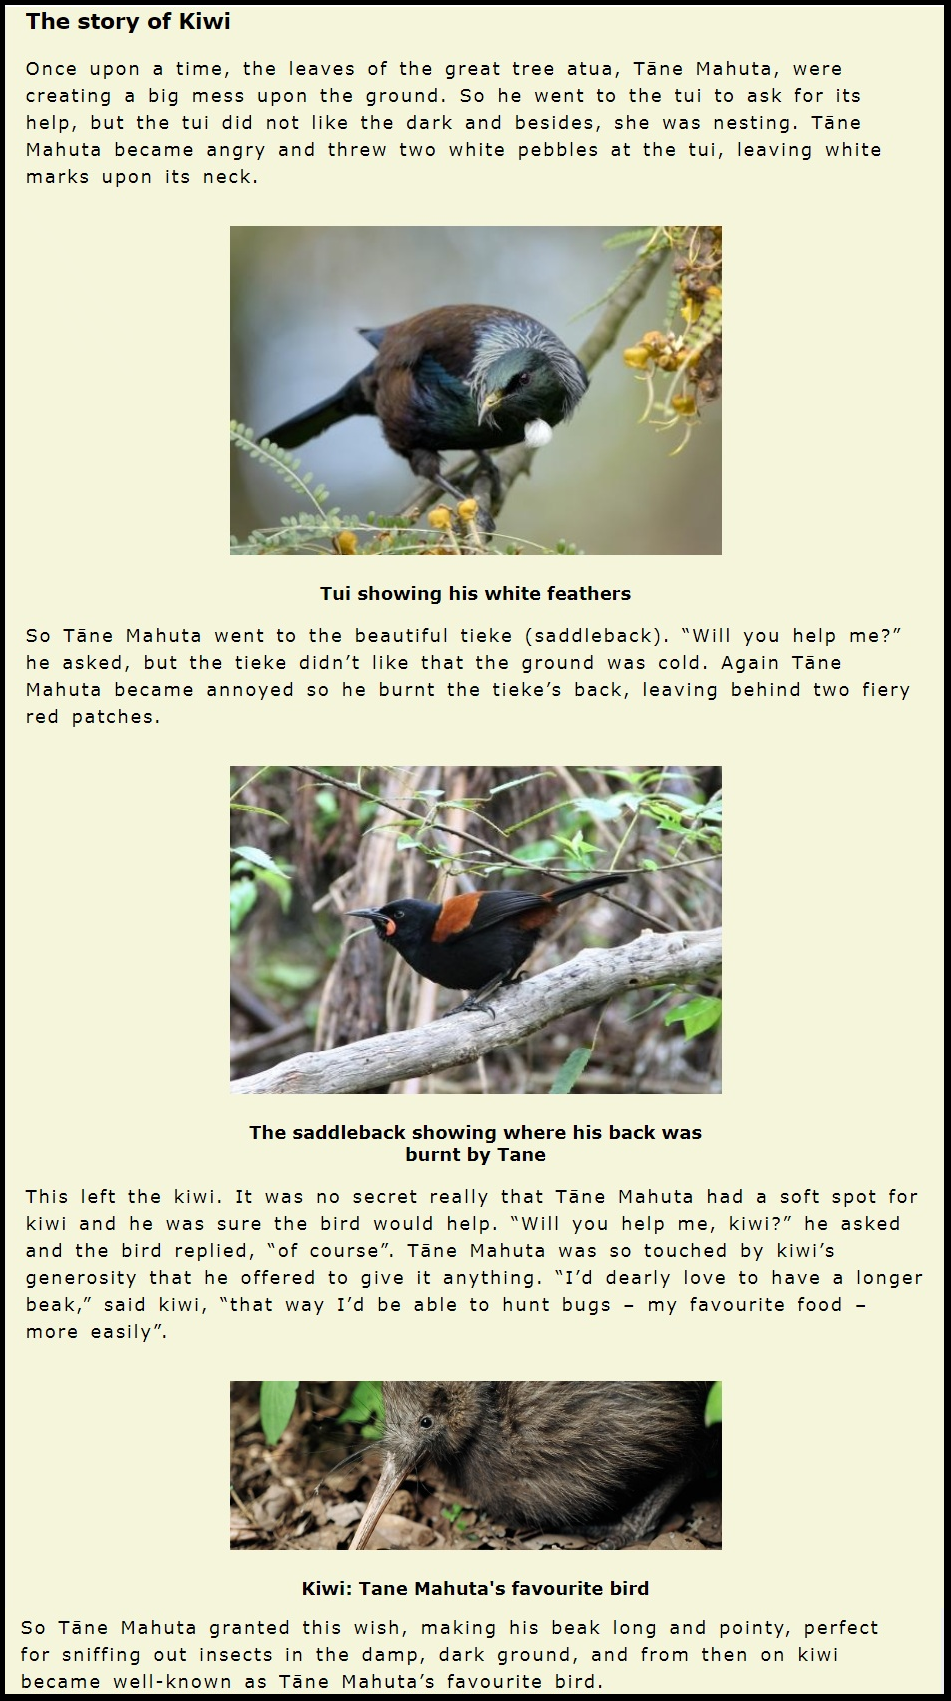
Fig 8: A story of Tane Mahuta and three birds
The above image is a screenshot of a web page which contains a story about Tane Mahuta and three birds: a tui, a saddleback and a kiwi. Tane engages with the birds in this order. Looking at Fig 8 above we see that there are three images of birds which are a tui, a saddleback and a kiwi.
Here each image illustrates the bird being referred to in the text. In this way it helps the reader engage with the same text.
Looking at the text block as a whole, the three images break up the text, thus making it less intimidating to the reader. This is an example where images are both assistive and informative.
1.1.1 A text alternative that serves the equivalent purpose
We have provided both an alt value to give a short description of an image and a longer description of the same image which is stored on a separate page and accessed through a hyperlink.
We are able to link from the main page to the page that contains the transcript for the image 'Tane Mahuta separates Rangi and Papa' and return back again to the main page. This link provides more information on the keyboard trap.
Informative images support and augment the accompanying text. Blind people, however, can't see them. For this reason text alternatives must be provided for those images. These alternatives can be one or more of the following:
alt text
caption
transcript
a combination of the above
Assistive images are inserted into long blocks of text. This is in order to break up those large blocks, thus making them less intimidating to the user. Assistive images come into their own if they can also complement or enhance the text they are inserted into.
Strictly speaking purely decorative images should be avoided. If, however, they can be used as visual landmarks then they also perform the extra function of assistive images. Examples of images that are both decorative and assistive include the Kowhaiwhai image we discussed in this page and the blue leaf image that we use to separate articles on the pages in this website.
In this assignment, you will explore the various principles and practices of integrating images into web pages to ensure accessibility for all users. Drawing from the provided content, demonstrate your comprehension of the following concepts:
Start by explaining the role of images in web pages. Discuss how images can serve as informative, assistive, or decorative elements, and describe how each type benefits different user groups. Ensure your discussion highlights the value of text alternatives such as the alt attribute, captions, and transcripts for improving accessibility.
Delve into specific techniques for implementing accessible images. Use examples from the material to illustrate how the alt attribute and captions complement each other to provide a cohesive understanding of an image's purpose. Highlight cases where additional transcripts or integration with the main text are necessary to provide detailed descriptions for complex visuals.
Discuss the use of decorative images, including when and how they should be implemented using CSS. Explain the rationale for assigning an empty alt attribute to purely decorative images and the benefits of using CSS for efficient design and accessibility compliance.
Analyze the examples of assistive images provided. Discuss how such images break up large blocks of text to aid users with cognitive impairments. Reflect on the dual role of some images that act as both informative and assistive elements.
Evaluate how the examples given comply with the WCAG Success Criteria, specifically regarding text alternatives (criterion 1.1.1) and avoiding keyboard traps (criterion 2.1.2). Provide your interpretation of why these practices are essential for accessibility.
Conclude your narrative by summarizing the importance of accessible images in web design. Include suggestions for best practices that align with the principles described, emphasizing the role of accessibility in creating inclusive web experiences.
Your submission should be a detailed narrative that demonstrates your understanding of the material. Support your explanations with references to specific examples from the provided content, ensuring clarity and coherence throughout your discussion.