Sequence is the most basic concept of programming. It involves performing a series of actions one after the other. All actions must be performed from beginning to end and no action or actions can be skipped. As sequence is the first concept that the students are to learn, misconceptions about it could cause problems learning other concepts later on, and thus the idea that all lines are executed and that they are never executed simultaneously must be made clear to the students.(Sorva, 2018) Thus the lessons on this page are designed to make it clear to the students that the computer executes each command one after the other from top to bottom and that at any time only one command is being executed
We shall be using a notional machine in order to consolidate these concepts.
For our first example of a sequence we shall get the robot to trace out the perimeter of a square. This will involve eight actions as follows:
The above set is a series of instructions in normal everyday English. They list the actions we require the robot to perform. Each pair of instructions is identical to the other pairs, and therefore swapping pairs around would make no difference.
On the other hand if we put all of the Move commands together, followed by the Turn commands then the robot would move forward 240 cm and then do a series of four 90o turns, which means it would end up pointing in the same direction as at the start. Not exactly what we want.
When you start up the on-line editor for EdPy, it automatically adds the lines 1 to 5. The rest of the code is typed in by the programmer. Of the code that has been automatically entered only line 3 should be explained to the students i.e. that distances in EdPy are calculated in centimeters, thus directly corresponding with the distances of Algorithm 1. The user-entered code in lines 6 to 13 is directly based on Algorithm 1.
Since lines 1 to 5 are always added automatically be the editor, in order to save space, we shall not include them in any of our listings for the rest of this course, but they will always appear in the actual code in the EdPy editor. Thus Listing 2 below is the same as Listing 1, except that the first five lines are missing. We shall follow the same convention with all of the other listings.
At line 1 the English command Move Forward at medium speed for 50 cm translates to Ed.Drive(Ed.FORWARD, Ed.SPEED_4, 50)
In EdPy any movement of the robot is specified by Ed.Drive(), so on its own it is simply saying ‘move the robot’. But how are we going to move it? The first item inside the brackets is Ed.FORWARD, which clearly means ‘move forward’ thus corresponding to the first command in Algorithm 1.
The robot, however wants to know how fast it is to move. We can give it any value from Ed.SPEED_1, which is very slow, to Ed.SPEED_10 which is very fast. In our case we will aim at medium speed with Ed.SPEED_4.
The final item we need to specify is the distance it is to move. In this case 50 means 50 centimeters.
Line 2 is where we tell the robot to make a left turn. Since turning involves moving we have to use Ed.Drive(). Now we have to describe how it is to move, which in this case is Ed.SPIN_LEFT. We will allow it to spin at medium level by specifying Ed.SPEED_4. Finally we specify the turning angle, which in this case is 90 degrees
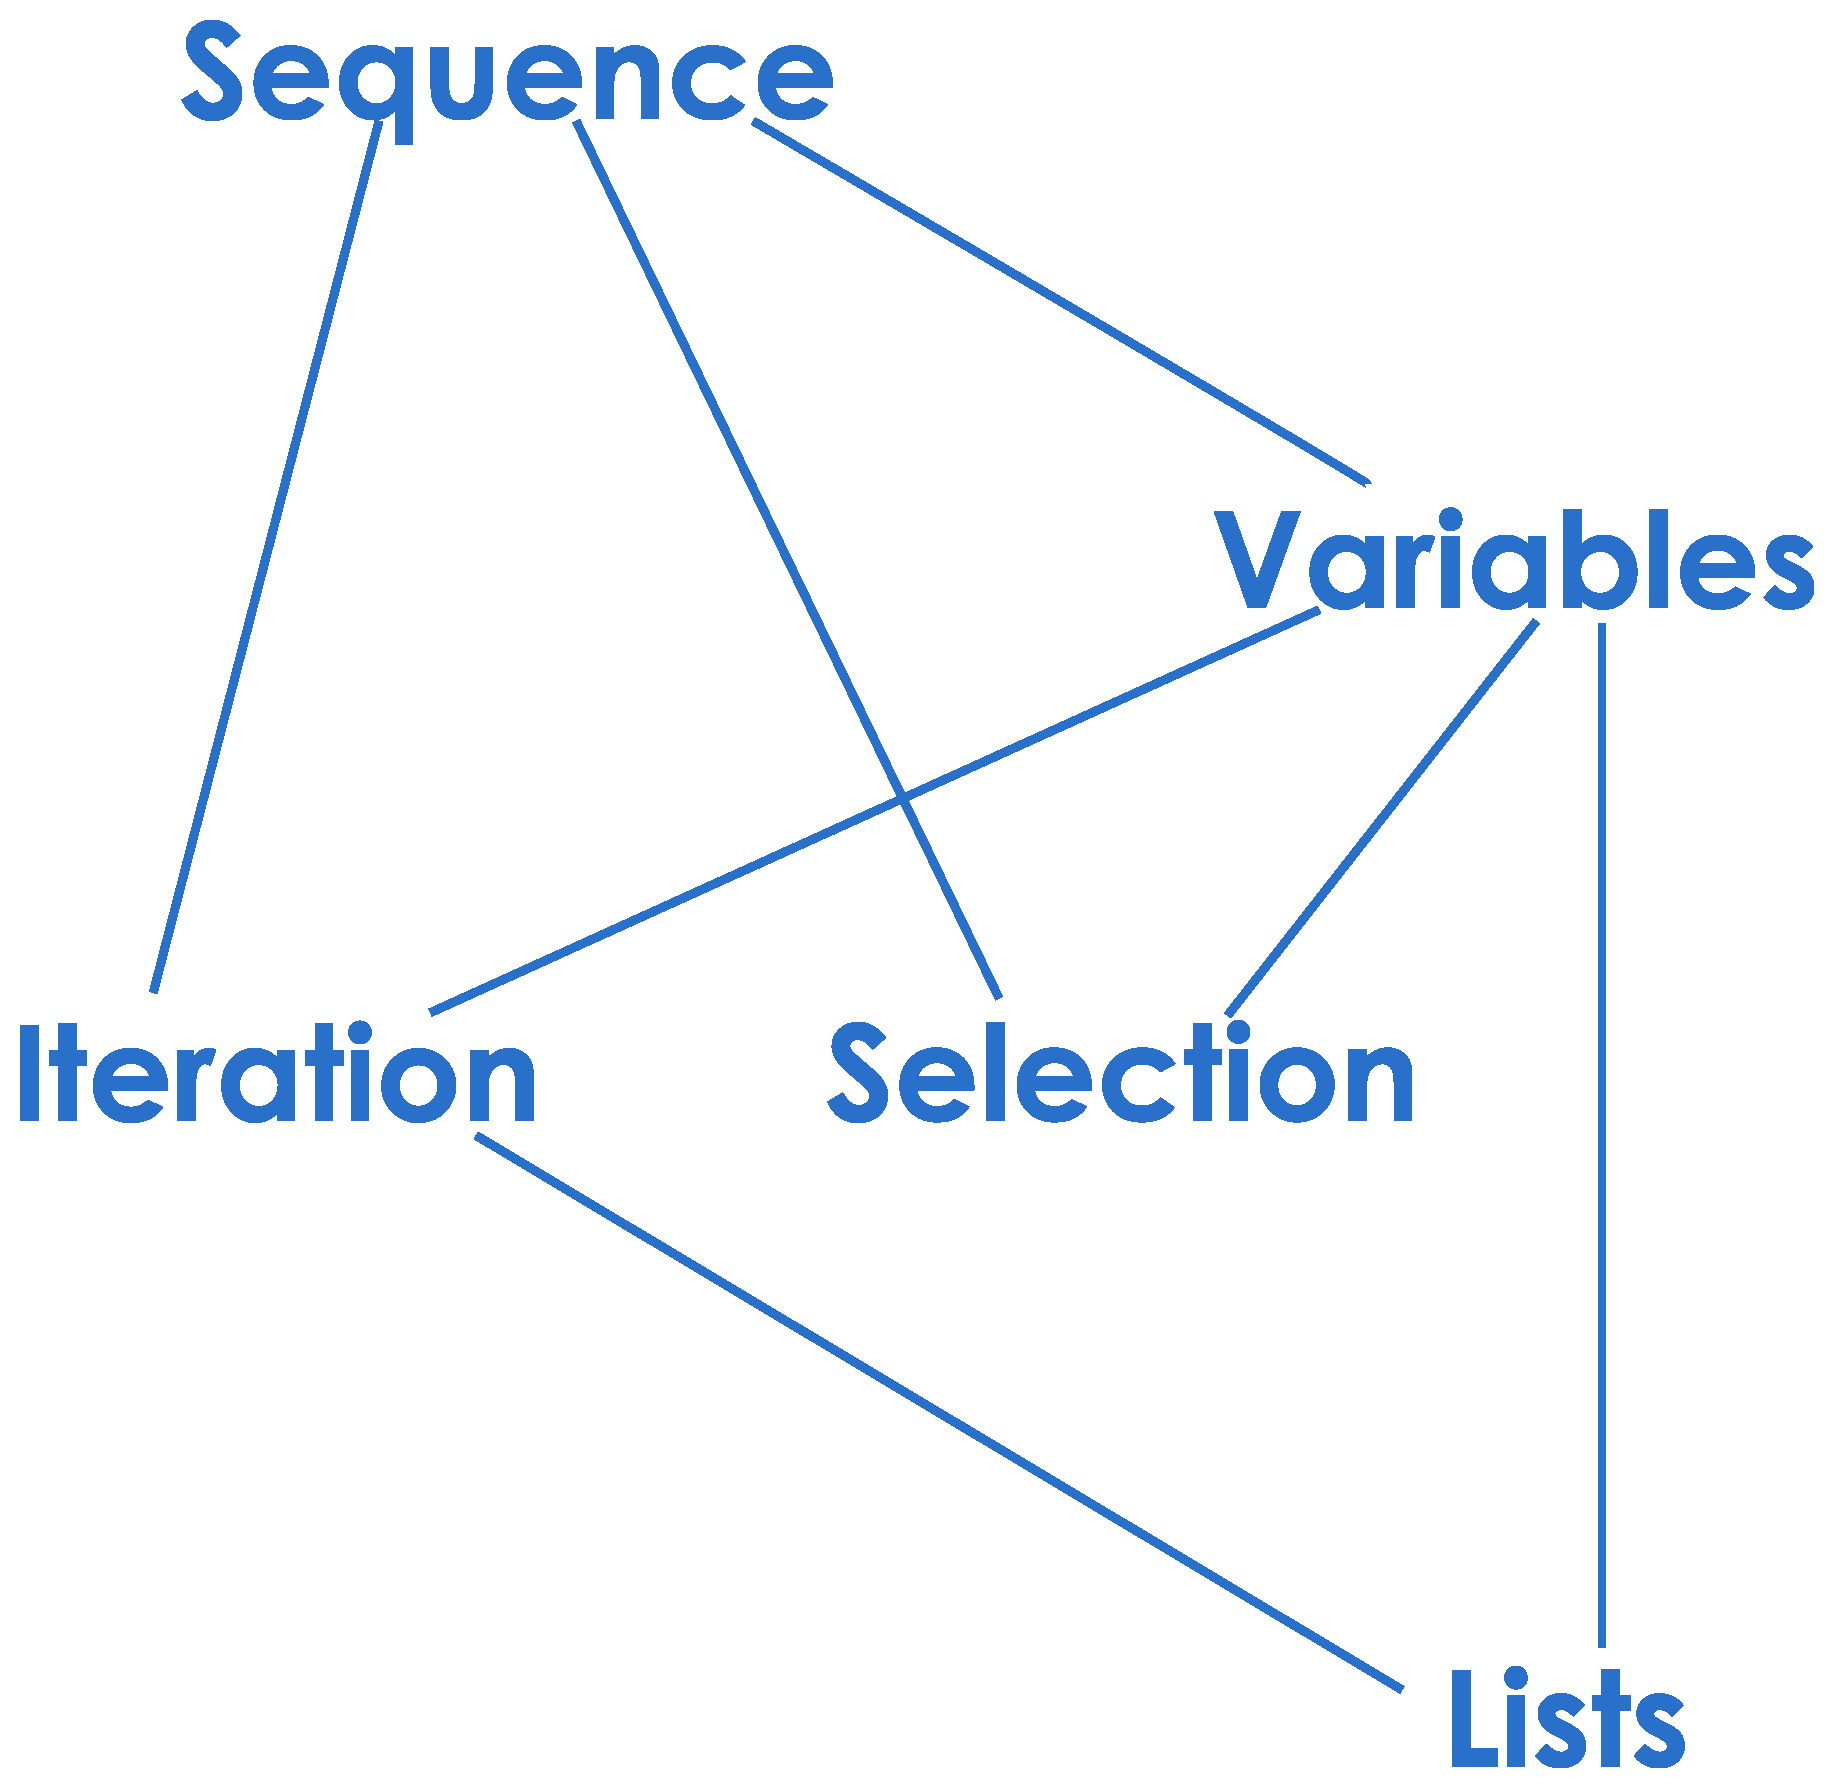
This is the first lesson in which most of the students may have encountered programming or any of the concepts that embody that discipline. Programming concepts are tightly integrated as shown in the illustration below.
Here we can see that the concept of Sequence is closely related to Iteration and Selection. This means that a student who has not fully comprehended Sequence will find the more complex concepts of Iteration and Selection more difficult to grasp. Difficulty in comprehending those concepts will further increase the difficulty of grasping other concepts of programming, thus leading to a downward spiral in the student’s achievement.
On the other hand a student who has fully comprehended the first concept learnt – Sequence in this case – will find each subsequent concept easier to master, thus creating an upward spiral in his or her achievement (Robins, 2010).
Based on this it is vitally important that every possible effort is made to ensure that from the very first lesson the students have fully grasped the contents of that lesson before moving on to the next and that this scaffolding is applied rigorously throughout the course (Robins, 2010).
Class Setup: Robots and their attendant computers should be ready and turned on and Code Example 1 should be loaded on each computer. In this case two students per computer – and therefore per robot. Each pair of students should be given a copy of Algorithm 1. Its text is straightforward enough that only minimum explanation is needed. Its purpose, however, which is a plan or design for making the robot perform certain actions should be pointed out.
Unplugged Activity: Once students are familiar with Algorithm 1 they should leave their desks and find an open space where they could act out themselves the commands it contains. (Assembly hall, corridors, playing fields and other spaces may need to be utilised here.) One member of each pair plays the part of the programme and calls out the instructions one by one while the other plays the robot and therefore obeys each instruction. They then can swap roles. This activity should take about 10 minutes.
Run through of code: Once back at their desks students should be guided to compare the eight commands in Algorithm 1 with the code in either Listing 1 or Listing 2. Regarding the two listings the code inserted automatically by the editor should be ignored and only the eight commands entered by the programmer. The reason for this is that the code entered by the editor uses high-level concepts that are yet unfamiliar to the students and therefore would be a distraction at best but could also be demotivating. For this reason they should be told to ignore it, and instead concentrate on the eight lines of code entered by the programmer.
As there is a very strong one-to-one correspondence between the algorithm and the program code it should be easy to explain to the students what the programme commands are doing.
Enter the code: Students should have a hard copy of the code and should copy it into the online whatever . This copying is important for a number of reasons:
They will get accustomed to the online SDK
They will get accustomed to the intellisense of the online editor
Typing errors will start them on the process of debugging
Running the code: Once the students show comprehension of the code they should then download the code into the robots and run it, followed by comment on whether or not the robot’s movements correspond with the programme’s commands.
Tinkering: Students should now be allowed to play with the worked example code. This could involve changing the lengths of some of the distances so that the robot draws shapes such as rectangles of various lengths, removing some lines so that it draws triangles or changing the turning angles so that open shapes are created.
For each type of shape students should first determine the shape’s proportions and then alter the code accordingly.
Tracing: This is a pedagogical practice that allows students to analyse the line by line execution of a program. It is generally used to trace values of variables within a program, hence its name, but here we shall use it to allow students to describe in English terms what each line of the program is doing.
The above video allows the learner to form a mental model of the program and should be shown once they have entered the code correctly and tried it out.
In this lesson we continue with the concept of Sequence where we concentrate on emphasising the importance of placing each command in the correct sequence. We will still make the robot describe the perimeter of a square, before starting its journey and after finishing appropriate starting and finishing sounds will be played. Also after each movement of the robot a different sound will be played. Our algorithm is below.
This programme is simply an extension of its predecessor, with extra code added for producing musical notes. If you check the line pairs 5, 6; 11, 12; 17, 18; 23, 24 you will notice that they are the same as the first example.
Apart from showcasing Edison’s ability to produce music, the primary purpose of this example is to consolidate the idea of correct sequencing. To do this we shall get the robot to play the notes doh, re, mi, fo, so, la, ti, doh as it makes its way around the perimeter of the square. As there are eight notes and only four stages of the journey we shall play two notes at the start of each stage.
To play a note EdPy uses the function PlayTone(). For this function we supply the note to be played and the duration.
Line 1 plays middle C – doh in this case by calling PlayTone() and giving it the values NOTE_C_7 and the duration which is NOTE_HALF.
We have to halt the programme until the note is played. To do this we use the function TimeWait(). Again we give this two values – in our case 1500 and TIME_MILLISECONDS. As you can guess we are counting time in milliseconds and therefore 1500 milliseconds is the same as 1.5 seconds. Thus line 2 halts the programme for 1.5 seconds in order to give the note time to play.
Line 3 plays the note D and in a similar manner to line 1 except that it uses NOTE_D_7, while line 4 halts the programme in order to give it time to play. If you check the other command lines that use PlayTone() you will see that the character between the underscores is the name of the note.
Apart from consolidating how an Edison robot moves and turns and introducing music into its repertoire the goal of this exercise is to emphasise the importance of correct sequencing of the programming commands. In this case, if we are to move up through the notes of one octave the commands for playing them must be placed in the correct order in the program.
Students must have clear understanding of the concept of sequence especially the fact that each command line is executed fully before moving on to the next one. Another aspect they must be made aware of is that the order commands are placed in a sequence is important, which was the main goal of the program we have just looked at. Consolidation exercises should look at reinforcing those ideas.
The image above shows some possible exercises, where a programme traces out the shape of a letter of the alphabet – one letter per programme for the moment. If you can attach a marker pen to the robot, all the better. These exercises would a number of benefits:
They would consolidate the fact that the order of command statements in a programme is important
Tracing the shape of each letter requires planning using pencil ruler, protractor and paper, i.e demonstrates necessity of using algorithms.
They would provide an opportunity to liaise with the Mathematics department regarding geometry – measurements, angles etc.
Liaising with Hard Materials to modify the robots in order to be able to place a pen halfway between the wheels.
Sequence is the most basic concept in programming. It involves performing actions one after the other. The robot in Algorithm 1 is instructed to trace the perimeter of a square. The “Move” and “Turn” commands must be placed in the correct sequence to achieve the desired outcome. The EdPy code examples demonstrate how to control the robot’s movement. The default speed used in the examples is Ed.SPEED_4. Sequence is closely related to iteration and selection. Scaffolding is essential to ensure students fully understand each concept before moving on.
Design an algorithm for a robot to trace the perimeter of a triangle. Write the EdPy code for the algorithm and test it on the robot. Include sound cues at the start and end of the journey, and after each movement.
Programming Assignment: Understanding Sequence
This assignment focuses on the fundamental concept of sequence in programming. Sequence is the foundation upon which other programming concepts such as iteration and selection are built. It is critical to understand that sequence involves executing commands one after the other in a specific order. Through this assignment, students will gain hands-on experience with sequence and develop a deeper understanding of its importance.
The assignment is divided into several tasks that guide students from understanding basic algorithms to implementing them in code. The tasks involve both physical and digital activities, ensuring a comprehensive grasp of the concept. By the end of the assignment, students will have built a strong foundation for tackling more advanced programming topics.
Task 1: Acting Out an Algorithm
Begin by understanding an example algorithm designed to move a robot around the perimeter of a square. This algorithm includes a series of steps such as:
Move forward 50 cm
Turn left 90 degrees
Repeat until the square is completed
Students should pair up and act out the algorithm in an open space. One student plays the role of the programmer, calling out commands, while the other acts as the robot, following the instructions. Afterward, switch roles and repeat the activity.
Task 2: Translating the Algorithm into Code
Using the EdPy programming environment, students will translate the algorithm into code. Copy the provided code template into the editor, ensuring all syntax is correct:
Ed.Drive(Ed.FORWARD, Ed.SPEED_4, 50)
Ed.Drive(Ed.SPIN_LEFT, Ed.SPEED_4, 90)
Students should debug any errors and test the program by uploading it to their robot. Observe whether the robot correctly traces the square's perimeter and make adjustments if necessary.
Task 3: Adding Creative Variations
Students will now modify the original code to create different shapes, such as rectangles or triangles. They should:
Change the distances to alter the lengths of the sides.
Adjust the turning angles to create new shapes.
Test each modification and observe the robot’s behavior.
Document all changes and explain how they impact the robot's movements.
Task 4: Integrating Sound Cues
Extend the code by adding sound cues at specific points in the sequence. Use the Ed.PlayTone() and Ed.TimeWait() functions to play musical notes before and after movements. For example:
Play a starting tone before the first movement.
Play different tones after each turn.
Ensure that the sequence of sounds aligns with the robot's actions. Reflect on how these additions emphasize the importance of proper sequencing.
Task 5: Creative Exercises
For further practice, students will design new algorithms to create letters of the alphabet using the robot. These exercises involve:
Planning the letter’s shape with pencil, ruler, and protractor.
Writing the algorithm and translating it into EdPy code.
Testing and refining the code to ensure accuracy.
If possible, attach a marker to the robot and have it trace the letter on paper.
Submission Requirements
Submit the following for this assignment:
A brief report explaining the algorithms and code used for each task.
Photos or videos of the robot performing the tasks.
Reflections on what was learned about sequence and its importance.
Grading Criteria
The assignment will be graded based on the following:
Completeness and accuracy of the tasks.
Creativity in modifying and extending the code.
Clarity and thoughtfulness in the submitted report.