The Cambridge English Dictionary defines the word 'Iteration' as the process of doing something again and again, while Dictionary.com defines it as 'the act of repeating'. Merriam-Webster defines it as 'the repetition of a sequence of computer instructions a specified number of times or until a condition is met'
From those definitions we can surmise that iteration means doing something over and over, while the last definition, i.e. repeating a computer instruction over and over a number of times or until a condition is met is exactly how we shall be using the Iteration here.
The concept of Iteration is a big step-up in complexity from the simpler concepts of Sequence and Variables that we have encountered up until now, thus providing a high cognitive load for the learners. For this reason we must do our utmost to reduce the extraneous load.
Apart from using notional machines, tracing tables and line-by-line description of the code we also have to introduce the concept of Iteration through examples already familiar to the learners. Thus Listing 1 below is a copy of Listing 2 on the page Sequence and we use its inefficient method continuously repeating line pairs as a means of introducing the concept of the more efficient and more versatile for loop. Similarly Listing 2 below, which is a copy of Listing 3 on the page Variables, helps us to introduce the concept of Variables into the for loop.
Once the learners are familiar with the for loop, and therefore with the basics of iteration, they can then be introduced to the more efficient while loop.
We started our lessons with Listing 1. We used it to introduce the concept of Sequence, i.e. that one program line follows another in a top-to-bottom order, and that no line starts until the previous one finishes execution. In order to further emphasise the concept of sequence we added sound cues between each move/turn line pairs.
Listing 2: Commands for updating the value of the variable inserted after each move/turn line pair.
When we began studying variables, again we used Listing 1 as our starting point and added commands for updating the variable between the move/turn line pairs, as shown in Listing 2.
It should now be clear that if we wished for the robot to do more and more move/turns we would add more and more line pairs to Listing 1 or more and more groups of three lines to Listing 2.
But what if we wanted the robot to keep going indefinitely? How many extra line groups would we need to add to either Listing 1 or Listing 2? Welcome to for loops!
In Listing 1 if we examine the line pairs 1, 2; 3, 4; 5, 6; 7, 8; we find that all the line pairs are identical to each other. Whether writing a program or ordinary English, repeating the same group of lines or the same sentence indefinitely is not a good idea. So what do we do with Listing 1 if we wish to avoid writing multiple copies of the line groups? We write a program that repeats the line groups as often as we require. The algorithm for this is shown below.
This algorithm converts to the following EdPy code:
Listing 3: A for loop version of the code shown in Listing 1
                            for loopCounter in range(4):
                                Ed.Drive(Ed.FORWARD, Ed.SPEED_4, 50)
                                Ed.Drive(Ed.SPIN_LEFT, Ed.SPEED_4, 90)
Lines 1 to 3 of Listing 3 implement Algorithm 1 above, with only some changes in wording. At line 1 the keyword for indicates that we have a for loop. The next word, loopCounter, is a variable. We have named it loopCounter here because it keeps count of how many times the next two lines are repeated. The rest of the line, in range(4), means that the variable loopCounter will start at the value zero and count up as far as 3. It will not actually get to 4 – that is the upper limit. The different values that will be stored in counter will be 0, 1, 2 and 3.
A run-through for the lines 1 to 3 will be as follows:
The variable loopCounter is initialised to zero at line 1
Line 2 is run, robot moves forward 50cm
Line 3 is run, robot turns left 90 degrees
Line 1 the variable loopCounter is increased to 1
Line 2 is run, robot moves forward 50cm
Line 3 is run, robot turns left 90 degrees
Line 1 the variable loopCounter is increased to 2
Line 2 is run, robot moves forward 50cm
Line 3 is run, robot turns left 90 degrees
Line 1 the variable loopCounter is increased to 3
Line 2 is run, robot moves forward 50cm
Line 3 is run, robot turns left 90 degrees
Line 1 the variable loopCounter is increased to 4. This is the upper limit as specified in the range() and therefore the program will stop
The variable loopCounter is not increased any further because the value 4 is specified as the upper limit. However the lines 2 and 3 have been run four times, which was the purpose of the loop in the first place.
Also notice in Listing 3 that line 1 ends with a semicolon. This indicates that it is the control line for a loop. Also notice that lines 2 and 3 are indented. This indicates that they are the lines that will be repeated four times.
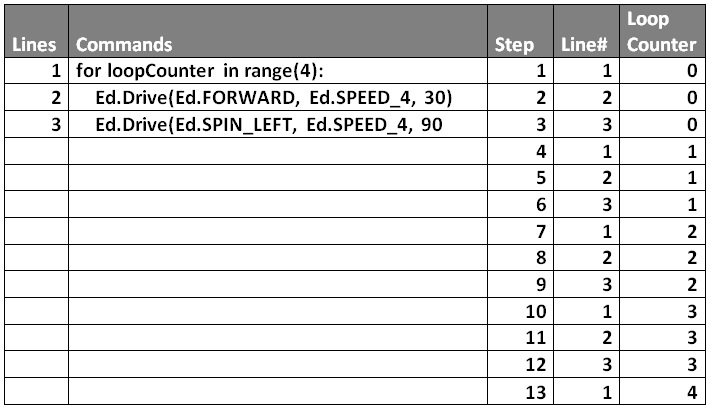
Figure 1: Tracing of the code in Listing 3
After a line-by-line discussion of the code, let us now look at a tracing table for it. This tracing table looks different to the ones we have used for variables. The reason is that in the previous page the program examples ran from top to bottom only once and therefore there were only as many steps in the execution as there were lines in the program. In our current example the three lines of the program are run four times and thus there are 12 steps, hence the reason for the Step column. The Line column is necessary to determine which line of the program is running at each step.
A notional machine that emulates a simple for loop.
As a further means of introducing the concept of a for loop, the video above acts as a notional machine
For loops: Practice Exercise
Exercise 1: Modify Listing 3 by changing the value in range() in line 1 to 3 and the value for the the turning angle in line 3 to 120. Run the program. The robot should come back almost to the starting position, just like it did in the original version of Listing 3.
Exercise 2: Using Figure 1 as an example create a tracing table for Exercise 1 to trace the value of loopCounter.
Exercise 3: Going back to Listing 3, change the value in range to 5 and the value of the turning angle to 72. Does it still finish up close to the starting position?
Now try the following combinations of values for range and turning angle.
Range
Turn
6
60
9
40
10
36
12
30
15
24
For loops: with variables
Now let us look at a more challenging example. Listing 3 above was simply an extension of Listing 1, but using the for loop to repeat the move/turn line groups. Here we shall look at adapting Listing 2 so that we can use the for loop to create a right-angled spiral.
The code based on the algorithm is shown below.
Listing 4: A for loop for creating the square spiral
Below is a line by line explanation of the code and algorithm.
Line 1: the variable movingDistance is created and given a value of 20.
Line 2: the loop starts with loopCounter having a value of 0.
Line 3: the robot is driven forward for a distance of 20cm.
Line 4: the robot turns left at a 90 degree angle.
Line 5: movingDistance is increased to 40
Line 2: the value of loopCounter goes up to 1
Line 3: the robot is driven forward for a distance of 40cm.
Line 4: the robot turns left at a 90 degree angle.
Line 5: movingDistance is increased to 60
Line 2: the value of loopCounter goes up to 2
Line 3: the robot is driven forward for a distance of 60cm.
Line 4: the robot turns left at a 90 degree angle.
Line 5: movingDistance is increased to 80
Line 2: the value of loopCounter goes up to 3
Line 3: the robot is driven forward for a distance of 80cm.
Line 4: the robot turns left at a 90 degree angle.
Line 5: movingDistance is increased to 80
Line 2: the value of loopCounter goes up to 4 - thus stopping the loop
Exercises on for loop
Exercise 4: Create a tracing table to follow the values of the variables movingDistance and loopCounter. Use the tracing table shown in Figure 1 as an example, but in this case you will need an extra column to the right for the extra variable movingDistance.
Exercise 5: Modify Listing 4 so that the variable movingDistance starts at a high value so that the robot moves a long distance the first time. For each iteration of the loop movingDistance is decreased by the same amount. Once the program is working correctly, crate a tracing table like the one you created for Listing 4 and trace the values of both movingDistance and loopCounter.
While Loops
For loops are used whenever we know how many times the loop must iterate. In the examples above we used the for loops to create more efficient versions of the programs we had previously created when studying Sequence and Variables. As those programs moved the robot around four times, the examples in Listing 3 and Listing 4 iterate four times, so the outputs of both set of programs should be identical. Of course, as we have seen in the exercises for loops can iterate as many times as we want them to but we must always specify the number of iterations.
On the other hand there are many times when we don’t know how often the loop must iterate. As an example, when creating a square spiral we may not want our robot to move any longer than 90cm. If this is the case then we would tell the program to iterate while the value of moving distance is less than 90cm. We shall look at how to do this below.
Creating spirals with while loops
Below is an algorithm for using a while loop. It is based on Algorithm 1 on the page Variables as both of them perform exactly the same function..
This algorithm translates to the code shown in Listing 5 below.
As this is our first example of a while loop we shall go through the code in some detail
At Line 1 the variable movingDistance is created and the value of 20 stored in it
At line 2 we meet the keyword while. As always it is followed by a condition. In this case the condition is movingDistance < 90. Since movingDistance currently has a value of 20 then this condition is true and therefore we will enter the body of the loop which consists of lines 3 to 5.
As you know by now lines 3 and 4 move the robot forward by 20cm i.e. the value stored in movingDistance while line 4 makes it do a right hand 90 degrees turn.
Line 5 adds 20 to the value stored in movingDistance, thus making it 40
Control now goes back to line 2 where once again movingDistance is tested for being less than 100. Again it is, so body of loop is entered once again
Lines 3 and 4 move the robot forward 40cm and turn it.
Line 5 adds 20 to movingDistance making it 60
At line 2 the condition again is true and body of loop is entered
Lines 3 and 4 move the robot forward 60cm and turn it.
Line 5 adds 20 to movingDistance making it 80
At line 2 the condition again is true and body of loop is entered
Lines 3 and 4 move the robot forward 80cm and turn it.
Line 5 adds 20 to movingDistance making it 100
At line 2 the condition will now be false since 100 is NOT less than 90. Thus the loop stops
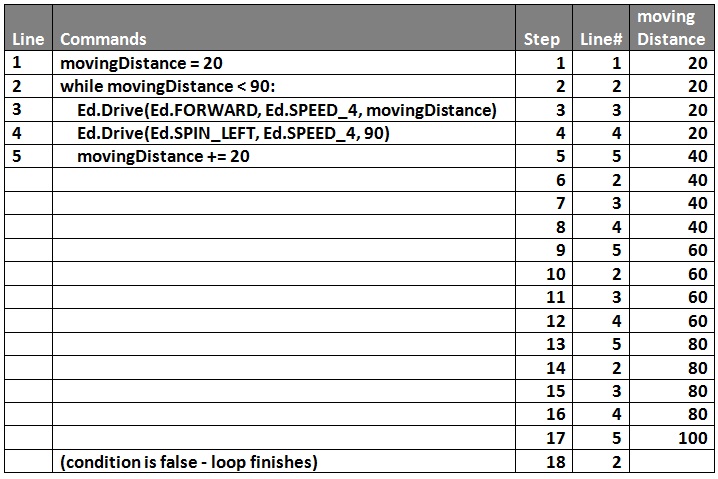
Figure 2: Tracing for the code in Listing 5
While loop: first set of exercises
Exercise 6: For this exercise you are to modify Algorithm 2 and Listing 5. Modify the algorithm so that movingDistance starts with a value of 120. The condition for the while loop will be that movingDistance is greater than 20. At the last line of the loop's body movingDistance is reduced by 30. From the algorithm create the EdPy code and and test it.
Exercise 7: Once the code for Exercise 6 is working correctly, create a line by line description of it as well as a tracing table. Use the description and tracing table for Listing 5 as an example.
Detecting Obstacles
By now you may have the impression that while loops are simply awkward substitutes for for loops. After all the examples you were introduced to above could have used either type of loop. The reason for this is that the cognitive load would be reduced if the introduction to while loops were based on code already familiar to the learners from the for loops.
There are, however, circumstances where we need to use while loops. Recall that we stated above the for loops are used when we know exactly how many iterations the loop is to make. In circumstances where we don't know this we use the while loop. An example of a circumstance where we don't know how many iterations would be required would be where we would want our robot to move in short steps through a room until it detected an obstacle such as a wall or an item of furniture it its path. Once an obstacle was detected then it would either stop or turn aside and continue until it met the next object. Since the distance between the robot and the obstacle would depend on so many factors, knowing how many steps the robot would need to take would be impossible. This is where while loops come into their own.
The Edison robot is fitted with an infra red beam that it uses to detect obstacles. However it is somewhat limited in its capacity to detect the same obstacles. It cannot, for example, measure the distance to an obstacle. However it can be calibrated to detect an obstacle that is within a certain distance from it. Once this calibration is completed, if the robot moves to a point that is within the calibrated distance to the obstacle then the signals from the IR will cause a flag inside the robot to be set to indicate that an obstacle has been detected. The value of this flag is Ed.OBSTACLE_AHEAD
As it stands the flag with the value Ed.OBSTACLE_AHEAD is not of much use to us since it is simply a set of ultra small circuits inside the body of the robot and thus invisible to us. In order to access it we need to use the function Ed.ReadObstacleDetection(). If the robot is within the calibrated distance then Ed.ReadObstacleDetection() will also return a value of Ed.OBSTACLE_AHEAD. If we want our program to work out if an obstacle has been detected then we use one of the following:
if Ed.ReadObstacleDetection() == Ed.OBSTACLE_AHEAD:
or if an obstacle has not been detected then we use
if Ed.ReadObstacleDetection() != Ed.OBSTACLE_AHEAD:
The first can be paraphrased into English as 'if the value returned by the obstacle detection beam is equal to Ed.OBSTACLE_AHEAD', while the second can be paraphrased as 'if the value returned by the obstacle detection beam is NOT equal to equal to Ed.OBSTACLE_AHEAD'
Watch the short video below which provides a notional machine demonstrating how we can determine if the flag for Ed.OBSTACLE_AHEAD has been set.
A video demonstrating Obstacle Detection
For the purpose of the examples we are going to look at below, the robot has been calibrated to detect objects at a distance of 7 cm or closer. For our example of while loops we shall create a simple algorithm that makes the robot move forward in 5cm steps until it detects an object, after which it will stop. The algorithm is the simplest we have created so far - it has only three lines.
The first line here refers to the fact that Edison detects obstacles by emitting two beams of infra red (IR) light and by testing the amount reflected back it can determine if the object that reflected the light back is within the calibrated distance or not.If it is it sets an internal flag to let the program know that an obstacle has been detected. It uses the command Ed.ObstacleDetectionBeam(Ed.ON) to activate the beam
In the second line the function Ed.ReadObstacleDetection() checks the flag that has been set by the reflected light detector. If this is not equivalent to Ed.OBSTACLE_AHEAD, i.e. if no obstacle has been detected then control passes to line 3, where the robot moves forward by 5cm.
Control then passes back to line 1 where the robot checks if it can again detect an object. If it cannot then line 3 is activated, thus moving the robot forward and once more control will return back to line 2.
If the code at line 2 does detect an obstacle the body of the loop, i.e. line 3, is skipped. In this case there is no other lines after line 3 and therefore the program ends.
Our next example is simply an extension of listing 6. Here we look at both sequential lines with an embedded loop and we are also using variables.
The program still involves the robot moving forward in 5cm steps until it detects the obstacle, but on its journey it counts the number of 5cm steps it has taken before detecting the obstacle.
Once it has detected the obstacle it exits the loop, calculates the distance it has traveled by multiplying the number of steps it has traveled by 5 and then reversing by that amount
In Listing 7 we meet a program where a loop is part of a larger program. Lines 1 and 2 and lines 7 and 8 are not part of the loop. Thus lines 1 and 2 will execute before the loop starts and lines 7 and 8 will execute once the loops finishes iterating. The number of times lines 3 to 6 will execute will depend on how far the robot and the obstacle are from each other. Before we start the analysis, however let us assume three things:
the robot moves forward in 5cm steps
the obstacle is 15cm away from the robot
the robot can detect obstacles up to 7cm away
Now let us do a line by line analysis of the program.
At line 1 the obstacle detection beam is turned on. (It is a beam of infra red light and therefore you cannot see it.)
At line 2 the variable RobotSteps is created and its value set to 0. This variable will be used to count how many 5cm steps the robot has taken before detecting the obstacle.
Line 3 is the controller of the loop.We know this for two reasons: the loop ends with a semicolon and the three lines following it, i.e. lines 4, 5, and 6 are indented, thus indicating that they are part of the loop. The other part of line 3 that we must examine is the condition i.e. Ed.ReadObstacleDetection()!=Ed.OBSTACLE_AHEAD. As we stated in the introduction the internal flag is set to Ed.OBSTACLE_AHEAD only if the robot is 7cm or less away from the obstacle. As the obstacle is 15cm away from the robot and as the beam can only detect an object up to 7cm away, the flag cannot be set to Ed.OBSTACLE_AHEAD. Therefore whatever the function Ed.ReadObstacleDetection() is reading it cannot be Ed.OBSTACLE_AHEAD and therefore the condition of the loop is true. For this reason the body of the loop, i.e. lines 4, 5 and 6 will be executed.
The command at line 4 will drive the robot forward five centimeters
At line 5 the function TimeWait() pauses the program for half a second. This line is not strictly necessary, but it is here so that the individual 5cm steps of the robot can be observed.
At line 6 the value of the variable RobotSteps is increased by 1. Since initially it was zero, its new value will be 1.
We have now reached the end of the body of the loop and therefore control of the program will go back to line 3, where once again it tests if the value returned by the function Ed.ReadObstacleDetection() is equal to Ed.OBSTACLE_AHEAD. By now the robot has moved 5cm closer to the obstacle. Since the obstacle detection beam can see a further 7cm ahead, it can only see to 12cm away from the start and thus cannot still see the obstacle. Again the condition at line 3 is still true and thus the body of the loop will be executed once again.
Lines 4 and 5 will make the robot move forward another 5 cm, which means that it will now be 10cm away from the starting point, while line 5 will cause the program to pause for half a second.
At line 6 the variable RobotSteps will again be incremented by 1. Since its previous value was 1, its new value will be 2.
Once again we have reached the end of the loop, and control again returns to line 3 where the condition is again tested. By now the robot will have traveled 10cm from the start and since its beam can see 7cm beyond this means that it can see 17cm from the start. For this reason it can now detect the obstacle and therefore the obstacle detection flag will be set to Ed.OBSTACLE_AHEAD. The loop condition will now be false and so the program will break out of the loop and control will pass to the first line after the body of the loop, i.e. line 7.
At line 7 a new variable is created and given a name ReverseDistance its value will be an expression. The expression is multiplying the value stored in RobotSteps 5. Since the value in RobotSteps is 2, the result of the calculation will be 10. This value is then stored in the newly created variable ReverseDistance.
Finally line 8 will make the robot move backwards for the distance specified in ReverseDistance, i.e. 10cm.
A notional machine for the above program is in the next video below.
A notional machine for the program in Listing 7
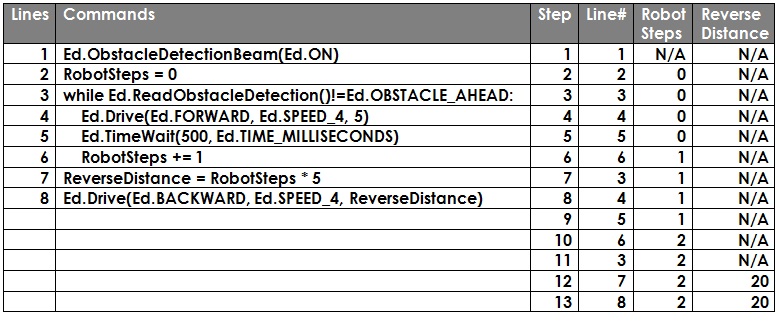
Below is a tracing table for our program
Figure 3
Above we stated that lines 1 and 2 and of Listing 6 would execute before the loop, that the loop itself, i.e. lines 3 to 6, would execute an indefinite number of times and that once finished, lines 7 and 8 would execute, thus finishing off the program
This is borne out by the tracing table. Notice in the Line# column that lines 1 and 2 start first, that lines 3 to 6 are executed twice and that the program finished with lines 7 and 8. Also notice that line 3 is executed three times; at steps 3, 7 and 11. The reason for the extra execution is that once the while loop finishes its second execution, control goes back one more time to line 3, where it finds that the obstacle has been detected. Once this occurs the loop is exited and control passes to line 7.
Exercise 8: Extend the program in Listing 7 so that once the robot has returned to its original position it performs a 90 degree turn to the left and then moves forward 5cm. It does this turn/move forward combination once for each 5cm step it took towards the obstacle. As an example if it took the robot three steps to detect the obstacle then it will do three sets of turn/move forward, thus describing three sides of a square. You will have created a program containing both a for loop and a while loop!
A hint! The code in line 9 of your program will be: for loopCounter in range(RobotSteps):
Exercise 9: Modify listing 7 again so that on detecting the obstacle the robot does not return to its starting position. Instead it makes a right hand turn and then moves again in 5cm steps until it meets the next object, at which point it stops
For exercise 9 are there some variables in the program that you do not need?
So far we have looked at for loops in Listing 3 and Listing 4 above and at while loops in Listing 5 and Listing 6. All of those consisted of programs containing a single loop structure. In Exercise 5 you may have met a program with two different loop structures but they were two separate and independent structures within the same program.
Here we shall look at a program that will have one loop inside the other. For our example we shall again use our robot moving forward until it detects an object. The difference from the previous examples in listing 5 or listing 6 is that once our robot detects an obstacle it will turn away and move onwards again looking for another obstacle. It will repeat this a number of times
We should already be familiar with a robot moving forward in steps until it detects an obstacle. This activity is controlled by a while loop. If this obstacle detection activity is to be repeated four times then it is to be controlled by a for loop.
The algorithm for the application is shown below
The algorithm converts to the code shown below.
Listing 8: A while loop nested inside a for loop
Ed.ObstacleDetectionBeam(Ed.ON)for loopCounter in range(4): while Ed.ReadObstacleDetection()!=Ed.OBSTACLE_AHEAD: Ed.Drive(Ed.FORWARD, Ed.SPEED_4, 5) Ed.TimeWait(500, Ed.TIME_MILLISECONDS) Ed.Drive(Ed.SPIN_LEFT, Ed.SPEED_4, 90)Ed.PlayBeep()
In Listing 8 there are no new syntax introduced; all that is new is the structure of the nested loops and that is what we shall concentrate on.
The for loop spans lines 2 to 6. We can tell this ag a glance since line 2 ends in a semicolon and lines 3 to 6 are indented to the right. Essentially that tells us that lines 3 to 6 will be repeated four times.
Line 3 itself is the start of a while loop. Again this is indicated by the keyword while, the fact that the line ends in a semicolon and that lines 5 and 5 are further indented in relation to line 3. Although we can tell from line 2 that the block of lines 3 to 6 will be repeated four times, we can never tell how many times the while loop will be repeated since that depends on how the different obstacles are positioned in the paths of the robot. So all that we can say about lines 3 to 5 is that on the first iteration of the for loop they will be repeated for as many steps as it takes the robot to detect the first obstacle. On the second iteration again lines 3 to 5 will be repeated for as many steps as it takes the robot to detect the second obstacle. The same will apply to the third and fourth iterations of the for loop.
Notice that line 6 is not part of the while loop because it is not indented to the same depth as lines 4 and 5. Instead it is part of the for loop since it has only one level of indentation. For this reason it will be repeated four times, once for each iteration of the for loop.
Finally line 7 has no indentation, which means it is not part of any loop. Therefore it will only be executed once, which is just before the program finishes.
What we have mentioned about the nested loops is illustrated as animation in the video below.
On this page we looked at loops. In order to reduce to reduce the cognitive load they were introduced as extensions of repeating line sequence examples from the pages Sequence and Variables. Of the two types of loops the simplest is the for loop and was introduced first where its efficiency was demonstrated in reducing the size of programs with repeating line groups. The defining feature of a for loop is that the program knows from the beginning how many times the loop is to iterate. Although this feature makes it easy to learn and to implement, it makes its use somewhat limited. It means that we cannot use it for situations where we don't know how often the loop is to iterate. When we meet a situation like this we need to use the while loop.
Again, for the purpose of reducing the cognitive load, we introduced while loops as alternatives to for loops, where the conditions for their finishing were already determined inside the code. They were then extended however to cope with situations in the outside world that were beyond the control of the program - searching for obstacles in this case.
Finally we looked at nested loops, i.e. one loop inside the other. In this case it was a while loop inside a for loop. This is not the only arrangement, however. Any type of loop can be nested inside another one and you can nest them to any level you wish. However if you have a for loop nested inside a while loop, which is itself nested inside another while loop which is in turn nested inside a for loop then perhaps it is time to look at redesigning your code.
The work requested here will contribute to your grade in AS91883 Create a computer program. As more concepts are studied the work on this assignment will be either extended, or else modified to incorporate facilities provided by the other concepts.
NCEA requirements
A computer program uses:
variables storing at least two types of data (e.g. numeric, text, Boolean)
sequence, selection and iteration control structures
input from a user, sensors or another external source
and one or more of:
data stored in collections (e.g. lists, arrays, dictionaries)
user-defined methods, functions or procedures.
Sequence and variables are used in this assignment, but the main focus is for and while loops and data read from IR sensors
Brief
Part 1
You are required to design and create a program to make a robot move around inside an enclosure. The robot is to move forward in 5cm steps and checking after each step if it detects the wall of the enclosure. If it detects the enclosure wall then it will pause, turn 90 degrees left and then proceed to move forward in 5cm steps until it detects another part of the wall.
The robot will stop once it has completed six move/turn routines within the enclosure
Part 2
Modify Part 1 so that the robot stops once it has traveled a total of 400cm.
Part 3
This is an extension of Parts 1 and 2. Here you must make an opening in your enclosure so that the robot may be able to 'escape'. The robot will have escaped if it has completed a single run that is longer than the largest diameter of the enclosure.
Planning the project
For planning your project you must first select your enclosure. It can be smooth floor area enclosed with timbers or other material to form an enclosure or it can be a reasonably a large carton. The floor area should be between A1 and A2 size.
Once you have decided on your enclosure you must prepare and design your algorithm. Unplugged activities should help with this. Also use Algorithms 1 to 5, the notional machines and the code samples as reference.
For Part 3 your enclosure must be redesigned so that it has an opening large enough for the robot to escape. This opening should be approximately twice the width of the robot.
The following evidence of completion must be supplied:
Algorithms for all of your code examples
Evidence of unplugged activities - videos, photographs and/or drawings. Only for Part 1
Copy or copies of the code
Video of the robot executing the programs
Written documentation of how you completed your project
Marking Scheme
Assignment Components
Grade
Algorithm for Part 1 supplied
A
Evidence of unplugged activities
A
Copy of the code
A
Video of the robot executing the program
A
Program code compliant with the algorithm
A
Documentation supplied
A
Part 2 modified correctly
M
Robot does not touch walls of enclosure
M
Code and video and documentation supplied
M
Algorithm and code and video and documentation for Part 3 supplied