Press enter to skip the top menu

JavaScript

The DOM Model

Learning Outcomes

On completion of this lesson you will know the concept of the document object model and its relationship to programming languages, especially JavaScript.

Go to top

Introduction

HTML consists of a hierarchy of elements inside the <html>..</html> tags. In the lesson Laying out a page we have discussed how to construct such an hierarchy. Our emphasis then was to make our code accessible to assistive technologies such as screen readers. (If you need a refresher on this topic it may be worth your while to look at that lesson again.)

A web page like the one we described would be totally accessible to a blind person using a screen reader. However it would be uncomfortable for a sighted person to use as it may lack many features that makes reading a comfortable experience. It could be even more inaccesssible to people with cognitive impairments.

To make the pages more accessible to sighted persons Cascading Style Sheets, normally abbreviated to CSS, were introduced. This highly versatile technology allows us create pages with a high visual impact, while at the same time catering for the needs of sighted users with either low vision or cognitive learning problems.

Although well presented and accessible, those pages are static. There is no animation and hiding or unhiding portions of the page is not possible. Users simply can not interact with the page apart from changing to another page using hyperlinks. For interactivity we need JavaScript.

JavaScript is one of the three components of a web page along with HTML and CSS. Unfortunately JavaScript is not directly compatible with assistive technologies such as screen readers. For that we need WAI-ARIA, which is outside the scope of these lessons.

Go to top

The Document Object Model - DOM

Before continuing further with JavaScript we need to look at the Document Object Model, which is more commonly known as DOM. First we look at the middle word 'Object'.

In advanced programming the word 'object' means a container of elements. Each of those elements may also contain elements of its own, so it would be an object in its own right. Each of these sub objects may also contain other obects ... and so on ad infinitum.

An HTML document, however, is not an object as programs understand it. It is simply a text document. However once it is loaded into the browser, the browser parses it and converts it into a framework known as the DOM. The entire page would now be an object and all of its component elements would also be objects. As objects programs can access them.

skeleton of an HTML document
Fig 1: the elements in this document are colour coded according to their position in the element hierarchy

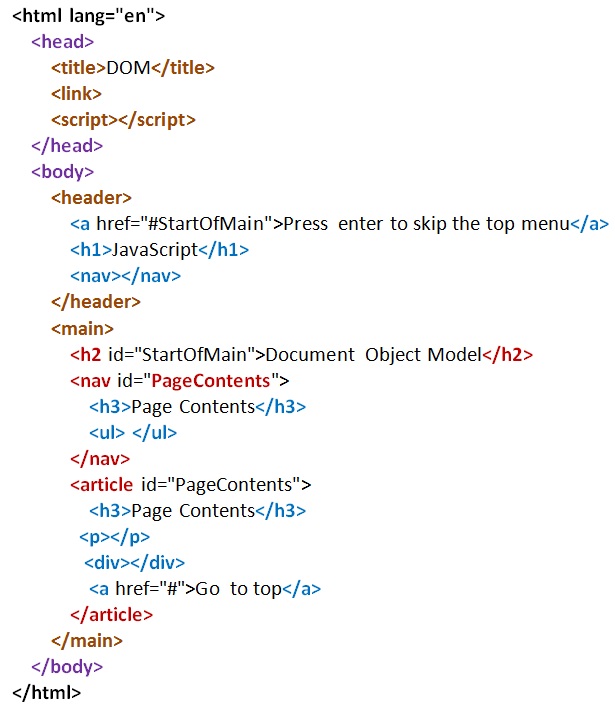
The block of HTML above is colour coded to show its hierarchical structure. At the highest level is the black <html></html>

On the next level down are the <head></head> and the <body></body> tags

On the third level are the <header></header> and the <main></main> tags

A browser, on opening this page, would first create an object of the top level element <html>. It would create similar objects of the <head> and the <body> elements.

It would continue in this manner until all of the elements in the document were converted to objects.

Fig 2: a representation of the DOM

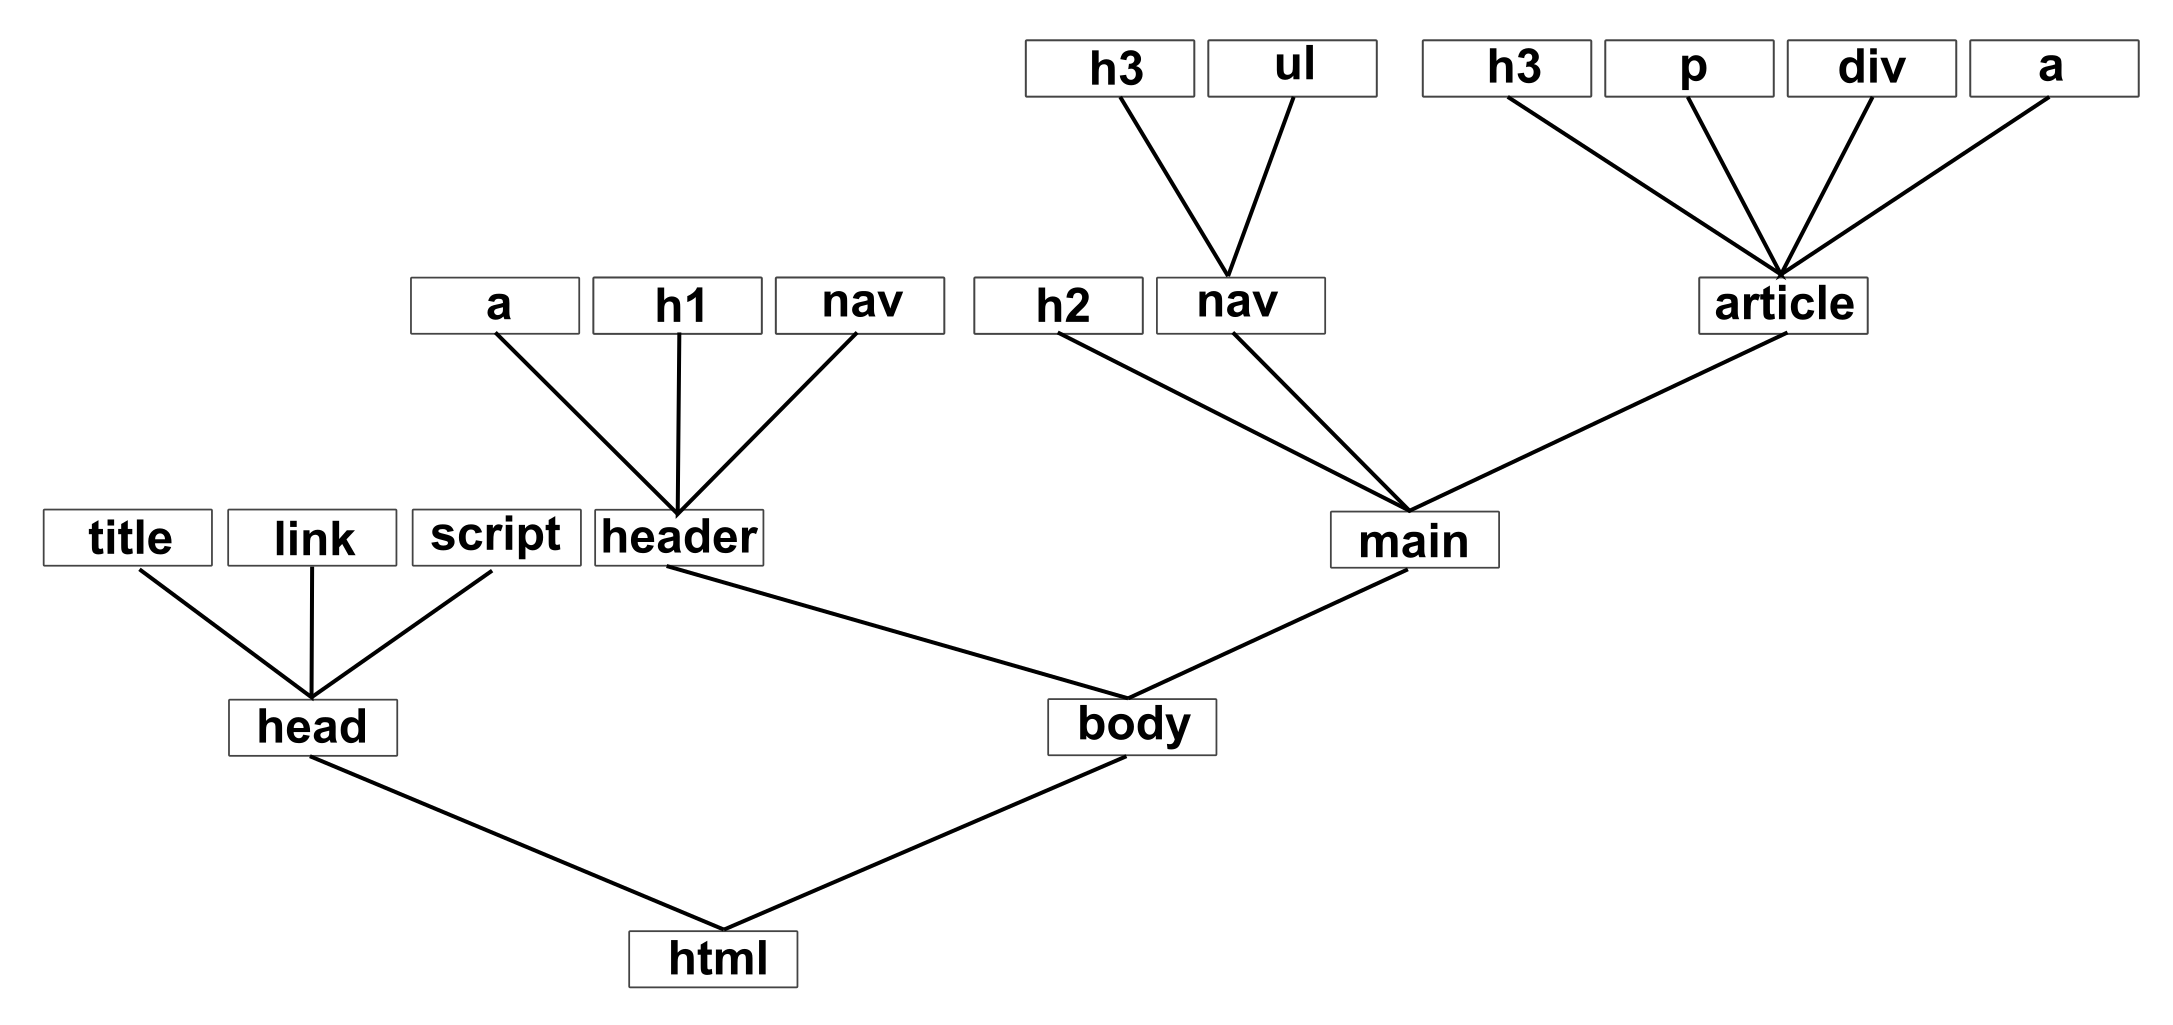
In Fig 2 above we have an example of the DOM for the HTML code in Fig 1. This is not a copy of the HTML code. It is simply another repesentation of it. In this representation all of the HTML elements are converted to objects so that JavaScript can have access to them.

This DOM is not created specifically for JavaScript. Python, Java, Ruby and most other languages can access it. However JavaScript is the most likely one, so you don't have to worry about the other languages.

Next up, we look at how to utilise the DOM in order to make interactive pages.

Go to top

DOM Examples

Here we shall give a short example of how we use the DOM to gain access to elements inside the page and modify their appearance. For our example we shall use a slightly cut down version of the HTML code in Fig 1 above.

Listing 1
                        <!DOCTYPE html>
                        <html lang="en">
                            <head>     
                                <title>DOM</title>
                                <link href="DOM%20Model.css" rel="stylesheet" type="text/css">
                                <script src="DOM%20Model.js"></script>
                            </head>
                            <body>
                                <main>
                                    <h2 id="StartOfMain">Document Object Model</h2>
                                    <article id="LearningOutcomes" onclick="changeColour('#444444','#ffff00')">
                                        <h3>Learning Outcomes</h3>
                                        <p>Lorem ipsum dolor sit amet, consectetur adipiscing elit, sed do eiusmod tempor incididunt ut labore et dolore magna aliqua. Ut enim ad minim veniam, quis nostrud exercitation ullamco laboris nisi ut aliquip ex ea commodo consequat. Duis aute irure dolor in reprehenderit in voluptate velit esse cillum dolore eu fugiat nulla pariatur.</p>
                                    </article>
                                    <article id="Introduction" onclick="addBorder('#4444ff')">
                                        <h3>Introduction</h3>
                                        <p>Sed ut perspiciatis unde omnis iste natus error sit voluptatem accusantium doloremque laudantium, totam rem aperiam, eaque ipsa quae ab illo inventore veritatis et quasi architecto beatae vitae dicta sunt explicabo. Nemo enim ipsam voluptatem quia voluptas sit aspernatur aut odit aut fugit, sed quia consequuntur magni dolores eos qui ratione voluptatem sequi nesciunt.</p>
                                    </article>
                                </main>
                                <footer>
                                </footer>
                            </body>
                        </html>
                    

Here we have added a link and a script to the head at lines 5 and 6 and removed the nav block from main. This leaves us with a level 2 heading at line 10 and two article blocks spanning lines 11 to 14 and Line 15 to 18.

We shall use our knowledge of the DOM to interactively style those two blocks.

Listing 2
                        body{
                            background-color: #eee;
                        }
                        main{
                            background-color: beige;
                            width: 800px;
                            display: block;
                            margin: 0 auto;
                            padding: 10px;
                        }
                    

Since our demonstration of a JavaScript program involves altering the styling of the two article elements, we should provide them with some basic styling first. The appropriate CSS file is shown in Fig 2 above. There is not much that needs clarification here. It simply gives the background a light grey colour, centers main, gives it a width of 800 pixels and a background colour of beige. The very boring looking result is shown in Fig 2 below.

Fig 3

Listing 3 below is our first encounter with JavaScript. It includes a global variable, styleType and two functions, changeColour() and addBorder(). We shall now examine those two functions and see how they relate to Listing 1 above.

Listing 3
                        var styleType;
                        function changeColour(bg,fg){
                            myElement=document.getElementById("LearningOutcomes");
                            styleType="background-color:"+bg+";color:"+fg;
                            myElement.setAttribute("style",styleType);
                        }
                        function addBorder(bclr){
                            myElement=document.getElementById("Introduction");
                            styleType="border:10px ridge "+bclr+";border-radius:15px;";
                            myElement.setAttribute("style",styleType);
                        }
                    

Below we have reproduced line 11 of Listing 1.

<article id="LearningOutcomes" onclick="changeColour('#444444','#ffff00')">

The first attribute is the id. This attribute has been used in all of the HTML lessons. Within HTML it marks a position in the page that a hyperlink can jump to. It also uniquely identifies that element in the page and thus each id value must be unique in any one page.

For JavaScript the id attribute identifies an object within the page. This enables JavaScript to process that object according to the user's requirements.

The second attribute is onclick. The value of this attribute is the name of the function that will be called when the user clicks on the article element whose id is 'LearningOutcomes'. The name of the function is this case is changeColour(). At line 11 of Listing 1 the values passed to the functions's arguments are #444444 and #ffff00, which are the hex codes for dark grey and yellow respectively.

When this function is called from the web page, control passes to line 2 of Listing 3 where the function changeColour is defined. The values #444444 and #ffff00 are stored in the parameters bg and fg, which are abbreviations of 'background' and 'foreground'.

myElement=document.getElementById("LearningOutcomes");

The code snippet above is for accessing the DOM. As most of the code discussed in this group of lessons are likely to be accessing the same DOM we shall spend some time looking at the details at what is going on.

Firstly document refers to the object DOM which contains all of the other objects related to the web page. Like any other object it has a series of methods to allow us to access and process the other objects that it contains.

Some of those methods are getElementById(), getElementsByClassName(), getElementsByTagName() and getSelection(). All of these methods return a pointer to one or more elements of the DOM.

The elements returned by the above methods will usually have methods peculiar to themselves. These include getAttribute(), setAttribute(), hasAttribute() and removeAttribute()

In the code of Listing 3 we use two of those methods: getElementById() and setAttribute()

Now let us get back to Listing 3

The purpose of this function is to change the background colour and the text colour of the article block to the values specified in the two parameters.

Our first task is to identify the element that we will be styling. This is done in line 3

myElement=document.getElementById("LearningOutcomes");

Here we create a variable myElement. This variable will hold a pointer to the element we wish to style. In this case the element is the article block with the id value of 'LearningOutcomes'.

To get the pointer we have to use the document object. This object is the DOM we had been talking about earlier. It contains all of the other objects within the page. As long as we know the id attribute or the name attribute of the object we can get a pointer to it. To do this we use one of the document methods getElementById() and we pass as an argument to it the value of the element's id, 'LearningOutcomes' in this case. The method getElementById()then stores the pointer in the variable myElement.

Now that we have a pointer to the element we are going to style we can start building up a CSS string to carry out that styling.

To do this we first build up the variable styleType as indicated in line 4 of Listing 3.

Here we notice that the value is built up from two string constants and two string variables. The two string constants are 'background-color:' and ';color:' and the two variable, bg and fg which have the values '#444444' and '#ffff00'. Altogether this equates to:

background-color: + #444444 + ;color: + #ffff00

This concatenates to:

background-color:#444444;color:#ffff00

This is simply two CSS instructions stating that the background colour is to be dark grey and the text colour to be yellow.

At line 10 the variable myElement points to the article block, whose id is 'LearningOutcomes'. We use the setAttribute() to change the styling of the article block to that specified in the variable styleType. To do this we pass two values to the method, the string constant "style" and the variable styletype.

The first tells the methid that it is to update a style attribute while the second specifies what the styling is to be.

On successfully running this function our web page should now look like Fig 2 below.

Fig 4

The function addBorder() is structured in identical fashion to changeColour(). The differences between them is that they access different elements and the stylings are different, although they are built up in identical fashion. Therefore there should be no need to explain it in any detail.

When both functions are run successfully our web page should look as in Fig 3.

Fig 5
Go to top

If you wish to change the formatting again you must first refresh the page (F5).

Go to top

Summary

DOM is an abbreviation of Document Object Model. It represents a web page as an object that a programming language can process. As an obect it contains the other elements belonging to a web page as other objects, thus making them accessible to programming languages.

The DOM contains a number of methods that the programming languages can call to either extract data from the DOM or else update its existing contents.

As well as the DOM's own methods, its elements can have methods of their own.

The DOM is accessible to most programming languages, althouugh it is generally only used by JavaScript.

Go to top