We have already included images into web pages using the format
<img alt=”Unable to load image” src=”myImage.jpg”/>
In this case the image that is to be displayed in our image holder is determined by the scr attribute of that holder. In our example here the image will be 'myImage.jpg'.
For showing a single image this is all that we need. If, however, we wish to be able to alter that image interactively, then an option is to use JavaScript.
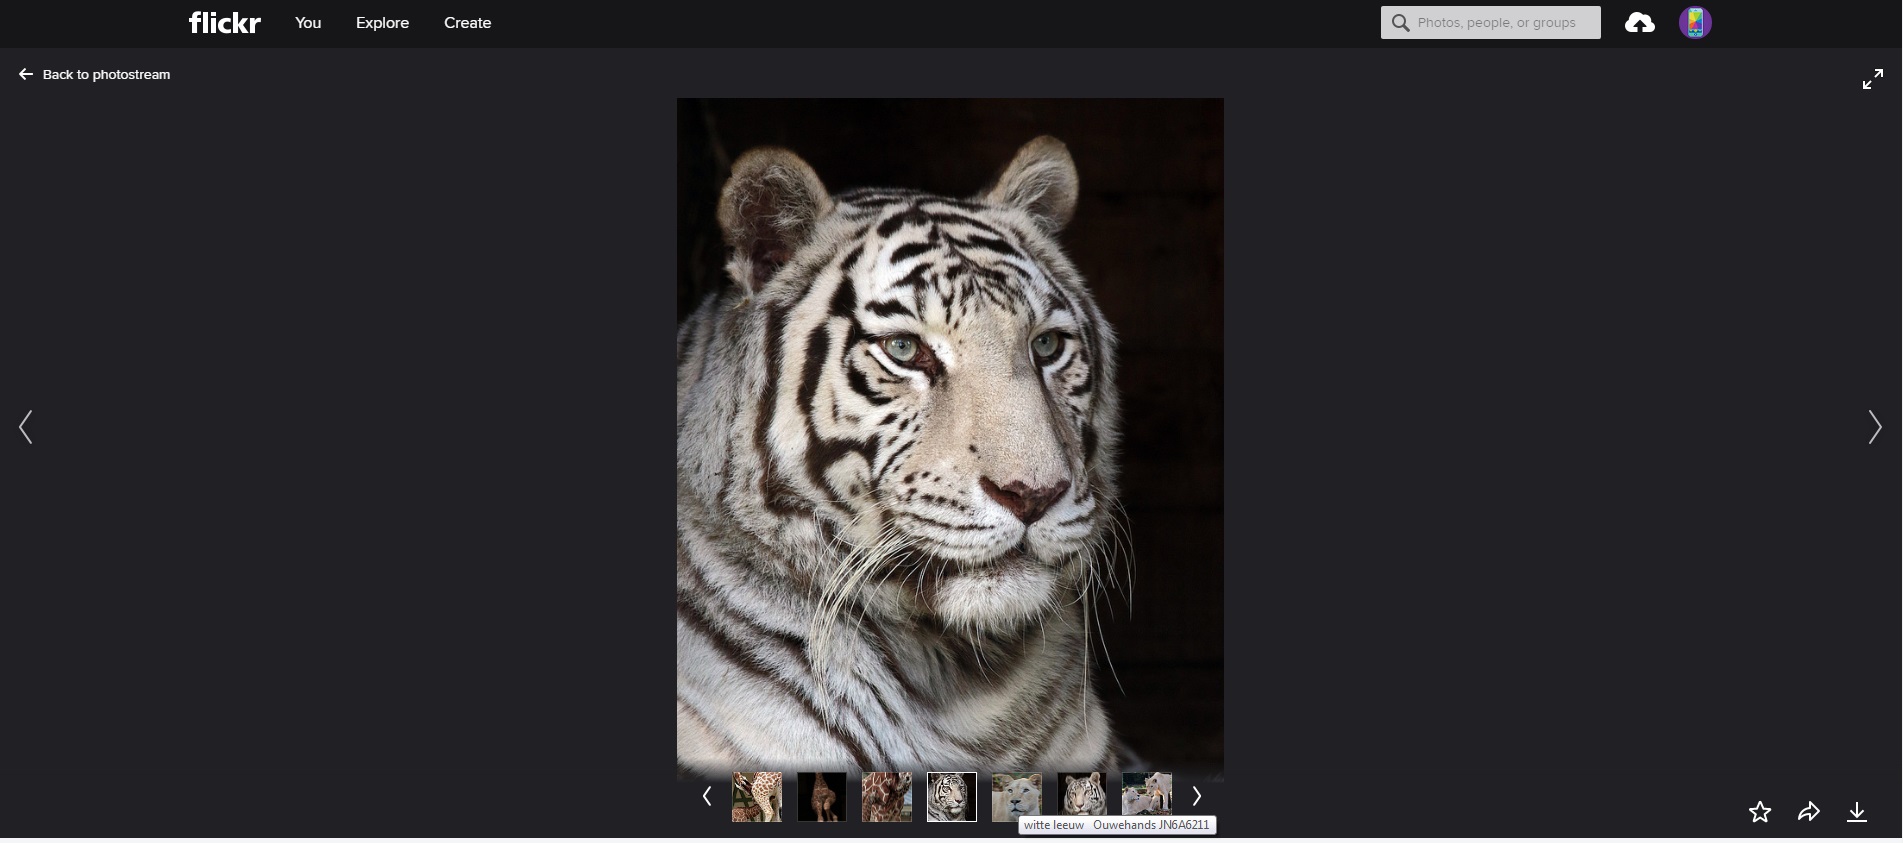
You will have seen plenty of JavaScript controlled image displays one the WEB. Many websites have home pages where a series of images are being displayed one after the other. Many of those are JavaScript controlled. An example is Flickr an example of which is shown below.
Fig 1
In this example you have two options of viewing the photographs. The arrowheads at the left and right of the screen allow you to move sequentially through the collection in either direction. The series of small images below the tiger are thumbnails of actual larger images and clicking on any of those thumbnails will instantly show the larger image on the screen. We will be showing a version of this form of display. Another option would be for the images to automatically appear on the screen for a given time before being replaced by another.
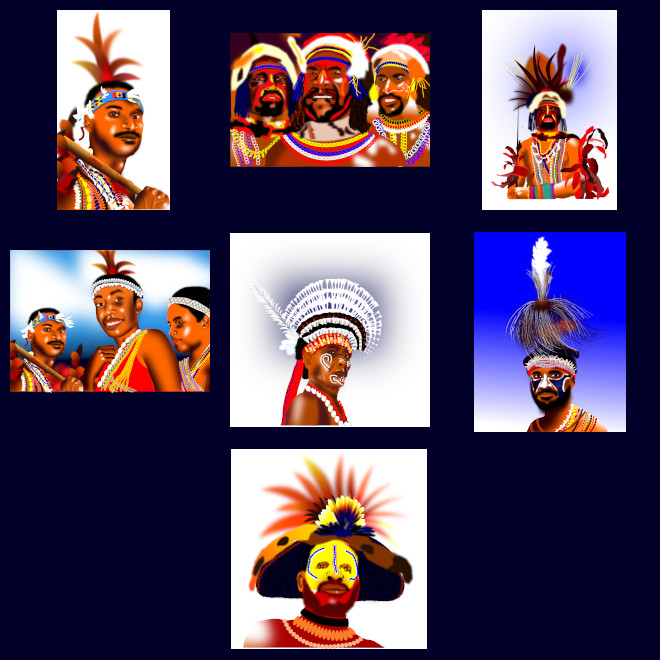
Fig 2 below shows the images that we shall be using for this demonstration.
Fig 2
If you wish to follow along with this exercise you need to pick a number of digital images that you want to display. For each of those images you also need to create a thumbnail copy. In this copy select a square area of the main image and save the selected square as a separate file with a width of 100 pixels. These images will then be displayed in a sidebar on the left side of the screen and clicking on any one of them will display the appropriate image
Below are the three documents that makes up our image gallery. The CSS file below is fairly sparse in places, especially when styling images. The reason for this is that most of the styling for images will be done by the JavaScript code and not CSS.
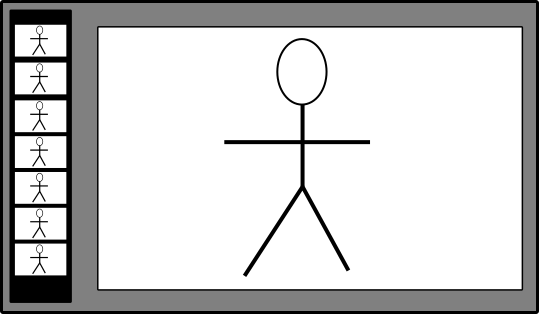
For the next few paragraphs we shall be simultaneously discussing Listing 1 and Listing 2 as well as the image between them: Fig 2. This is the wireframe that we will use to build the structure of the image gallery.
On the left is a vertical block containing small icons. Those are thumbnails of the actual images we wish to show. To the right and taking up most of the remaining space is the block where we display our images.
Clicking on any of the icons in the left column will cause the corresponding image to appear in the space to the right.
Fig 3
Next we look at how the above relates to our HTML code below.
In Listing 2 we will begin by examining lines 10 to 20. This is an <aside> block and contains nine images. We also see that each of them has an onclick() property. In other words they all cause the same function to run, i.e. showImage() except that each one is passing a different parameter value to it.
Now checking Listing 1, lines 2 to 8 we find that our <aside> is narrow, only 9% of the width of the page, and that it floats to the left. This is the narrow column to the left of Fig 1 and the images in it are the icons that we discussed.
Lines 21 to 23 is an <article> element and contains only one blank image holder with an id of 'mainImage'.
The idea of an <img> may appear strange, but the element and the image that it holds are two different items. If you think of the <img> as a picture frame, which is simply wood and glass. It is of no use until a picture is fitted inside it. It is the same with the <img> element and the image that it holds. So currently at line 20 we have the equivalent of a blank picture frame.
The file Photo Gallery.js is a JavaScript implementation for managing and displaying a photo gallery on a web page. The code preloads a series of images into memory and dynamically adjusts their display size to match the proportions of the browser window. The primary purpose of the script is to ensure that images are displayed with optimal scaling while maintaining their aspect ratios, either by adjusting their width or height based on the screen's dimensions. It provides methods to preload images, show a specific image, and handle potential issues like missing DOM elements.
The script begins by defining an array, arr, which contains the file paths of the images to be displayed in the gallery. These images are listed as strings, encoded to ensure compatibility with web usage. The imageArray is an empty array used to store preloaded image objects.
The preloadImages function uses a forEach loop to iterate over each file path in the arr array. For every file path, it creates a new Image object, assigns the respective source path (src), and stores the object in imageArray. This ensures that all images are preloaded into memory, reducing load times during display.
The showImage function takes an index (par) as a parameter to display a specific image from the imageArray. It retrieves the height and width of the image, calculates its aspect ratio (sngImageProportion), and compares it to the browser window's aspect ratio (sngWindowProportion). Depending on which aspect ratio is greater, the script dynamically adjusts the image's dimensions—either by setting the width to a fraction of the window width or the height to a fraction of the window height. These adjustments ensure that the image fits neatly within the available space. The image's size is applied as inline styles to an HTML element with the ID mainImage. If the element is not found, an error is logged to the console.
The script concludes by calling preloadImages() to preload the images and includes a sample invocation of showImage(0) to test the display of the first image in the array.
Overall, the script demonstrates robust image handling and a focus on responsive design principles for visual content on the web.
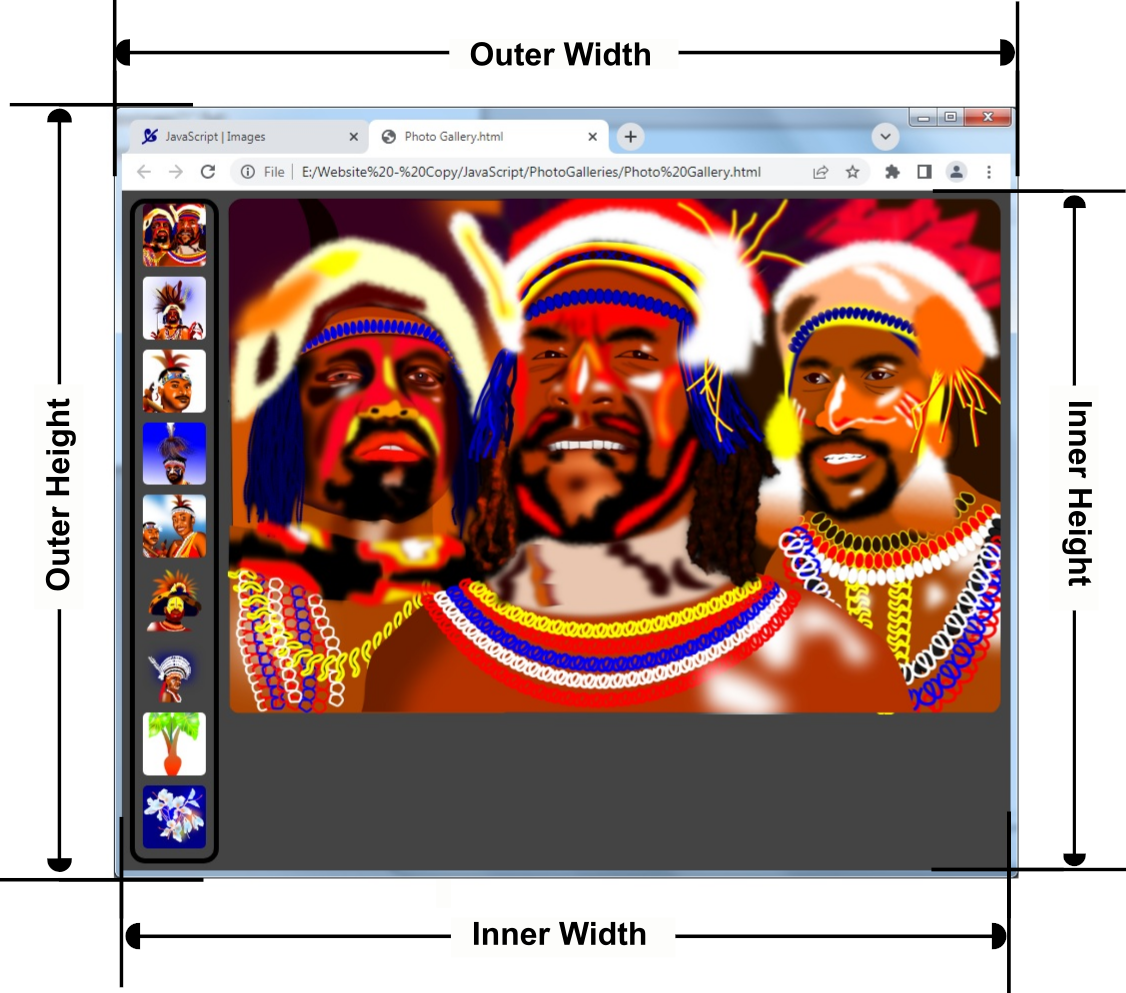
Fig 4
All HTML pages are inside a browser. This browser has a border along its four sides. It also has a number of bars at the top and may have a status bar at the bottom. All of those items reduce the amount of space available for us to position images, text boxes and other elements we put on a web page. Therefore when deciding on the size of an image that we wish to position on a browser we must be aware of the amount of space available, especially the width and height of the windows.
JavaScript comes to our aid here, in that it provides us with four variables that give us the required measurements we need. These are:
outerHeight
innerHeight
outerWidth
innerWidth
Fig 4 above illustrates the difference between the inner and outer versions of the variables. For the purpose of calculating widths of elements to place inside a window, we use the inner measurements.
With that let us look at how our images are sized and positioned within our gallery. For this we fist go to Line 11 of Listing 2. This line calls the function showImage() and passes the value zero to it as a parameter. Now we examine showImage() itself.
This spans lines 11 to 26 of Listing 3. At line 11 the function receives its parameter through the par. Following from our example above the value of par should be zero. With this value then, let us look at lines 13 and 14.
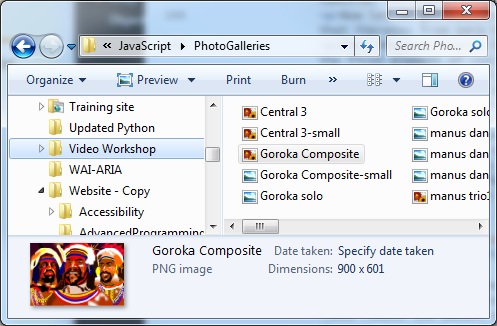
These two lines read the height and width of the image stored at imageArray[0] and stored them in the local variables intImageHeight and intImageWidth
Fig 5: Windows explorer showing the width and height of an image. We cannot get those values using either HTML or CSS, but JavaScript can access them.
At line 15 the orientation of the image is determined by dividing its width by its height. If it is less than zero then the image is portrait shape, otherwise it is landscape shape.
Lines 16 to 18 determine the orientation of the window itself using its internal dimensions. At line 18 the orientation of the window itself is calculated but in a slightly different manner to how the image's orientation was calculated. Here only 87% of the window's width is used. This is because we cannot use the full width of the window since the column of buttons already take up 9% of it.
Lines 20 to 23 determine how the image is to be sized so that it can be fully shown on the gallery window. If the image proportion is greater than the window proportion then the image is styled as being 87% of the window's width at line 21, otherwise at line 23 it is styled as being 95% of the window's height. At either line 21 or line 23 these styling data are stored in the text variable styleText
At line 24 the blank image holder that we met at line 22 of Listing 2 is now styled using the contents of the variable styleTextt while line 25 copies the image data into the newly styled holder.
Below is an example of our completed gallery.
Follow this link for a full screen rendering of the Photo Gallery
Although this file has an extension of .html there is hardly any HTML code in it. Its main activity is to call three functions from the JavaScript file and set a counter to zero.
The order that the functions are called, however is important and we shall have a short discussion on that topic.
The functions are called starting at line 13. This is preloadImages() We have met this function above. It simply loads the contents of the image files into memory
At line 14 the variable imageIndex is initialised to zero. As the program runs it counts each image as it is being displayed. We shall be talking more about it when we discuss the JavaScript code.
At line 15 we run the function showImage(). Again we have met this one before. This time we are not passing any parameter to it as we have a differrent way of calculating which image will be shown next.
Finally at line 16 we run startup(). This is the function that gives our page its spirit. It is a function that you nave not met before, so we will be concentrating on it.
The file AutoGallery.js shares a significant portion of its functionality with Photo Gallery.js, including the preloading of images and dynamic adjustment of their display size to match the proportions of the browser window. However, it includes additional features that automate image transitions, enabling the creation of a slideshow-like gallery. These functionalities enhance the user experience by eliminating the need for manual navigation and providing a seamless viewing experience.
The script begins with the same structure as Photo Gallery.js, defining an array, arr, containing the file paths of the images, and an empty array, imageArray, for preloaded images. It also includes a preloadimages function, similar to preloadImages in the other file, which loads all images into memory and ensures they are ready for display without delays.
The key addition in AutoGallery.js is the implementation of a slideshow mechanism. This is achieved through the startup and nextItem functions. The startup function initializes a timer using the setInterval method, which calls the nextItem function every 6000 milliseconds (6 seconds). This periodic invocation creates an automatic image transition effect.
The nextItem function is responsible for updating the currently displayed image index. It checks whether the current index, stored in the variable imageIndex, is at the end of the imageArray. If so, it resets the index to zero, looping back to the first image. Otherwise, it increments the index to display the next image in the array. After updating the index, the function calls showImage to render the newly selected image on the screen.
The combination of the startup and nextItem functions ensures that the gallery operates automatically, cycling through the images in a continuous loop. This approach enhances usability and is particularly suited for applications where passive viewing, such as on informational kiosks or digital photo frames, is desired.
In summary, the AutoGallery.js file extends the functionality of Photo Gallery.js by introducing automated image transitions through a slideshow mechanism. This is achieved with the inclusion of a timer-based function, startup, and a loop-based navigation function, nextItem. Together, these additions create an engaging and automated image viewing experience, making the script highly adaptable for various display scenarios.
The uploaded file outlines an instructional guide on creating photo galleries with JavaScript, focusing on both manual and automated gallery implementations. The document begins with an overview of the learning outcomes, emphasizing preloading images, handling image arrays, resizing images for consistent display, and creating interactive and automated galleries. These principles provide foundational skills for developing dynamic and user-friendly web applications.
The introduction explains the basics of including images on web pages and highlights the limitations of static image embedding. It introduces JavaScript as a solution for interactive image handling, demonstrating examples like Flickr’s photo display functionalities. The section provides a detailed walkthrough for preparing images and thumbnails for the exercise, setting the stage for the development of a manual gallery.
The manual gallery section introduces a two-part layout: a sidebar for clickable thumbnails and a main display area for full-size images. It explains the use of CSS for styling and JavaScript for interactivity. The JavaScript code handles tasks like preloading images, dynamically adjusting image dimensions to match the browser window, and displaying images based on user interaction. This approach ensures a responsive and visually appealing gallery.
The document transitions to the automated gallery, which builds on the manual implementation by introducing automated image transitions. The automated gallery uses a timer to cycle through images at set intervals, creating a slideshow effect. The script features functions for preloading images, dynamically resizing them, and seamlessly transitioning between images. These enhancements make the gallery suitable for scenarios like kiosks or digital photo frames.
Overall, the file provides a comprehensive guide to developing interactive and automated photo galleries using HTML, CSS, and JavaScript. It includes detailed code examples, explanations of key functions, and discussions on responsive design principles. The guide is a valuable resource for anyone looking to enhance their web development skills, particularly in creating engaging visual content.
Objective: This assignment is designed to deepen your understanding of JavaScript and its role in creating interactive and automated photo galleries for web pages. By completing this assignment, you will gain hands-on experience with preloading images, handling user interactions, implementing responsive designs, and creating automated image transitions.
Task 1: Analyze the Structure and Components of a Manual Photo Gallery
Begin by studying the structure of a manual photo gallery as discussed in the reference material. Identify the key HTML, CSS, and JavaScript elements involved. Pay special attention to the role of the <aside> and <article> elements, the use of the onclick property, and the functionality of the showImage function. Based on your understanding, recreate the manual photo gallery, ensuring that you include thumbnails for navigation and a main display area for larger images.
Task 2: Implement Responsive Design Principles
In your manual gallery, ensure that images are displayed responsively based on the dimensions of the browser window. Use JavaScript to dynamically adjust the width and height of images while maintaining their aspect ratios. Consider scenarios where the browser window is resized, and ensure that your implementation adjusts the gallery layout appropriately.
Task 3: Extend the Manual Gallery to Include Automation
Transform your manual gallery into an automated one by adding functionality for image transitions. Implement the startup and nextItem functions as described in the reference material. Ensure that the images in your gallery cycle automatically at a defined interval, creating a seamless slideshow experience.
Task 4: Customize Styling and Visual Effects
Enhance the visual appeal of your automated gallery by adding custom CSS styles. Experiment with properties like box-shadow, border-radius, and animations to create an engaging user experience. Ensure that your styling choices do not interfere with the functionality of the gallery.
Task 5: Discuss the Implementation
Write a detailed explanation of your implementation. Describe how each component (HTML, CSS, and JavaScript) contributes to the overall functionality of the gallery. Highlight any challenges you encountered and how you resolved them. Include screenshots or a video demonstration of your completed gallery to support your explanation.
Task 6: Explore Advanced Features
As an optional challenge, add advanced features to your automated gallery. For example, implement a pause and play button, add captions to the images, or allow users to control the transition speed. Document your approach and provide examples of how these features enhance the user experience.
Submission: Submit your completed assignment, including all source files (HTML, CSS, JavaScript), a written explanation of your implementation, and any additional media (screenshots, videos). Ensure that your code is well-commented and adheres to best practices for readability and maintainability.
Evaluation Criteria: Your assignment will be evaluated based on the correctness and functionality of your implementation, the quality of your design and styling, your ability to articulate your approach and reasoning, and your exploration of optional advanced features. Creativity and originality will also be considered.