On completion of this page you will:
- know how to introduce text into your graphics
- how to draw circles
- understand advantages of SVG files over images
- how to draw ellipses, rectangles, paths and polygons
On completion of this page you will:
On this page we shall concentrate on introducing the major shapes used by SVG, how to draw them and add basic formatting such as colours and borders
Go to topIn the short program below you can see that the layout of the SVG script if very similar to that of HTML itself
                        <svg width="600" height="400" viewBox="0 0 250 100" version="1.1" xmlns="http://www.w3.org/2000/svg">
                            <text x="0" y="0" font-family="Verdana" font-size="15" fill="blue">
                                I am to start learning SVG
                            </text>
                            <text x="0" y="15" font-family="Verdana" font-size="10" fill="blue">
                                I am so excited about it
                            </text>
                        </svg>
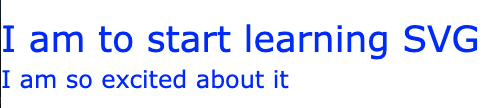
Listing 1 is a small SVG script that introduces the topic. Firstly we shall look at the similarities between SVG and HTML
The opening <svg> tag has its corresponding closing </svg> closing tag at line 8. Similarly the <text> tag at line 2 has its corresponding closing tag at line 4.
Now let us examine those tags more closely, beginning with the </svg> tag. Firstlhy SVG does not have the equivalent of CSS to style it and thus if we wish to adjust any ofthe attributes of a tag we must do it in the main file. The first two attributes we look at are width and height. They are given values of 600 and 400 respectively, and as you have guessed they specify the width and height of the SVG window.
The other attribute is the viewBox. This is where all of the graphics are displayed. Here it is given four attributes. The first two, 0 and 0, specify the position of the top left corner, while the 25 and 100 specify the width and height of the viewBox. The largest value for the width or height should be the width and height of the svg element itself.
Now we shall look at the <text> tag that spans lines 2 - 4. The attributes x and y specify the starting point of the text. In this case it is the top left hand corner of the viewBox.
The font-family attribute specifies the font to be used for rendering the text while the font-size specify the size of the font, as you might expect. Finally the fill attribute specifies the colour of the text.
The same explanation applies to the text block that spans lines 5 - 7.
The output of the code is shown below.
Now that we know how to use text in images we shall progress to looking how to draw geometrical shapes. We shall begin with circles. A circle is the easiest of all shapes to draw. You simply supply it with the coordinates of the centre and the radius. Optionally you can also supply the filling, colour and border if you wish. An example is shown below.
                        <svg width="154" height="200" viewBox="0 0 154 200" version="1.1" xmlns="http://www.w3.org/2000/svg">
                            <circle cx="25" cy="25" r = "25" fill="blue"></circle>
                            <circle cx="75" cy="25" r = "25" fill="rgb(255,0,0)"></circle>
                            <circle cx="125" cy="25" r = "25" fill="rgb(255,255,0)" stroke-width="8" stroke="black"></circle>
                            <circle cx = "25" cy = "75" r="25" fill="rgba(0,0,255,0.5)"></circle>
                            <circle cx="75" cy="75" r="25" fill="rgba(255,0,0,0.5)"></circle>
                            <circle cx="125" cy="75" r="25" fill="rgb(255,255,0, 0.5)" stroke-width="8" stroke="black"></circle>
                            <circle cx="50" cy="150" r="50" fill="rgba(0,0,255,0.5)"></circle>
                            <circle cx="100" cy="150" r="50" fill="rgba(255,0,0,0.5)"></circle>
                        </svg>
As stated earlier, SVG does not have the equivalent for styling and thus all of the attributes of the conponents have to be filled in within the SVG document itself.
We don't need to examine line 1 as it is the equivalent of its predecessor in line 1 of Listing 1. We will therefore commence with the circles, which start at line 2
To draw a circle we begin with the <circle> tag. At line 2 we see that the first two attributes that are given values are cx and cy. These stand for x-cordinate of centre and y-coordinate of the centre.The r is for radius, which in this case has a value of 25. Thus our circle would fit into the square defined by the coordinates (0,0), (0,50), (50,50) and (50,0).
The final attribute we need to look at is fill. This specifies the colour inside the circle. In this case the constant blue is used. This is another similarity with HTML.

The other seven circles are drawn in the same manner - only their locations differ. Also some extra features are added to the different circles which we shall look at next.
<circle cx="75" cy="25" r = "25" fill="rgb(255,0,0)"></circle>
Above we have reproduced line 3 from Listing 2. Its cx value is 75 and cy still remains at 25. Thus it occupies the square with the coordinates (50,0), (50,50), (100,50) and (100,0).
Another feature to notice is how the fill colour is specified. This time it is using the rgb system. Here r has a value of 255 while the other values have zero. Thus the circle will be filled with red, as shown in Fig 3.
<circle cx="125" cy="25" r = "25" fill="rgb(255,255,0)" stroke-width="8" stroke="black"></circle>
At line 4 above we meet a circle with a border. For clarity this border is eight units wide. Looking at Fig 3 we notice that the tops of the blue and red circles touch the top of the viewBox while half of the border of the yellow circel disappears over the top. Thus when you add a border to a circle, half of the border encroaches on the area of the circle itself while the other half takes up space outside of the circle.
<circle cx = "25" cy = "75" r="25" fill="rgba(0,0,255,0.5)"></circle>
Line 5 is reproduced above. It differs line 2 only in how the fill is specified. The system used here is rgba where a stands for "alpha". The value of "alpha" ranges from 0 to 1. A value of 1 indicates that the fill is totally opaque while a value of zero indicates that it is totally transparent. Values in between indicate various levels of transparency.
Examining Listing 2 you will see that in lines 5 - 9 the alpha value is 0.5 which indicate that the transparency is at 50%. This is the cause of the delapidated look of the circles in rows 2 and 3.
Finally lines 8 and 9 of Listing 2 produce two circels with semi-transparent filling which overlap each other, thus fusing each other's colour where they intersect.
Go to topThe image in Fig 3 above was loaded into this page using the following code:
<img src="IntroductionCircles.svg" style="border: thin solid black" >
Notice that there is no mention of sizing the file. Consequently the image is displayed on this page in the size that was specified in the SVG document.
On the other hand, the larger version shown in Fig 4 below was loaded using the following code:
<img src="IntroductionCircles.svg" width="100%" style="border: thin solid black" >
In this case the width is specified as being 100% of the width of the containing element, i.e. this very article you are reading.
Despite it's size being increased by a factor of 10.6 the quality of the image remains unchanged. This is the big advantage of SVG images. They always retain their small size and can be increased to any level without loss of quality.
Go to topA path is a series of lines and curves joined together to form a shape. It is possibly the easiest concept in SVG to understand but the most boring and frustrating to code. This is because the meeting point of every line and curve must be manually plotted, and the more lines in the drawing the more frustrating and error prone the operation becomes.
Let us look at the code below to see how coding a path is accomplished.
                        <svg width="235" height="235" viewBox="0 0 235 235" version="1.1" xmlns="http://www.w3.org/2000/svg">
                            <path d = "M95,95 L120,5 L150,95 L235,95 L165,150 L195,235 L120,180 L50,235 L75,150 L5,95 L95,95" stroke_width ="5" stroke ="black" fill="aqua"></path>
                        </svg>
Line 1 of our SVG code will rarely change and so we shall concentrate on line 2.
To start a path you use the <path> element. In our simple example here we only use the d attribute. The value of this attribute will be a list of the points on the path, as well as the thickness of the line and the value of the fill
In our example the value of d begins with M95,95. This means 'move to the position (95,95)'. the next component is 'draw a line from the previous coordinate to (120,5)'. Similarly the next component means 'draw a line from the previous component to (150,95)'. The rest of the values for d follow the same rule.
The stroke-width property specifies the thckness of the lines that are being drawn while the stroke property specifies the colour of the line. Finally fill, which you have already met, specifies the colour of the interior.
The shape drawn is shown below.

Below is another example of a path. This has a background path in order to form a border for the other two paths that follow it.
                        <svg xmlns="http://www.w3.org/2000/svg" width="400" height="380" viewBox="0 0 400 380" version="1.1">
                            <!--BACKGROUND-->
                            <path d="M0,0 L0,400 L400,380 L400,0 L0,O" fill="aqua"></path>
                            <!--THE LETTER C-->
                            <path d="M150,100 L50,100 L50,300 L150,300 L150,260 L90,260 L90,140 L150,140 L150,100"  stroke-width="5" stroke="#0000ff" fill="#ffffcc"></path>
                            <!-- THE LETTER E -->
                            <path d="M240,100 L240,300 L340,300 L340,260 L280,260 L280,220 L320,220 L320,180 L280,180 L280,140 L340,140 L340,100, L240,100" stroke-width="5" stroke="#0000ff" fill="#ffffcc"></path>
                        </svg>
No new concepts are introduced here, apart from having a background path against which the other paths are displayed. Notice that the dimensions of the background image are identical to the dimensions of the viewBox.

The letters C and E above are much easier to draw than the previous example in Listing 3. They have fewer points for starters. If you wish to practice drawing more paths, this could be a good model for you to work with.
YOu could start by using a sheet of squared paper and tracing the outlines of the letters C and E. Once complete you could trace out the points for another letter on the paper and then use the points on that to plot the same points in your SVG code. As you are adding extra paths to the SVG element, ensure that you adjust the dimensions of the SVG element itself as well as the dimiensions of the viewBox
Have fun!
Go to topAn ellipse can be crudely described as an elongated circle. A recipe for drawing an ellipse is as follows:
If you want to find a more mathematical description of an ellipse go to the SoftSchools website. However, the recipe above should be sufficient for you to understand the SVG code below.
                        <svg width="600" height="300"  xmlns="http://www.w3.org/2000/svg">
                            <path d="M0,0 L0,300 L600,300 L600,0 L0,0" fill="yellow"></path>
                            <ellipse cx="300" cy="150" rx="100" ry="40" fill="orange" stroke-width="1" stroke="black"></ellipse>
                        </svg>
Line 1 above sets up the dimensions of the SVG page and line 2 traces a path with the same dimensions. This path is filled with yellow to form the background of the page.
We shall be using the image below as well as the recipe we described earlier in order to discuss how line 3 produces an ellipse.

In the image above the two green spots labelled 'focus' are the equivalent of the two pins stuck in the sheet of paper. The two grey dotted lines labelled d1 and d2 are the equivalent of the string while (x,y) is the pencil pulling the string taught.
Although physically that is how an ellipse is constructed, in computing a different technique is used. This is also demonstrated in Fig 6 above. The data we must supply for the ellipse are:
With that explained we shall look at line 3 of our code.
<ellipse cx="300" cy="150" rx="100" ry="40" fill="orange" stroke-width="1" stroke="black"></ellipse>
The x and y coordinates of the centre, i.e. cx and cy are assigned values of 300 and 150 respectively. This is the same way we start describing a circle.
The next pair of values are the values of the two radii. The x-radius, i.e. rx is assigned 100 while the y-radius ry is assigned the value of 40. Thus our ellipse will have a total width of 200 and a total height of 160.
The completed ellipse is shown below.

To finish off with ellipses we shall we shall create a drawing of a can that could hold baked beans, soup or any of the other food-types that come to us in cans. We will not be introducing any new topics here. Instead we shall be looking at combining concepts that we have just learnt in order to create an impression of some real-life object.
The code for drawing the can is below.
                        <svg width="600" height="600"  xmlns="http://www.w3.org/2000/svg">
                            <!--BACKGROUND-->
                            <path d="M0,0 L600,0 L600,600 L0,600" fill="yellow"></path>

                            <!--BODY OF CAN-->
                            <ellipse cx="300" cy="450" rx="100" ry="40" fill="orange" stroke-width="1" stroke="black"></ellipse>
                            <path d="M200,150 L400,150 L400,450 L200,450 L200,15" stroke-width="1" fill="orange"></path>
                            <ellipse cx="300" cy="150" rx="100" ry="40" fill="orange" stroke-width="1" stroke="black"></ellipse>

                            <!--DECORATING TOP OF CAN-->
                            <ellipse cx="300" cy="150" rx="80" ry="32" fill="orange" stroke-width="1" stroke="black"></ellipse>
                            <ellipse cx="300" cy="150" rx="60" ry="24" fill="orange" stroke-width="1" stroke="black"></ellipse>
                            <ellipse cx="300" cy="150" rx="40" ry="16" fill="orange" stroke-width="1" stroke="black"></ellipse>
                        </svg>
Lines 1 - 3 have already been covered and thus we shall skip to creating the body of the can.
At line 6 we create an ellipse which is identical to what we created at line 3 of Listing 5 above. At line 7 we create a path that has the same width as the ellipse. The horizontal base of the path is is at position 450 which means that it is at the same level as the major axis of the ellipse. Also it was created after the ellipse which means it is on top of it. Thus it is hiding the upper half of the ellipse.
Line 8 draws the ellipse that represents the top of the can. Its major axis is at the same level as the top of the path. Also it is the last item that is drawn and thus is at a higher level than the path. Therefore it is entirely visible.
Lines 11 - 13 draw three concentric ellipses on the top of the lid. They are concentric by giving the same values to the cx and cy attributes. Their sizes are proportionally reduced by proportionally reducing the values of the rx and ry attributes.
The finished product is shown below.

Once you have mastered paths, polygons should be no problem for you. They both consist of pairs of coordinates. The major difference between them is that paths can deal with both straight and curved lines, whereas polygons can deal only with straight lines.
In our code example below we use a single path and two polygons. This is so that you can easily compare the two. The path is used to produce the background while the two polygons trace out the letters F and C
                        <svg width="320" height="280" fill="#888888" xmlns="http://www.w3.org/2000/svg">
                            <!--PATH FOR THE BACKGROUND-->
                            <path d="M0,0 L320,0 L320,280 L0,280" fill="#ffff88"></path>

                            <!--POLYGON FOR THE LETTERS F AND C-->
                            <polygon points="40,40 40,240 80,240 80,160 120,160 120,120 80,120 80,80 140,80 140,40" stroke-width="5" stroke="#0000ff" fill="#ffffcc"></polygon>

                            <polygon points="280,40 200,40 180,80 180,220 200,240 280,240 280,200 220,200 220,80 280,80" stroke="#0000ff" stroke-width="5" fill="#ffffcc">></polygon>
                        </svg>
Line 3 traces the background for the letters. It has the same dimensions as the SVG itself. It uses the path to trace the points. This is indicated by the fact that there is a letter before each pair of coordinates.
At line 6 the coordinates of the letter F are traced using a polygon. The polygon uses the keyword points instead of the d and there is no letter in front of the coordinate pairs.
The same comments apply to the polygon at line 8.
Running this code in a browser produces the image shown in Fig 9 below.

Having mastered paths and polygons, rectangles should not pose any problem. They are the easiest of all shapes to construct: you supply the coordinates of the top left corner, the width and the height - just like the viewBox.
Unlike the paths and polygons you can style the corners of the rectangles. There are three types of corner styling: miter, bevel and round. We shall draw four rectangles: one with no corner styling and the others demonstrating the other three styles.
                        <svg width="800" height="800" viewBox="0 0 800 800" xmlns="http://www.w3.org/2000/svg">
                            <rect x="0" y="0" width="800" height="800" fill="#444444"></rect>
                            <rect x="20" y="40" width="400" height="150" stroke-width="20" stroke="white" fill="magenta"></rect>
                            <rect x="100" y="230" width="400" height="150" stroke-width="20" stroke="yellow" fill="blue" stroke-linejoin="miter"></rect>
                            <rect x="180" y="420" width="400" height="150" stroke-width="20" stroke="aqua" fill="crimson" stroke-linejoin="bevel"></rect>
                            <rect x="260" y="610" width="400" height="150" stroke-width="20" stroke="rgb(255, 255, 140)" fill="purple" stroke-linejoin="round"></rect>
                        </svg>
The above code uses only the rect element. In line 2 it is used to create the background. Thus the x and y values start at (0,0) and the width and height are both set to 800, which is the size of the viewBox. It has no border and is filled with a dark-grey colour. The rectangles we wish to concentrate on are specified at lines 3 - 6.
At line 3 we style our first rectangle. It starts at (20,40), has a width of 400 and a height of 150. The width of the border is 20 and the border colour is white.
At line 4 our rectangle starts at (100,230), its border color is yellow and the fill colour is blue. However it has a new attribute - stroke-linejoin. This is the attribute that styles the corners. In this case it has a value of miter which means that the corners have sharp edges. If we look at the two top rectangles in Fig ? below we see that both rectangles have sharp edges. From this we can conclude that the mitre is the default style for rectangle corners.
At line 5 the rectangle has a style of bevel which removes the sharp edge thus turning each corner into two sub-corners. The rectangle at line 6 has a corner style of round, thus giving it rounded corners.

Explain the main purpose of the `viewBox` attribute in SVG and how it differs from the `width` and `height` attributes of the `<svg>` tag.
Describe the different ways you can specify colors in SVG, including named colors, RGB values, and RGBA values. What does the 'A' in RGBA stand for, and how does it affect the appearance of a shape?
What is the key advantage of using SVG images over traditional image formats like PNG or JPG, especially when dealing with images that need to be displayed at different sizes?
Explain the concept of a 'path' in SVG. How do you define the starting point of a path, and what are the commands used to draw straight lines within a path?
Compare and contrast the use of paths and polygons in SVG. When might you choose one over the other for creating a specific shape?
Describe the different types of corner styling available for rectangles in SVG. How do you apply these styles, and what visual effect does each style have on the corners of the rectangle?
Imagine you are creating an SVG illustration of a simple house. Outline the steps and SVG elements you would use to draw the house, including the roof, walls, windows, and a door.
Explain how you can create a semi-transparent shape in SVG. Provide an example of why you might want to use transparency in an SVG drawing.
If you wanted to create a complex shape in SVG, like an irregular star or a detailed map, would you prefer to use paths or polygons? Explain your reasoning.
Explain how SVG handles scaling. What happens to the quality of an SVG image when it is zoomed in or out compared to a raster image?
Go to top