On the previous page we drew rectangles by specifying the coordinates of their top left corners as well as their width and height. We shall do it in a different manner here, by actually drawing them directly on the screen. We simply press the mouse button where we want to srart our rectangle and then drag the mouse to the diagonally opposite corner and then release the mouse button. Now let us look at the code.
Listing 1-1
import pygamepygame.init()YELLOW = (225,225,0)PURPLE = (127,0,127)drawingBoard = pygame.display.set_mode((900,600))pygame.display.set_caption("Drawing rectangles using the mouse")drawingBoard.fill(YELLOW)
The above code contains no new ideas or concepts and therefore should be familiar to you by now.
Listing 1-2
x = 0y = 0w = 0h = 0drawmode = Truerunning = True
Above we initialise six variables that will be used in the drawing of the rectangles. The variable x, y, w and hwill hold the values of the coordinates and dimensions of the rectangle. The variable drawmode is a Boolean variable that is used to prevent rectangles being drawn when the mouse button is pressed down. Finally running is set to true so that the while loop in Listing 1-3 can iterate.
Listing 1-3
                        while running:
                            for event in pygame.event.get():
                              if event.type == pygame.QUIT:
                                 running = False
There is nothing new introduced in Listing 1-3 and thus we shall look at Listing 1-4 instead.
In line 23 we meed the event MOUSEBUTTONDOWM. This event occurs when the user presses down the left mouse button.
The function pygame.mouse.get_pos() returns a tuple containing the coordinates of the point on the screen where the mouse was at when the key was pressed.
The MOUSEBUTTONUP event at line 26 occurs when the user releases the mouse button. When this occurs the x and y positions of where the mouse button was raised are passed as a tuple into x1 and y1. From these values the width and height of the rectangle are calculated at lines 28 and 29.
At line 30 an object of the class Rect is created. This contains the position and dimensions of the rectangle that is to be created.
Listing 1-4
if event.type == pygame.MOUSEBUTTONDOWN: x,y = pygame.mouse.get_pos() drawmode = True if event.type == pygame.MOUSEBUTTONUP: x1,y1 = pygame.mouse.get_pos() w=x1-x h=y1-y drawmode= False rect = pygame.Rect(x,y,w,h) if drawmode == False: pygame.draw.rect(drawingBoard, PURPLE, rect,12) pygame.display.flip()pygame.quit()
Here we set up the variables for our programme. The variables x and y will hold the value of the coordinates of the top left corner of our rectangle while w and h will store the values of the width and height.
At line 33 the rectangle is drawn using the surface drawingBoard created at line 7 above, the colour purple, the rect element spcified at line 31 and the value 12. This latter value means that the rectangle will have a purple border that is 12 pixels thick while the interior will be empty. On the other hand, if this argument was missing then the interior of the rectangle will be filled with purple.
Like rectangles we have touched briefly on circles in the previous page. Here we shall look at them in more depth.
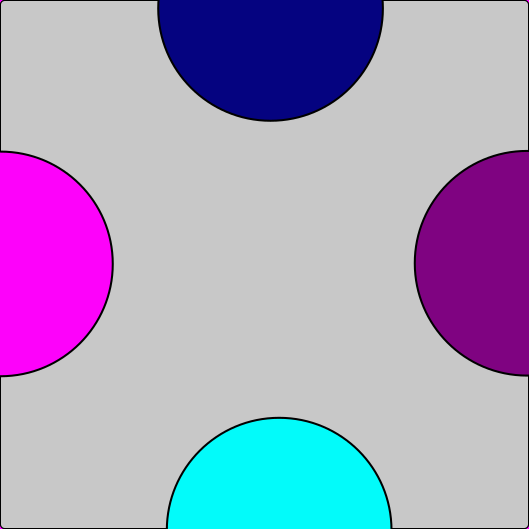
Here we shLL create four circles to which which we shall add simple animation. Each circle will have its own colour: cyan, purple, dark blue and magenta.
We shall also try to overcome a shortcoming of the function circle(). This shortcoming is that a circle in Pygame can't have both a border and a filling at the same time. It can only have one or the other. The way we overcome this problem is to draw a white filled circle underneath each of the other circles with a radius slightly larger than the others. The white circle will have the same centre as the circle above it, thus giving the impression of a white border on the circle..
This will be a precursor to our first game, which will be the subject of our next page.
Above we specify the starting positions of our four circles. From the code in lines 18 and 19 we can deduce that the magenta circle will have its x-axis at (0,400) since the constant WIDTH has a value of 800. For the same reason lines 20 and 21 indicate that the centre of the dark blue circle will be (400, 0). Similarly tthe circleshe other two circles will have a value of (800,400) and (400, 800) respectively.
Fig 1: the positions of the four circles as specified by the code in Listing 2-2. (Ignore the fact that the circles have black borders.)Listing 2-3
forwards = Truerunning = Truewhile running: for event in pygame.event.get(): if event.type == pygame.QUIT or event.type == pygame.K_ESCAPE: running = False
Apart from line 27, the rest of the code should be familiar to you and therefore we shall deal only with that line.
Our animation of the circles will involve the magenta circle moving to the right along the x-axis until its centre meets the right side of the rectangle. From here on it will move back until its centre meets left side of the triangle. Once this occurs it will start its journey forward again.
The purple circle will travel in the opposite direction. Its centre will move from the right side until it meets the left side and then traces its journey back again. The same applies to the dark-blue and cyan rectangles except that they move up and down the center of the page instead of left and right.
In order to control the direction of those movements we use the Boolean veriable forwards.
Listing 2-4 below consists entirely of the body of an if...else statement. Line 34 tests if the Boolean variable forwards has a value of True.
If forwards has a value of True then the code that spans lines 35 - 40 is executed. At line 35 the x-coordinate of the magenta circle is increased by 1 which will result in that circle moving 1 pixel to the right. At line 36 the x-coordinate of the purple circle is decreased by 1 thus causing that circle to move 1 pixel to the left.
Similarly line 37 causes the dark-blue circle to move one pixel downwards and line 38 causes the cyan circle to move one pixel upwards.
At line 39 the x-coordinate of the magenta circle is tested for being equal the the value of the constant WIDTH. If it is, then it means that the purple circle's x-coordinate has reached a value of zero and the two other circles have reached the top or bottom of the screen. It also means that it is time to change direction. This is achieved at line 40 where the value of the Boolean variable forwards is set to False
In the body of the else the circles are moved in the opposite direction until the get to their original positions. From here they start moving outwards again and continue to do so until the user terminates the programme.
Finally we look at how the circles are to be displayed on the screen. Firstly we discussed above how the circles were moved by increasing or decreasing the x-coordinate or y-coordinate of the centre. This is not strictly true. The coordinates of the centre were certainly changed but the circles themsleves did not move. Actually moving them occurs at lines 49 - 59.
At line 49 the screen surface is filled with blue. This clears any other drawings from the screen and is the first step in moving the circles.
At line 50 the magenta circle is drawn using the coordinates assigned to it at line 35.
At line 51 another circle is drawn. The coordinates of the centre of this circle are the same as the magenta circle above and the radii of both circles are also the same. This circle howecer has a border of 5 pixels, which means that the main body of it is empty. For this reason it acts as a border to the magenta circle.
The same comments apply to the rest of the circles.
Parallax scrolling normally lives in the realms of HTML and CSS. We can, however, achieve the same effect with Python programming. The code may be longer than its CSS equivalent, but it is much less cryptic.
Parallax scrolling is based on the fact that if we are moving very distant objects appear to move very slowly or to be standing still. Objects closer to us in the middle distance appear to move somewhat faster while objects very close to us move quite fast. By moving images past each other at different speeds we can mimic the parallax we experience in real life.
This image is of Rangitoto. It will form the background of our parallax. It will move very slowly and the top of the volcano will not go past the top edge of the window.
Fig 2-2
Notice that the sky has been removed from this image. We were able to do this since it is a .PNG file. Removing the sky means that it will not block the view of Rangitoto as we scroll past it.
To indicate that it is closer to us than Rangitoto we shall move it much faster. Its starting position will be more than half ways down the page and we will move it very close to the top of the page so that the tallest trees will almost touch the top. Due to having to cover a longer distance that Rangitoto it has to remove faster.
Fig 2-3
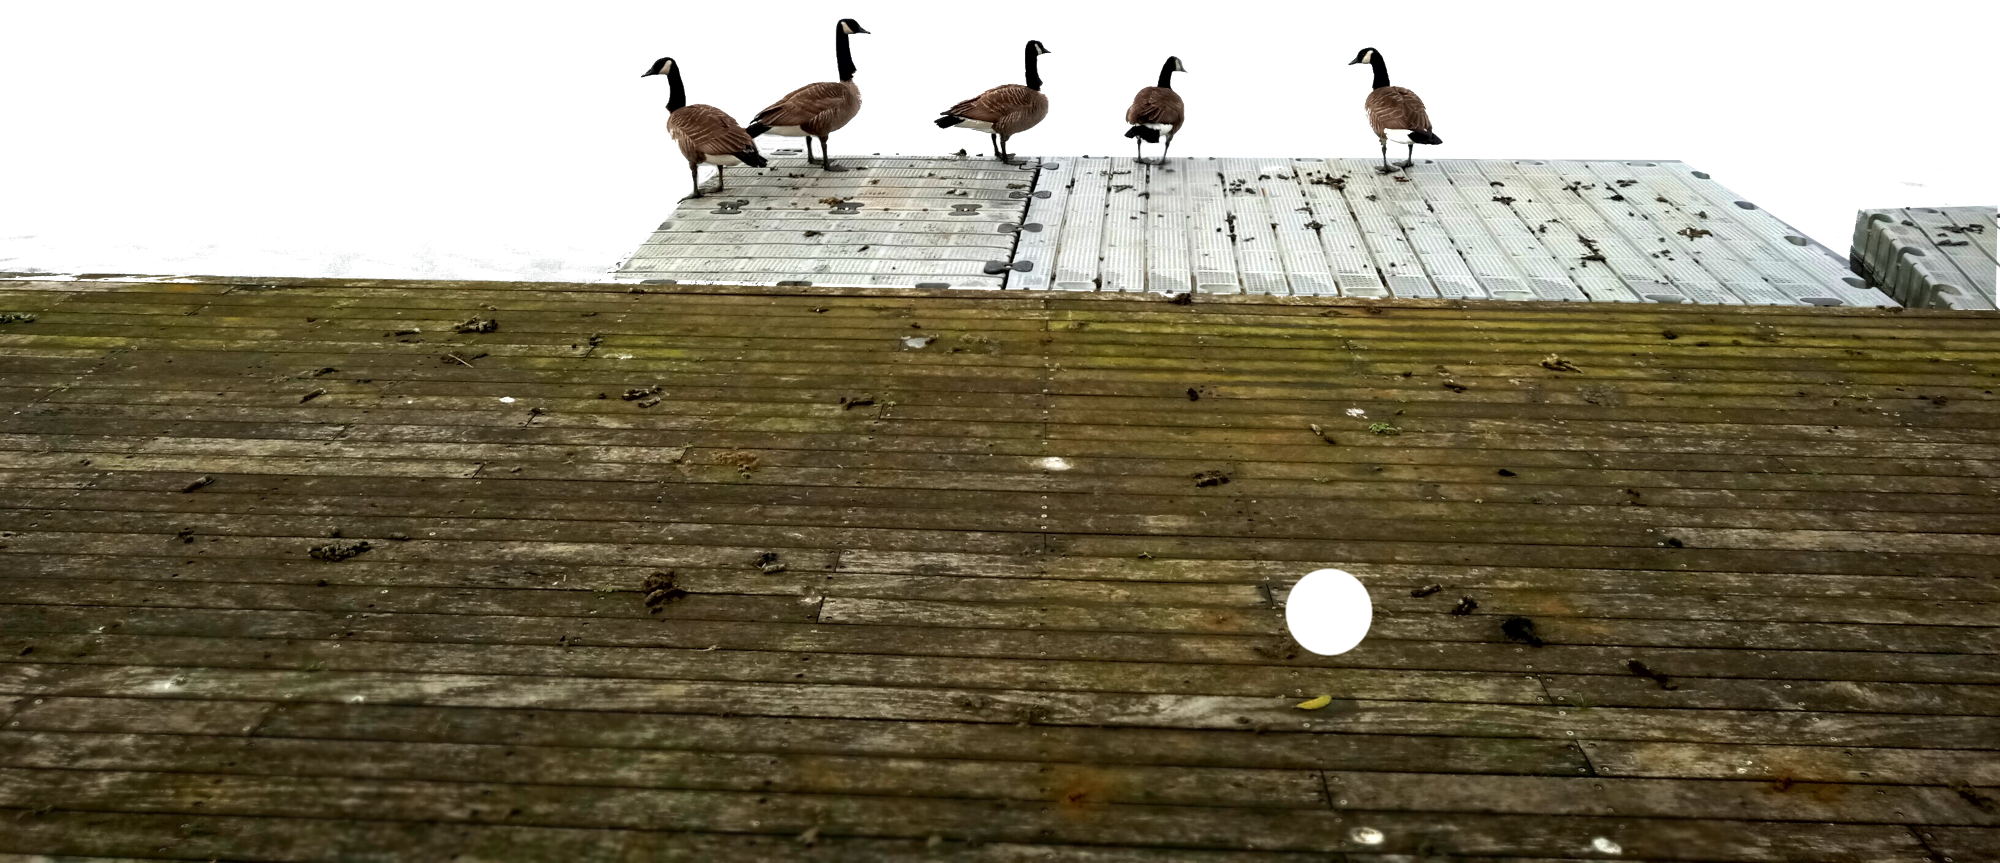
The initial position of the geese will be below the bottom of the window and they will not appear until a few seconds of the scrolling has past. They will move until the birds' heads touch the shorline of the lake.
Again the geese will travel a longer distance than the lake image, so they will have to move faster still - thus adding to the illusion that they are closer to us.
Fig 2-4
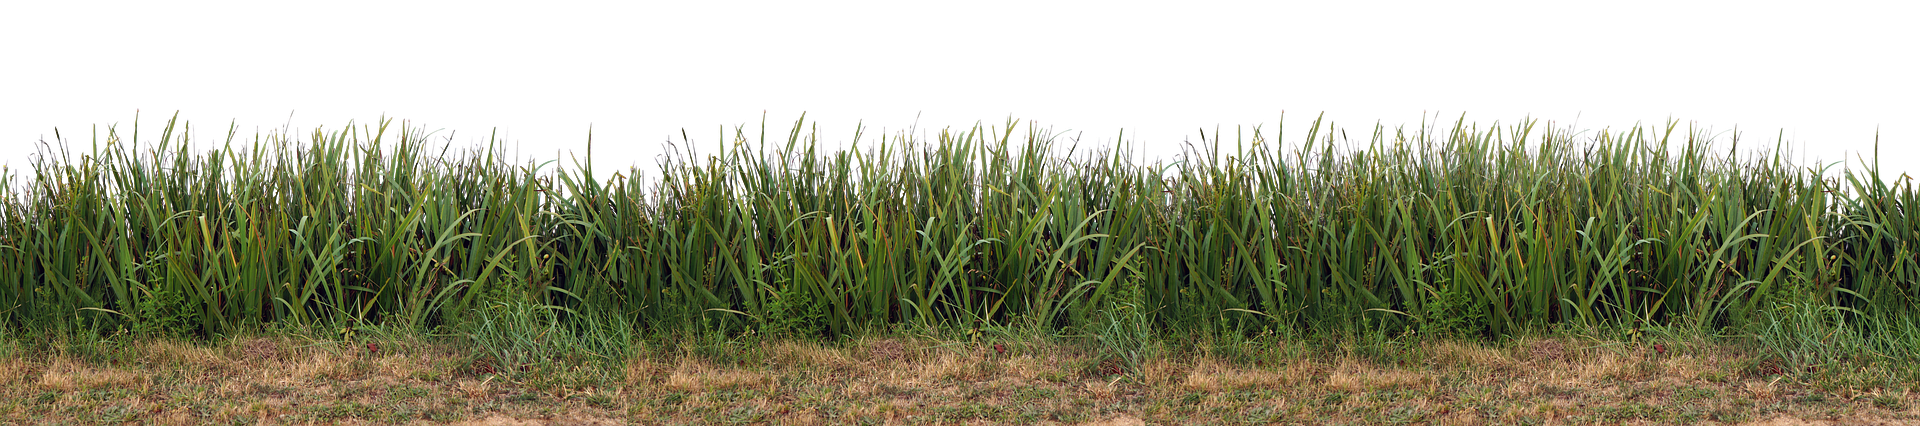
The detail is so strong in the grass image that you feel you could touch it. The image must start a long distance below the level of the window and end at the base of the same window.
Our program should be able to adapt itself to different screen sizes. For this reason our first task is to ensure we resize our images to be compliant with the screen size. Since we have four images it is more efficient for us to create a single function that resizes all images rather than repeating the same code several times. The function is shown below. It is appropriately named prepareImage()
The function prepareImage(), as its name implies, resizes the image to be compliant with the size of the screen.
At line 1 the function is passed the name of the file to be processed and the width of the window that the image must fit into.
At line 2 the image is loaded into the system and at lines 3 and 4 the width and height of the same image is calculated.
At line 6 the width of the image is compared to the width of the window. If the image is wider then it has to be scaled proportionally to fit the window's width and height. This is accomplished at lines 7 - 10.
At line 7 a proportion is calculated by dividing the window width by the image width.
Line 8 changes the width of the image to the width of the page.
Line 9 adjusts the height of the image by multiplying the image hieght by the value of the fraction proportion
Line 10 uses the function pygame.transform.scale() to scale the image to a size that is appropirate for our application. The values calculated in lines 8 and 9 are sent as arguments to the function..
The second function is calculateStep().. As you know by now animation in Pygame is achieved by moving the item to be animated a small distance in the y direction in our case, since the images will be moving vertically. The amount of pixels we move the element is referred to as a step.
If we move the image by a small amount it will travel slowly across the screen, while if we move it by a large amount it will move fast.
How fast the element moves depends on a number of factors:
The frames per second of the system
The duration of the animation
The distance the element has to travel;
All of the above factors are dealt with in the code below.
The above function calculates the step value for each of the four animations in our application. The values we pass to it are:
the duration of the animation - 10 seconds in our case.
the number of frames per second - 60 in our case
the starting position of the image
the end position of the image
Line 2 calculates the travelling distance of the image using the absolute value of the difference between the starting and ending position of the image
Line 3 calculates the value of the step by dividing the travel distance by the product of the frames per second and the animation duration.
Above are constants related to controlling the stqrting and ending positions of the images we shall be manipulating.
At line 25 the constant DURATION holds the value 20, meaning that the animation lasts 20 seconds.
Lines 36 and 37 specify the starting and ending positions of the Rangitoto image. The starting position is 0 which means that its top surface is aligned with the top of the window. The ending position is negative one eight of the height. This gives a rounded value of -89. This means that the top 89 pixels of the Rangitoto image will disappear above the top of the window.
Line 28 specifies that the starting position of the Lake Pupuke image is 426 pixels and its end position is approximately 20 pixels, i.e. very close to the top.
Finally we get to the setup of the program. Above the clock is set up, the game window is also set up and it is given a caption of "PARALLAX SCROLLING"
This is the final block of code before we encounter the main loop. In this block we set up all of our four images so that they can be ainimated in the main loop.
Here we shall look at how the Rangitoto image is set up.
At line 40 we call the calculateStep() function and pass it the falue of the animation duration, the frames per second and the start and end positions of the image. The function returns the value of the step for the Rangitoto image, i.e. how many pixels we move the image for each iteration of the loop.
Line 41 calls the function prepareImage(). This will load the image,adjust its size according to the application's requirements
Line 42 creates a rectangle for the image so that the image can be manipulated.
At line 43 the variable rangitoto_current_point is assigned the value of RANGITOTO_START_POS This will be used to trace the position of the Rangitoto image as it moves up the window.
Finally at line 44 the top left corner of the image is positioned at its starting point.
The code above treats the other three images in the same way as the Rangitoto image was treated in Listing 3-6 above. There is therefore no need describe them in detail
At line 70 above we meet the variable rangitoto_current_point. This variable was initialised at line 43 to have a value of 0. (Strictly speaking it was initialised to the value of RANGITOTO_START_POS, which itself was given a value of 0 at line 26 of Listing 3-4.)
Still on line 70, the value of the variable rangitoto_step is subtracted from rangitoto_current_point. Nothing else happens here but but when we get to the code in Listing 3-11 where the images are being blitted, the Rangitoto image will rise to a slightly higher position in the window.
The code above describes how the positions of the other three images are being altered. The logic is exactly the same as in Listing 3-9 and therefore there is no need to describe it.
A detailed explanation is hardly required here since we have been using the blit() function ever since we started studying Pygame. It does need a short comment however: with a duration of 20 seconds and a frame rate of 60 frames per second the main loop will iterate 1,200 times. At each iteration the images are pushed up towards the top of the page and by the time 1,200 iterations are complete they will have reached their destinations.