Learning Outcomes
On completion of this section you will know:
- The difference between display:block and display:none
- How to make selected parts of a page collapse or appear
- How to alter styling using JavaScript

On completion of this section you will know:
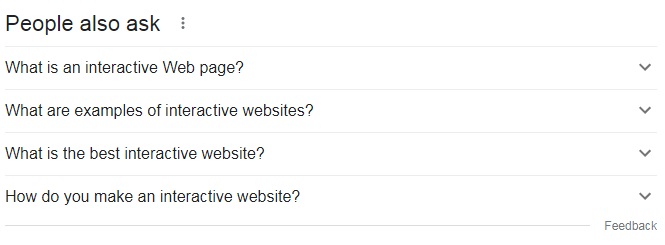
Typing the phrase 'interactive web pages' into a Google search will give you a set of options as shown below in 'Collapsed List'

As well as links to possible useful web sites the search also provides other suggestions of potentially useful sidelines under the heading 'People also ask:'. To the right of each of the lines is a V shaped icon which signals that each of those lines can be further expanded.
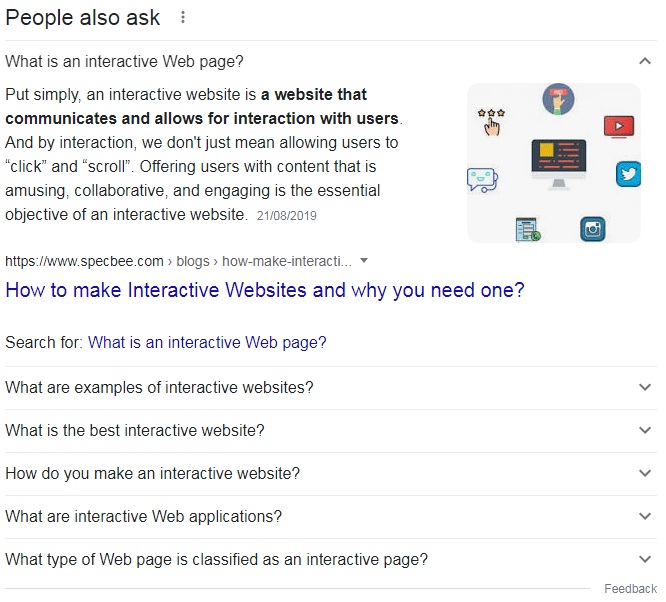
Clicking on the v-icon of the first line displays the hidden content as shown in 'Expanded List Item' below.

Clicking on the same v-icon would collapse the list back to its original shape.
In this lesson we shall look at creating a similar effect while using a more ornate display.
Go to top
                        <!DOCTYPE html>
                        <html lang="en">
                            <head>
                                <link href="Artworks.css" rel="stylesheet" type="text/css">
                                <script src="Artworks.js" type="text/jscript"></script>
                                <meta charset="UTF-8">
                                <title>Artworks</Title>
                            </head>
                            <body>
                                <main>
                                    <h2 >Artworks</h2>
                                    <h3 onclick="changeView('Johnson')">Ben Johnson</h3>
                                    <article id="Johnson">
                                        <p>Drink to me, only, with thine eyes,<br>
                                        And I will pledge with mine;<br>
                                        Or leave a kiss but in the cup,<br>
                                        And I’ll not look for wine.<br>
                                        The thirst that from the soul doth rise,<br>
                                        Doth ask a drink divine:<br>
                                        But might I of Jove’s nectar sup,<br>
                                        I would not change for thine.</p>
                                    </article>
                                    <h3 onclick="changeView('Shelia')">Shelia Natusch</h3>
                                    <article id="Shelia">
                                        <img src="Shelias-Pictures10.jpg">
                                    </article>
                                    <h3 onclick="changeView('Shakespeare')">Shakespeare</h3>
                                    <article id="Shakespeare">
                                        <p>Shall I compare thee to a summer’s day?<br>
                                            Thou art more lovely and more temperate.<br>
                                            Rough winds do shake the darling buds of May,<br>
                                            And summer’s lease hath all too short a date.<br>
                                            Sometime too hot the eye of heaven shines,<br>
                                           And often is his gold complexion dimmed;<br>
                                            And every fair from fair sometime declines,<br>
                                            By chance, or nature’s changing course, untrimmed;<br>
                                            But thy eternal summer shall not fade,<br>
                                            Nor lose possession of that fair thou ow’st,<br>
                                            Nor shall death brag thou wand'rest in his shade,<br>
                                            When in eternal lines to Time thou grow'st.<br>
                                                So long as men can breathe, or eyes can see,<br>
                                                So long lives this, and this gives life to thee.</p>
                                    </article>
                                    <h3 onclick="changeView('Kambubu')">Kambubu</h3>
                                    <article id="Kambubu">
                                        <img src="Kambubu.JPG">
                                    </article>
                                    <h3 onclick="changeView('Wordsworth')">Wordsworth</h3>
                                    <article id="Wordsworth">
                                        <p>I wandered lonely as a cloud<br>
                                            That floats on high o'er vales and hills,<br>
                                            When all at once I saw a crowd,<br>
                                            A host, of golden daffodils;<br>
                                            Beside the lake, beneath the trees,<br>
                                            Fluttering and dancing in the breeze.</p>
                                    </article>
                                    <h3 onclick="changeView('Midsummer')">Oberon</h3>
                                    <article id="Midsummer">
                                        <p>I know a bank where the wild thyme blows,<br>
                                            Where oxlips and the nodding violet grows,<br>
                                            Quite over-canopied with luscious woodbine,<br>
                                            With sweet musk-roses and with eglantine:<br>
                                            There sleeps Titania sometime of the night, <br>
                                            Lulled in these flowers with dances and delight.</p>
                                    </article>
                                    <h3 onclick="changeView('DaVinci')">Da Vinci and forgery</h3>
                                    <article id="DaVinci">
                                        <img src="01_IllustratorAnIntroduction_04.png">
                                    </article>
                                </main>
                                <footer>
                                </footer>
                            </body>
                        </html>
Inside the <main>, apart from the <h2> heading, the rest of the block consists of pairs of <h3> and <article> elements.
The <h3> elements will always stay on the screen but the display of the <article> elements can be turned on or off by clicking on the heading above them.
Now let us see how this works as far as the HTML code is concerned.
The first <h3>/<article> pair spans lines 12 to 22.
At line 12 an <h3> element is marked up with a value of 'Ben Johnson'. It also has an event trigger which launches the function changeView() if the user clicks on the heading. The function is passed the parameter string 'Johnson'. In a moment we shall see the significance of this.
Line 13 starts the <article> block starts. It is given an id of 'Johnson'. This complements the 'Johnson' that is passed as a parameter to changeView() at line 12.
The function changeView() acts as a toggle switch for turning on or off the visibility of any of the <article> blocks on this page. When it is called it is passed the id value of the <article> block that is to be processed. This block is then tested for being visible. If it is then it is rendered invisible and vice versa.
All other <article> pairs on the page are processed in the exact same manner and so there is no need to discuss them.
We shall now look at the JavaScript code to see how the visibility of the <article> pairs are effected.
Go to top
                        const varStyleOn = "display:block;visibility:visible";
                        const varStyleOff = "display:none;visibility:hidden";
                        const changeView = (itemID) => {
                            const elem = document.getElementById(itemID);
                            const varVisible = window.getComputedStyle(elem).getPropertyValue("visibility");
                            if (varVisible === 'visible') {
                                elem.setAttribute("style", varStyleOff);
                            } else {
                                elem.setAttribute("style", varStyleOn);
                            }
                        }
Lines 1 and 2 of Listing 3 declare and populate two variables. The variable varStyleOn is given the value 'display:block:visibility:visible'. This looks like a piece of CSS, which in fact it is. The only difference to regular CSS is that this will be applied spontaneously to an element by a JavaScript command. As you can see it will make visible whichever HTML element it is applied to.
The second variable, varStyleOff if given a value that will turn off the visibility of whichever element it is applied to
Line 3 is the actual start of the function. If it had been called from line 12 of Listing 1 then the parameter itemID would have a value of 'Johnson'.
In line 5 the document is searched for the element whose value is 'Johnson'. If found than a pointer to that element is stored in the variable elem.
With a pointer to our element now stored in the variable elem we cab now do any processing on that element we wish. All we want to do however is to find out whether it is visible or hidden, and whichever state of visibility it is in change it to the other state.
To do this we first need to know what visibility state it is in currently. For this we go to line 6. This line is more easily explained by using an English sentence. This could be phrased as 'find the visibility property of elem and store it in the variable varVisible
The rest of the code is very simple: if varVisible has a value of 'visible' then at line 8 the element pointed to by elem has the styling of varStyleOff applied to it, which means that it is rendered invisible.
On the other hand if varVisible has a value other than 'visible' then line 10 is activated. This applies the styling specified in varStyleOn to elem, thus making it visible.
Go to top
                        h3{
                            display:block;margin-left:auto;margin-right:auto;
                            width:600px;
                            height:30px;
                            background-color:blue;
                            color:white;
                            text-align:center;
                            border-top:4px #00aaff solid;
                            border-left:4px #00aaff solid;
                            border-bottom:4px #003366 solid;
                            border-right:4px #003366 solid;
                            border-radius:20px;
                            margin-bottom: 0;
                            margin-top: 0;
                        }
                        article{
                            display:block;margin-left:auto;margin-right:auto;
                            background-color:#0099ff;
                            width:400px;
                            padding:30px;
                            border-bottom:12px blue solid;
                            border-top:12px blue solid;
                            margin-top: 0;
                            margin-bottom:20px;
                            visibility:visible;
                        }
                        body{
                            background-image:url('clouds.jpg');
                            background-attachment:fixed;
                        }
                        h2{text-align: center;}
                        img{width: 100%}
The above CSS file is shown for completion and in case you want to use the code to create your own version of our sample web page.
Go to topThe uploaded HTML file is an educational resource designed to teach JavaScript concepts through interactive webpage development. It provides a comprehensive layout for students to learn how to modify webpage contents dynamically. The page includes a top navigation menu, offering links to various sections such as home, the DOM, programming basics, decisions, arrays, and interactivity. The primary focus is on illustrating how JavaScript can be used to toggle visibility, modify styles, and enhance interactivity in web pages.
The document begins with learning outcomes, outlining objectives like understanding the difference between `display:block` and `display:none`, making page elements collapse or appear, and dynamically altering styling using JavaScript. These outcomes are reinforced through examples and practical applications. The introduction sets the stage by demonstrating real-world use cases of interactive elements like collapsible lists found in search engines, encouraging learners to replicate similar functionalities with more ornate designs.
The HTML structure is detailed, emphasizing the pairing of <h3> headings and <article> elements. The file explains how these pairs are designed for toggling visibility, with the <h3> elements always visible and the <article> sections appearing or collapsing based on user interaction. The functionality is powered by a JavaScript function `changeView()`, which dynamically adjusts the visibility of the corresponding <article> element using CSS styles applied through JavaScript commands. The script demonstrates efficient use of DOM manipulation to create a responsive and interactive user experience.
The JavaScript code included in the file showcases the toggling mechanism. It uses two predefined CSS style variables, `varStyleOn` and `varStyleOff`, for showing and hiding elements respectively. The function `changeView()` dynamically applies these styles based on the current visibility state of the target element, effectively acting as a toggle switch. The code is designed to be reusable, making it a robust tool for managing element visibility on a webpage.
The file also includes a CSS section that defines the aesthetic aspects of the page. Styles for headings, articles, and the background are specified, creating a visually appealing layout. The CSS enhances usability with features like centered headings, responsive article widths, and a fixed background image of clouds, adding depth to the learning environment. These styles are complemented by borders, rounded corners, and vibrant colors, reflecting modern web design principles.
Finally, the page integrates an iframe to showcase a working example of the interactive features in action. This allows learners to see the practical implementation of the concepts discussed. Overall, the uploaded file serves as a well-structured, interactive educational tool for teaching JavaScript concepts and encouraging hands-on learning.
Go to topWrite a JavaScript function that toggles the visibility of an HTML element when a button is clicked. The function should accept the ID of the element as a parameter and switch between visible and hidden states based on the current visibility. Test the function by creating a simple webpage with a button that toggles the visibility of a paragraph or image.
For this assignment, you are required to create an interactive webpage that showcases a collection of artworks. The page should include a series of <h3> headings, each representing an artist or artwork, and corresponding <article> elements containing images, descriptions, or other content.
Implement a JavaScript function that allows users to click on the <h3> headings to expand or collapse the associated <article> content. The function should toggle the visibility of the <article> elements, providing an interactive experience for users to explore the artworks.
Go to top