NCEA Compatibility
Module: as91906 Use complex programming techniques to develop a computer program
Requirements: programming or writing code for a graphical user interface (GUI)
Go to top
Module: as91906 Use complex programming techniques to develop a computer program
Requirements: programming or writing code for a graphical user interface (GUI)
Go to topOn completion of this section you will know:
Up to now we have used the command line system to run our programmes and output data was printed on our IDLE window as simple text. Hardly any computer application does that nowadays and in order to bring our Python experience in line with modern computing we shall now look at how to create a Graphical User Interface or GUI as it is commonly known by.
The code of our example is shown in Listing 1 at the end of this section. It’s an enormous piece of code but don’t let that dismay you. We shall be concentrating primarily on lines 1 to 58 which is the section that sets up our GUI. Any references to the rest of the code will only be in relation to how that part of the code interacts with the GUI. Also to avoid having to look at two pages simultaneously the code has been broken down into shorter snippets and each snipped explained in detail
Go to topLike all of our previous examples this will involve a payroll application. As in all those examples we shall for input feed the application the values for the hours and rate. Although the processing will be similar to all of the preceding examples both the input and the output different.
Regarding the input, the programme will read the values of the hours and rate from text boxes. The output will also be different since, instead of using the print() function, the results will be placed in labels on the application window.
Our user interface is shown below.
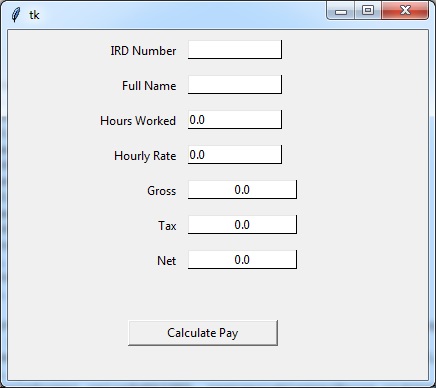
In this application the user will enter an employee's IRD number, full name, hours worked and hourly rate into the appropriately labelled text boxes. When the user clicks on the button with the caption 'Calculate Pay', the program will calculate the gross, tax and net and display the three calculated values in the appropriately labelled text boxes.
Go to topThere are two ways of placing widgets on a form: one is creating a grid by dividing the frame into columns and rows and then placing each element of the form into its own cell on that grid. The other is to use pixels. Here we shall look at only the pixels method.
Go to topOn the form shown in Figure 1 and Figure 2 there are three types of widgets shown: widgets for displaying data, widgets for inputting data and widgets for running programming code.
These are the labels that run down the left column in Fig 1. Their text are IRD Number, Full Name etc. down as far as Net Those labels are there for the sole purpose of indicating to the user what type of data is stored in the Entry boxes and labels in the column to the right. During the running of the programme the values shown in the labels in the left column will not change.
The last three widgets in the right hand column, i.e. those opposite the labels Gross, Tax and Net, are also labels. They are different from the other labels in that the values displayed in them during the running of the program can change. They will be used, once the programme has finished processing, to display the values of the gross, tax and net pay.
In order to display this data each of those three labels must be linked to a memory variable. To display data in a label we simply update the value of the variable that the label is linked to. This will automatically update the value shown in the label.
Those are widgets that the user can directly use to input data into the programme via the keyboard. In Python they are referred to as Entry boxes, although most other languages, especially Visual Basic refer to them as Text Boxes. They include the four Entry boxes in the right hand column i.e. the entry boxes opposite the labels IRD Number, Full Name, Hours Worked and Hourly Rate.
There is only one of those on our form, the command button at the bottom with the caption Calculate Pay. This neither passes data to the programme to read or display any calculated data. Its sole purpose is for the user to click on it in order to trigger programme code to run. In this case the code in question would be that which calculates the gross, tax and net.
Go to topAs we mentioned above, form widgets that deal with data, either allow the program user to input data into the application via the keyboard or to display data calculated by the program. In order to facilitate this transfer of data each of those widgets is matched up with its own internal variable. For an entry box, once the user alters the value in the box, the corresponding variable is automatically updated. Similarly when a variable received data during the processing, the label assigned to that variable is also updated.
We shall be using two types of internal variables in this example, StringVar() and DoubleVar().
Go to topThe code for our application is shown in Listing 1 at the end of this section. As it is a fairly large piece of code it is broken it up into its constituent parts for ease of explanation.
                            import tkinter as tk
                            from tkinter import *
The two lines here import the tkinter library. This library contains classes and functions for defining the various widgets that appear on a GUI window. In our case the widgets will include Entry boxes, labels and command buttons.
                            root = Tk()
                            frame1 = Frame(root, width = 420, height = 350)
                            frame1.pack()
Tk() is the top level window controller and at line 4 we create a pointer to it which we name root. This will be the parent or grandparent of all our our widgets.
At line 5 we create a Frame object which will be the main container for our widgets. By specifying root as the first argument we make our frame a child of the main top level window. The next two arguments specify the width and height of the frame. The variable frame1 points to this Frame. It will, in turn, become the parent of all our our other widgets
Line 6 uses the tkinter pack() function to place frame1 in its parent widget - root
                            varIRD=StringVar()
                            varName=StringVar()
                            varHours=DoubleVar()
                            varRate=DoubleVar()
                            varGross=DoubleVar()
                            varTax=DoubleVar()
                            varNet=DoubleVar()
Both StringVar() and DoubleVar() are tkinter types that differ from Python's own string and float types. If we are to get string or float type data from a tkinter GUI we need to use their tkinter equivalents. Further on we shall look at how those tkinter types can be converted to Python's data types and vice versa.
Notice from their names that we have a variable for each of the data items that we need for our application, i.e. IRD number, name, hours, rate, gross, tax and net.
                            irdLabel=tk.Label(master=frame1,text='IRD Number',width=15, anchor=E)
                            irdLabel.place(x = 60, y = 10)
                            nameLabel=tk.Label(master=frame1,text='Full Name',width=15, anchor=E)
                            nameLabel.place(x = 60, y = 45)
                            hoursLabel=tk.Label(master=frame1,text='Hours Worked',width=15, anchor=E)
                            hoursLabel.place(x = 60, y = 80)
                            rateLabel=tk.Label(master=frame1,text='Hourly Rate',width=15, anchor=E)
                            rateLabel.place(x = 60, y = 115)
                            grossLabel=tk.Label(master=frame1,text='Gross',width=15, anchor=E)
                            grossLabel.place(x = 60, y = 150)
                            taxLabel=tk.Label(master=frame1,text='Tax',width=15, anchor=E)
                            taxLabel.place(x = 60, y = 185)
                            netLabel=tk.Label(master=frame1,text='Net',width=15, anchor=E)
                            netLabel.place(x = 60, y = 220)
This section of the code defines and creates seven descriptive labels and places them on the form in such a way that they butt up against the Enter boxes and labels whose contents they describe.
Line 16 defines a label named irdLabel. It is to be placed in frame1 as evidenced by the first var-value pair master=frame1.. The text inside it will be 'IRD Number', its width will be 15 and its anchor will be 'E'. Regarding the anchor 'E' stands for 'East' and in this case means that if the text in the label is shorter than the width of the same label then the text will be aligned to the right of the label.
Line 17 uses the function pack() to position the label inside its container frame. The var-value arguments mean that the label will be positioned 60 pixels from the left and 10 pixels from the top of frame1.
What we have discussed about lines 16 and 17 also applies to lines 18 - 29. Looking at the group however notice the following:
The result of this is that all of the text will be aligned to the right and will therefore butt up against the other widgets that they describe.
                            txtIRD=tk.Entry(master=frame1,relief=RAISED, textvariable=varIRD,width=15,bg="#ffffff", bd=1)
                            txtIRD.place(x = 180, y = 10)
                            txtName=tk.Entry(master=frame1,relief=RAISED, textvariable=varName,width=15,bg="#ffffff", bd=1)
                            txtName.place(x = 180, y = 45)
                            txtHours=tk.Entry(master=frame1,relief=RAISED, textvariable=varHours,width=15,bg="#ffffff", bd=1)
                            txtHours.place(x = 180, y = 80)
                            txtRate=tk.Entry(master=frame1,relief=RAISED, textvariable=varRate,width=15,bg="#ffffff", bd=1)
                            txtRate.place(x = 180, y = 115)
                            lblGross=tk.Label(master=frame1,relief=RAISED, textvariable=varGross,width=15,bg="#ffffff",bd=1)
                            lblGross.place(x = 180, y = 150)
                            lblTax=tk.Label(master=frame1,relief=RAISED, textvariable=varTax,width=15,bg="#ffffff", bd=1)
                            lblTax.place(x = 180, y = 185)
                            lblNet=tk.Label(master=frame1,relief=RAISED, textvariable=varNet,width=15,bg="#ffffff", bd=1)
                            lblNet.place(x = 180, y = 220)
In this section we shall look at defining and creating the Entry boxes for data input and the lables for data output. They are defined in a somewhat similar manner to the labels from the previous section, but as these widgets will have dynamically changing data we shall be using a few different arguments. Again, like the labels, each widget is defined in the same way as its peers and thus we only need to describe one widget.
At line 31 the Entry box txtIRD is created. As with the labels the var-value pair master=frame1 indicates that this widget will reside in frame1. The next var-value pair relief=RAISED that it will have an appearance of being raised above the surface of the form. If you don't like this look then you can change it to either FLAT or SUNKEN
The next argument - textvariable is the most important one as it links the Entry box to one of the tkinter variables, varIRD in this case. This means that once data is entered into this widget by the user it is linked to the tkinter variable varIRD
Just as with the previous example of the labels, the tkinter function place() positions this widget 180 pixels from the left and 10 pixels from the top.
This description applies to all of the rest of the widgets defined and created in this block of code.
                            calculateButton=Button(master=frame1,text='Calculate Pay', width = 20, command=lambda:calculatePay(varHours.get(),varRate.get()))
                            calculateButton.place(x = 120, y= 290)
The first argument for creating a button i.e. master=frame1 is identical to that of all of the other widgets and indicate that the command button will be enclosed within frame1. The second argument text = 'Calculate Pay' is similar to the same var-value pair we used when specifying text for the labels in at lines 16 - 29. The third argument, width = 20 specifies the width of the button.
The fourth argument, command=lambda:calculatePay(varHours.get(),varRate.get())) is unique to the button on this form. It specifies the function to call when the button is clicked - calculatePay() and the arguments that are to be passed to that function. Those, of course, should be the values of hours and rate. Those values are stored in the tkinter variables varHours and varRate. Python cannot process those values directly. If we are to calculate the gross, tax and net from the hours and rate then we must extract their values from varHours and varRate and convert them to the variable types that Python can process. This conversion is effected by the get() function of both varHours and varRate.
                            def calculatePay(argHrs, argRt):
                                lvGross=argHrs* argRt
                                lvTax=lvGross * 0.25
                                lvNet = lvGross - lvTax
                                varGross.set(lvGross)
                                varTax.set(lvTax)
                                varNet.set(lvNet)
Above is the function calculatePay() that we were referring to at line 46. The values passed to its two arguments argHrs and argRt will be in the format that Python can process. Within the body of the function we use three local variables: lvGross, lvTax and lvNet.
At line 50 the value of the gross is calculated by multiplying the hours by the rate, i.e. the values of argHrs and argRt are multiplied and the result stored in the local variable lvGross.
At line 51 the tax is calculated by getting 25% of the gross, i.e. the value of lvGross is multiplied by 0.25 and the result is stored in the local variable lvTax.
At line 52 the net is calculated by subtracting the tax from the gross, i.e. lvTax is subtracted from lvGross and the result stored in lvNet.
With the gross, tax and net calculated and stored in the local variables lvGross, lvTax and lvNet our next task is to have those values displayed in the appropriate widgets on our form. Those widgets are lblGross, lblTax and lblNet defined at lines 39 - 44. At lines 39, 41 and 43 we see that lblGross is linked to the internal variable varGross, lblTax to varTax and lblNet to varNet. By updating those variables we will automatically update the linked labels. This updating is done at lines 53 - 55.
At line 53 we use the set() function of varGross and pass the local variable lvGross to it as an argument. This will cause the value of lvGross to appear in the widget lblGross.
In the same way the values of lvTax and lvNet are made to appear in the widgets lblTax and lblNet.
                            root.title("Payroll")
                            root.mainloop()
Recall that root is a pointer to the top level window. You may visualise it as the typical top level window tht has the application's logo at the top right hand side. This is followed by the title and to the right you have the minimise, maximise and close buttons. If we wish to put our own title on a window, then we pass the text for that title to the title() function of root. At line 57 we pass the value "Payroll" to it.
Even with different loop and decision structures our programs still have a top-to-bottom sequence, and once a program reaches the last command it usually stops. With a GUI application we want to avoid this, and therefore we use the mainloop() function to keep the program active indefinitely until we close it using the close button in the top right hand corner
                        import tkinter as tk
                        from tkinter import *

                        root = Tk()
                        frame1 = Frame(root, width = 420, height = 350)
                        frame1.pack()

                        varIRD=StringVar()
                        varName=StringVar()
                        varHours=DoubleVar()
                        varRate=DoubleVar()
                        varGross=DoubleVar()
                        varTax=DoubleVar()
                        varNet=DoubleVar()

                        irdLabel=tk.Label(master=frame1,text='IRD Number',width=15, anchor=E)
                        irdLabel.place(x = 60, y = 10)
                        nameLabel=tk.Label(master=frame1,text='Full Name',width=15, anchor=E)
                        nameLabel.place(x = 60, y = 45)
                        hoursLabel=tk.Label(master=frame1,text='Hours Worked',width=15, anchor=E)
                        hoursLabel.place(x = 60, y = 80)
                        rateLabel=tk.Label(master=frame1,text='Hourly Rate',width=15, anchor=E)
                        rateLabel.place(x = 60, y = 115)
                        grossLabel=tk.Label(master=frame1,text='Gross',width=15, anchor=E)
                        grossLabel.place(x = 60, y = 150)
                        taxLabel=tk.Label(master=frame1,text='Tax',width=15, anchor=E)
                        taxLabel.place(x = 60, y = 185)
                        netLabel=tk.Label(master=frame1,text='Net',width=15, anchor=E)
                        netLabel.place(x = 60, y = 220)

                        txtIRD=tk.Entry(master=frame1,relief=RAISED, textvariable=varIRD,width=15,bg="#ffffff", bd=1)
                        txtIRD.place(x = 180, y = 10)
                        txtName=tk.Entry(master=frame1,relief=RAISED, textvariable=varName,width=15,bg="#ffffff", bd=1)
                        txtName.place(x = 180, y = 45)
                        txtHours=tk.Entry(master=frame1,relief=RAISED, textvariable=varHours,width=15,bg="#ffffff", bd=1)
                        txtHours.place(x = 180, y = 80)
                        txtRate=tk.Entry(master=frame1,relief=RAISED, textvariable=varRate,width=15,bg="#ffffff", bd=1)
                        txtRate.place(x = 180, y = 115)
                        lblGross=tk.Label(master=frame1,relief=RAISED, textvariable=varGross,width=15,bg="#ffffff",bd=1)
                        lblGross.place(x = 180, y = 150)
                        lblTax=tk.Label(master=frame1,relief=RAISED, textvariable=varTax,width=15,bg="#ffffff", bd=1)
                        lblTax.place(x = 180, y = 185)
                        lblNet=tk.Label(master=frame1,relief=RAISED, textvariable=varNet,width=15,bg="#ffffff", bd=1)
                        lblNet.place(x = 180, y = 220)

                        calculateButton=Button(master=frame1,text='Calculate Pay', width = 20, command=lambda:calculatePay(varIRD.get(),varName.get(),varHours.get(),varRate.get()))
                        calculateButton.place(x = 120, y= 290)

                        def calculatePay(argHrs, argRt):
                            lvGross=argHrs* argRt
                            lvTax=lvGross * 0.25
                            lvNet = lvGross - lvTax
                            varGross.set(lvGross)
                            varTax.set(lvTax)
                            varNet.set(lvNet)

                        root.title("Payroll")
                        root.mainloop()
The package tkinter provides Python with a wide variety of facilities regarding how to lay our a Graphical User Interface form. Here we are using a vary small subset of those facilities.
In this example we use the Tk object as our to level entity. We then create a Frame object which will be a child of the Tk object. Within this Frame object we organise our widgets.
We only use three types of widgets within the Frame object: labels, Entry boxes and a single command button.
We use labels for two purposes i.e. to provide captions for our Entry boxes and for other lables that display output data
The package tkinter provides facilities for variables. These are StringVar, DoubleVar, IntVar and BooleanVar. Of those we shall be using the first two. Those variables are needed to pass data between the form's widgets and the program. Thus any widget that is used to allow the user to enter data or to allow the user to see data calculated by the program must be linked to one of those variables
Unfortunately Python itself cannot calculate using tkinter's variables and therefore input data must be converted to Python variables using the get() function, while output data must be converted to tkinter style variables using the set() function.
For the labels used to provide captions we have to specify the parent frame, the text to be displayed, the width of the label and the anchor which means the justification of the text. In our case we want the text to be right justified and therefore we give the anchor a value of E. (tkinter uses N, S, E and W for orientation, based on how maps are read.)
For the Entry boxes and the labels used to to display calculated data we must supply the link to the container frame. We also provide the relief, in order to distinguish those widgets from the labels used solely for caption purposes. They can, however be left out if you wish. The most essential argument we provide is the textvariable which allows us to link the widget to the appropriate tkinter variable - thus allowing data transfer. The width, bg and bd var-value pairs are for display purpose only and you may leave them out if you wish
For the command button the first three var-value pairs are similar to their equivalents described above.
Go to top