Requirements: using appropriate tools, techniques and design elements for the purpose and end users, applying appropriate data integrity and testing procedures in the development of the outcome, describing relevant implications
Relevant Implications: end user considerations, health and safety implications, intellectual property
This short course is aimed at providing you with a basic knowledge of how to use HTML. In order to follow the instructions and do the exercises you will need a text editor such as Notepad, Notepad++ or Brackets. The former comes with Windows while the latter two can be downloaded free from the Internet.
Don't use a word processor as it will put in extra coding of its own which you will have to manually remove before you can run the HTML code.
You can of course use a web development package such as Dreamweaver, but at some time you will have to get behind the user interface and manually tweak the HTML code in the background. The purpose of this course is to give you sufficient knowledge of HTML to be able to do that. Once you have acquired those skills you will then be able to use a package such as Dreamweaver to create your web pages quickly and then occasionally go behind the scenes to tweak things to your own requirements.
HTML stands for HyperText Markup Language. It produces code that browsers such as Google Chrome, Internet Explorer or Mozilla Firefox can interpret in order to produce the web pages that we are familiar with. We shall introduce you to HTML by first showing you a piece of code, followed by an explanation of the code and then the same code interpreted by a browser.
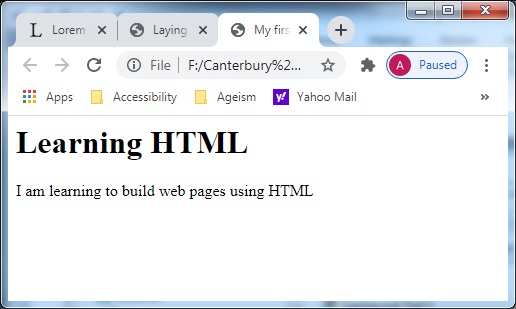
Listing 1
<html> <head> <title>My first HTML page</title> </head> <body> <h1>Learning HTML</h1> <p>I am learning to build web pages using HTML</p> </body></html>
Lines 1 and 9 form the boundaries of the code. In other words all html code is contained within the starting tag and the end tag </html>
Lines 2 and 4 contain the starting and end tags of the header section of the code. This contains the title of the page, i.e. the short piece of text that will appear on your page's tab in the web browser
Lines 5 to 8 is where our active code is in this example. This is the body of the code and is contained between the tags <body> and </body>. Line 6 will display the text "Learning HTML" in large bold letters because the piece of text is contained within the tags <h1> and </h1>. In this case h1 stands for "heading 1", or in other words the topmost heading in the document. Line 7 displays the piece of text "I am learning to build websites using html". Because it it contained within the tags <p> and <p> it is printed in the default small font. The tag <p> stands for "paragraph".
Fig 1
Fig 1 above show how the HTML code woul appear in a browser's window.
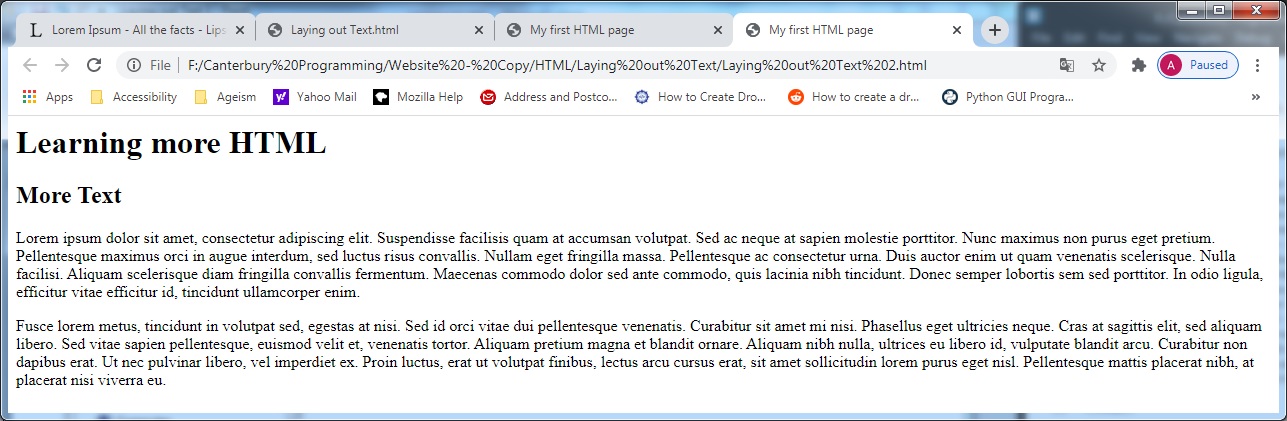
                        <html>
                            <head>
                                <title>My second HTML page</title>
                            </head>
                            <body>
                                <h1>Learning more HTML</h1>
                                <h2>More Text</h2>
                                <p>Lorem ipsum dolor sit amet, consectetur adipiscing elit. Suspendisse facilisis quam at accumsan volutpat. Sed ac neque at sapien molestie porttitor. Nunc maximus non purus eget pretium. Pellentesque maximus orci in augue interdum, sed luctus risus convallis. Nullam eget fringilla massa. Pellentesque ac consectetur urna. Duis auctor enim ut quam venenatis scelerisque. Nulla facilisi. Aliquam scelerisque diam fringilla convallis fermentum. Maecenas commodo dolor sed ante commodo, quis lacinia nibh tincidunt. Donec semper lobortis sem sed porttitor. In odio ligula, efficitur vitae efficitur id, tincidunt ullamcorper enim.</p>
                                <p>Fusce lorem metus, tincidunt in volutpat sed, egestas at nisi. Sed id orci vitae dui pellentesque venenatis. Curabitur sit amet mi nisi. Phasellus eget ultricies neque. Cras at sagittis elit, sed aliquam libero. Sed vitae sapien pellentesque, euismod velit et, venenatis tortor. Aliquam pretium magna et blandit ornare. Aliquam nibh nulla, ultrices eu libero id, vulputate blandit arcu. Curabitur non dapibus erat. Ut nec pulvinar libero, vel imperdiet ex. Proin luctus, erat ut volutpat finibus, lectus arcu cursus erat, sit amet sollicitudin lorem purus eget nisl. Pellentesque mattis placerat nibh, at placerat nisi viverra eu.</p>
                            </body>
                        </html>
Listing 2 is similar to listing 1 apart from the fact that we have two headings and two paragraphs. Also the text in each paragraph is considerably longer than that of the paragraphs in Listing 1. Fig 2 below shows how it looks in a browser.
Fig 2
Even at this early stage we can see that the layout of our text leaves a lot to be desired. Firstly it takes up the entire width of the browser window. This is not a good idea since long lines of text are difficult to read.
Also all of our text resides inside the <body>..</body> block. Since different parts of a web page may require different formatting styles.
In order to accommodate the different types of styles within a page we need to break the <body>..</body> block into separate sub-blocks
Within the <body>..</body> block a web page should be broken up into three separate sub-blocks: header, main and footer. This concept is illustrated in Fig 3 above.
The header to a web page is the same as the main title page is to a book. In our case it will contain the main title of the page only, but as we progress through HTML, it will contain other items.
The main is where the bulk of the page's content will occur. If there is a lot of text it should be broken up into sub-containers such as article elements. Within each of those you can have headings, paragraphs images etc. The article element should contain a block of text that stands on its own without referring to text anywhere else in the page. For uses of MS Word it is roughly equivalent the Heading 3 - in our example here the heading for the article content would be h3.
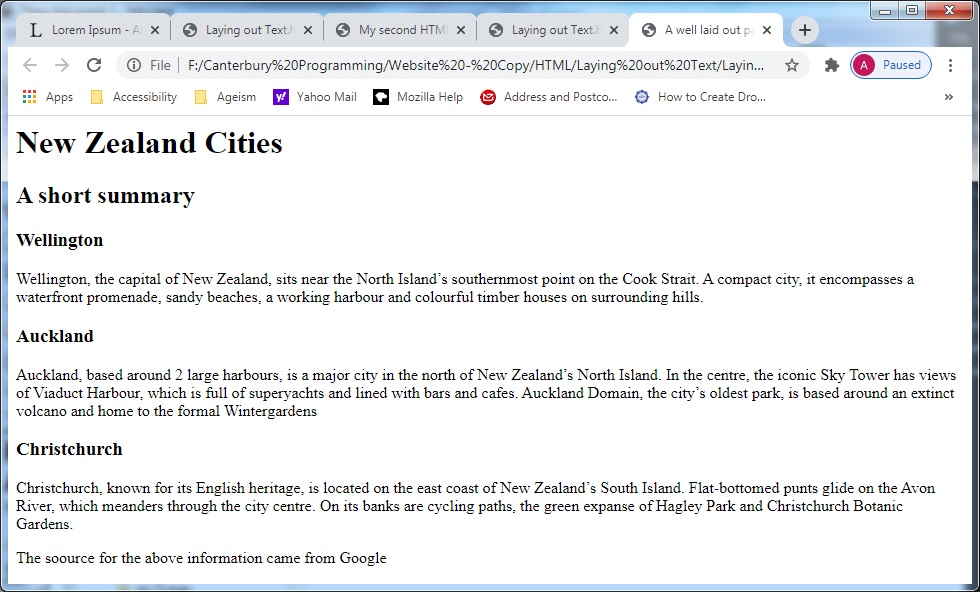
Below is the HTML code for a page, laid out as we have decribed above.
Listing 3
<html> <head> <title>A well laid out page</title> <link href="Laying%20out%20Text.css" type="text/css" rel="stylesheet"/> </head> <body> <header> <h1>New Zealand Cities</h1> </header> <main> <h2>A short summary</h2> <article> <h3>Wellington</h3> <p>Wellington, the capital of New Zealand, sits near the North Island’s southernmost point on the Cook Strait. A compact city, it encompasses a waterfront promenade, sandy beaches, a working harbour and colourful timber houses on surrounding hills.</p>; </article> <article> <h3>Auckland</h3> <p>Auckland, based around 2 large harbours, is a major city in the north of New Zealand’s North Island. In the centre, the iconic Sky Tower has views of Viaduct Harbour, which is full of superyachts and lined with bars and cafes. Auckland Domain, the city’s oldest park, is based around an extinct volcano and home to the formal Wintergardens</p> </article> <article> <h3>Christchurch</h3> <p>Christchurch, known for its English heritage, is located on the east coast of New Zealand’s South Island. Flat-bottomed punts glide on the Avon River, which meanders through the city centre. On its banks are cycling paths, the green expanse of Hagley Park and Christchurch Botanic Gardens.</p> </article> </main> <footer> <p>The soource for the above information came from Google</p> </footer> </body></html>
The resulting web page is shown in Fig 4
Fig 4
There is a slight improvement here from the output shown in Fig 2 above, but not as much as one was expecting from the structuring that we have done. Everyting is still left-aligned and the text takes up the entire width of the page. Why is the outut not looking better? Because we have not yet instructed it how to look better.
There are generally two components that contribute to the creation of a web page: content and styling. The content is what we want the viewer to see on the browser. It generally consists of text, images and other multimedia and is contained in a ".html" file. The second commponent is styling. This means how the content is actually presented. It involves such issues as background colour, positioning of text, adding borders etc. The styling is usually contained in a document known as a Cascading Stylesheet which has an extension of ".css"
The code below is from a cascading styesheet named "Laying out Text.css" that is used to style the html document shown in Listing 3 and Fig 4.
The most top-level element we can style is the <body> element. We don't want to leave is as a bland white colour, but we don't want it screaming at us either so we shall colour it beige. This is accomplished at lines 1 to 3 of Listing 4. The format of the stylesheet is that we first specify the element we wish to style. This is followed by a pair of curly brackets and the styling specifications goes between those brckets. The attribute of the <body> element we wish to style is the background-color, so we write this down, add a colon and then specify the colour - "beige" in this case. In a CSS file each command ends with a semi-colon.
Fig 5
Fig 5 above shows the structure of CSS coding. It begins with the element's name. This is followed by a left curly bracket and this must be closed off with a right curly bracket. Within the two curly brackets we specify the attributes. Each attribute's name is followed by a colon. This is in turn followed by the value of the attribute, which is itself followed by a semi colon. For each element any number of attributes can be specified between the two curly brackets.
Now let us carry on with our examination of Listing 4.
Within the page's body the three main components are the header, main and footer. Modern computer screens, as we have seen already, are too wide for us to read comfortably, and therfore we should restrict the horizontal size of our viewing area to a value between 800 and 1000 pixels. In our case we will go with 800 pixels. We shall apply this stylins and also some extra styling to the header, main and footer. The styling common to those three elements is specified at lines 4 to 12.
Line 4 demonstrates that if we wish to apply the same styling to a number of elements, we don't need to repeat the styling a number of times; we simply list the elements separated by a comma and then use the curly brackets to enclose the different attributes we want styled.
As stated above the first styling we apply is the width which we set at 800px at line 5. The next attribute we style is display. We set this attriute to block. Setting an elemeent's display attribute to block means that no other element can be displayed beside that element - they must be placed either above or below it. This is therfore applied to elements we wish to stack vertically.
At line 7 the attribute margin is set to auto. When an element's display attribute is set to block and it's margin attribute set to auto then that element will be positioned in the centre of the window.
The rest of the styling of those three elements involves padding. The value of this attribute specifies the space between an element's edge and any text or other contained within it.
By now have now the header, main and footer elements have the same widths and are centered on the page, one beneath the other.
Lines 13 to 15 specify the styling for the heading elements, h1 and h2. In this case the text-align attrbute is set to center which means that those two headings will appear centered on the page.
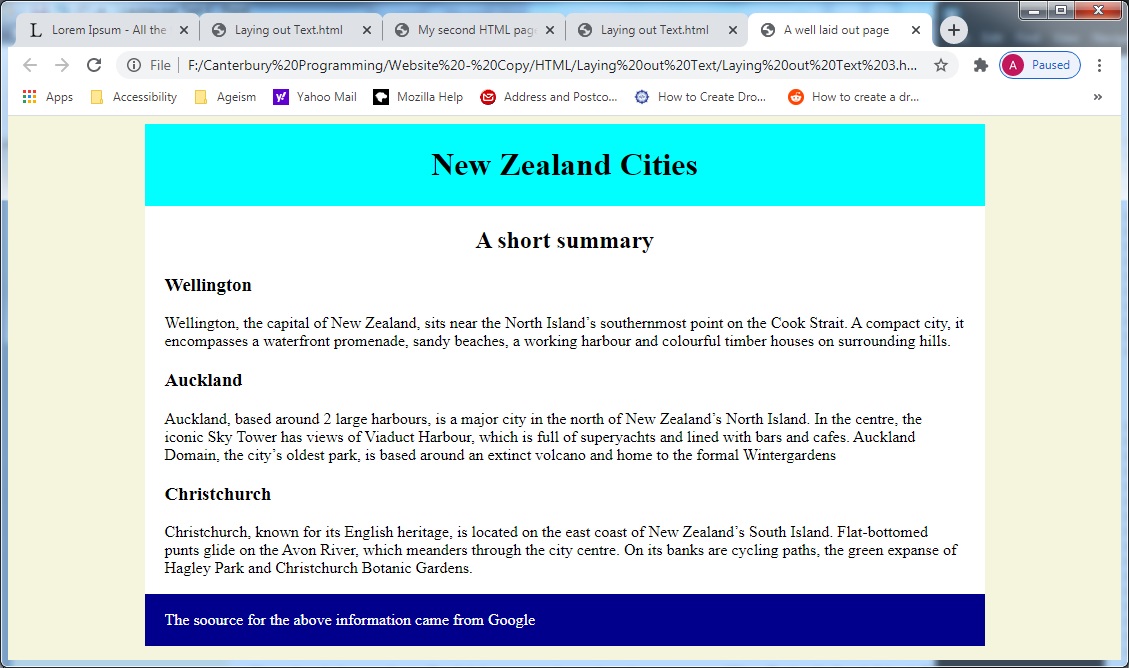
Lines 4 to 12 may give the impression that the elements header, main and footer will be visually indistinguishable from each other, but this is not the case as shown in lines 16 to 24. Line 17 sets the header's background colour to "aqua" - a light blue, the main's background colour to "white" and the footer's background colour to dark blue. Here the color attribute is set to "white" so that the text can be read against the dark background colour.
Fig 6
Comparing Fig 6 above with fig 4 we can easily see the similarities and differences between the two presentations:
All the text in both presentations are the same, indicating that the actual data has come from the same HTML file.
The beige colour of the <body> element distinguishes the foreground from the background - line 2
The width of the header, main and footer are the same and they are all centered on the page - lines 5 and 6.
The header is clearly distinguishable from the rest of the page due to its light blue colour - line 17
The level 1 and 2 headings are centered - line 14
The footer is distinguishable by its dark background colour and white text - lines 22 and 23
This topic involves making the person who views the web page have as enjoyable an experience as possible. We do this by confining the text on the page within a width of 800 pixels in order to make reading easier.
Another issue is copyright. The text we have used has been copied from a Google page on New Zealand cities. When you copy text from another source, you must acknowledge that source. We have done this in the footer as shown in lines 25 to 27 of listing 3 and as can be seen as the white text on a dark blue backgrond in Fig 6.
Copy Listing 3 into a text editor and save it as "Cities.html". Next copy the code in Listing 4 into the text editor and save it as "Laying out Text.css". Now load the HTML file into your browser. It should look like Fig 6.
Now try some experiments on the CSS file. Some suggestions include:
Change the header background to black and the text colour to white. To change the text colour use color: white;
Change the main background colour to purple and the text colour to yellow.
In the paragraphs make the font weight bold and the size extra large
For the next practice you will create at least two CSS files and name them "Laying out Text1.css" and "Laying out Text2.css" etc. They all start of as exact copies of Listing 4. Now change the styling so that the colours specified in one CSS file are completely different to those specified in the other. Once complete alter line 4 of Listing 3 so that the name of the CSS file is "Laying out Text1.css". Once this is working correctly alter line 4 again so that it will now link to the second CSS file you created. Each time you change the CSS file the appearance of the HTML file in your browser should be totally different from its previous appearance.
The document provides a foundational overview of building web pages using HTML and CSS, focusing on structuring and styling text content effectively. It begins by introducing HTML as a markup language used to create web pages, emphasizing its role in defining the structure and content visible in a browser. Key elements like paragraphs, headings, and container elements are explained, along with examples demonstrating their implementation in simple HTML code.
One of the core principles highlighted is the division of a web page into a structured layout comprising three main sections: header, main, and footer. The header serves as the title or branding area, while the main section houses the primary content, which can be further subdivided into articles or sections for better organization. The footer is reserved for supplementary information, such as source acknowledgments or navigation links.
The document also introduces Cascading Stylesheets (CSS) as a tool for styling web pages. It explains how CSS separates content from presentation, allowing developers to control elements such as background colors, text alignment, borders, and padding. Specific examples illustrate how to apply CSS properties to create visually appealing and accessible web pages, including the use of color schemes and layout techniques to enhance readability and usability.
End-user considerations are emphasized throughout the text, stressing the importance of making web pages easy to read by limiting text width, aligning content properly, and choosing appropriate colors. The document also discusses the ethical aspects of web development, such as acknowledging sources for copied content and adhering to copyright rules.
To reinforce learning, the text includes practice exercises and assignments that encourage readers to experiment with HTML and CSS. These tasks guide users through creating structured and styled web pages, progressively introducing more advanced concepts. The goal is to equip learners with the skills needed to design functional, attractive, and user-friendly web pages.
Select a topic for creating a web site. Generally a web site is a closely related number of web pages. Examples of topics include a music genre, a rock band or singer, an actor, a particular sport or a sporting team.
Those are just a sample of some of the topics available. As an example if you selected a rugby team then you could create separate web pages on idividual members of the team or with a music genre you could create separate pages for bands or individual singers belonging to that genre
Now create a web page on one of the subtopics of your chosen topic. As an example if you selected the All Blacks as your topic you would create a web page on either a current or past member of the team. Use Listing 3 as the model for your web page and Listing 4 as the model for the CSS file.
Still using the All Blacks as an example the h1 inside the header would have a value of "All Blacks" while the h2 element at the very top of the main container would have the name of the player who is the subject of the page as its value. Finally each article element would deal with a different aspect of the player's life such as family background, education, personal details etc.